お問い合わせ
ダウンロード
マニュアル、データシート、ソフトウェアなどのダウンロード:
フィードバック
2-RK Rackmount Kit Instructions
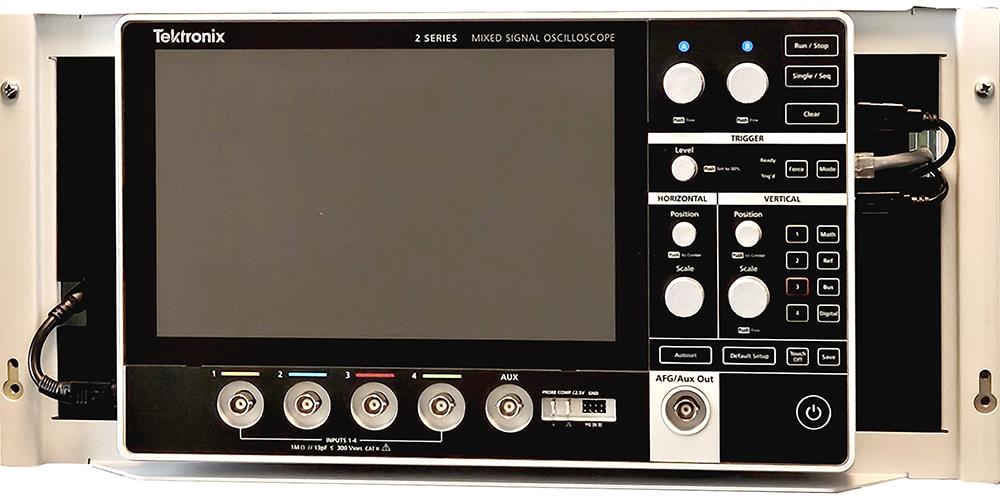
This document supports installing the 2 Series MSO with the rackmount kit in a standard equipment rack.
該当製品:
MSO22, MSO24, 2-RK, MSO22-EDU, MSO24-EDU
ダウンロードすることにより、マニュアル・ダウンロードに関する利用条件の諸条件に同意したことになります。
マニュアルのダウンロードに関する利用条件
注意:このWebサイトからドキュメントをダウンロードする前に、次の契約条項をよくお読みください。 テクトロニクスのWebサイトからマニュアルをダウンロードすることによって、次の契約条項に同意したことになります。
現在サポートされている製品のマニュアル:
当社機器の所有者は、社内使用または個人使用の目的で、このWebサイトのマニュアルをダウンロードし複製することができます。 現在サポートされている製品のマニュアルは、Tektronix, Incの書面による明示的な承認がない限り、他者への配布のために複製することはできません。
テクトロニクスのマニュアルは、製品のライフサイクル中に製品に適用された変更を反映するために改訂されていることがあります。 そのため、特定の製品に複数の版のマニュアルが存在していることがあります。 特定の製品のシリアル番号に該当するマニュアルの版を取得してください。
サポート終了製品のマニュアル:
テクトロニクスでは、長期サポートの適用外の計測製品のマニュアルは提供できません。 テクトロニクスは、(a)当社部品番号を標記し、(b)当社がサポートしない測定製品に限り、ユーザ・マニュアル、オペレータ・マニュアル、サービス・マニュアルなどを含む当社測定製品マニュアルのコピーを複製し配布する許可とライセンスを他者に付与します。
テクトロニクスのマニュアルは、製品のライフサイクル中に製品に適用された変更を反映するために改訂されていることがあります。 そのため、特定の製品に複数の版のマニュアルが存在していることがあります。 特定の製品のシリアル番号に該当するマニュアルの版を取得してください。
この権利とライセンスは、現在当社から入手可能なマニュアルや出版物、または映像制作製品やカラー・プリンタ製品のマニュアルや出版物には適用されません。
免責事項:
テクトロニクスは、当社が提供したものでないか、または上記の権利およびライセンスに従って製作または配布された、いかなる計測製品マニュアルや出版物に含まれる情報、テキスト、グラフィック、概略図、部品リスト、またはその他の素材の正確性や完全性について保証しません。
テクトロニクスは、このWebサイトのコンテンツまたはその製品をいつでも通知なく変更することがあります。
責任の制限:
テクトロニクスは、上記の権利とライセンスに従って製作または配布されたいかなる計測製品マニュアルや出版物の使用から生じた、いかなる損害(結果損害または偶発的損害、利益の損失、事業の中断、または知的所有権の侵害による損害を含むがこれらに限らない)に対して責任を負わないものとします。
Read Online
Kit description
The 2-RK rackmount kit is a collection of parts that, once installed, configure the instrument for mounting into a standard 19-inch equipment rack.
This kit supports all 2 Series MSO instruments.
Parts list
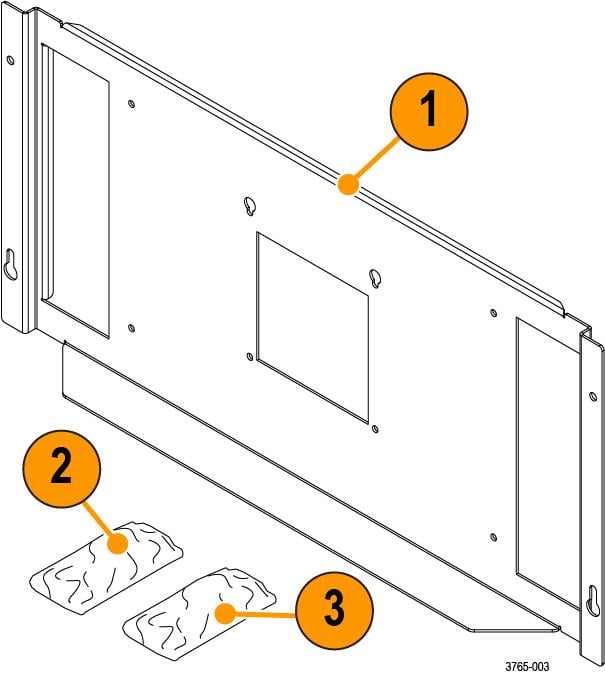
| Item | Part Number | Quantity | Description |
|---|---|---|---|
| 1 | 407-6248-XX | 1 | Rackmount bracket |
| 2 | 211-1732-XX | 8 | Screw, M4X.7X8mm. Use for attaching the bracket to the instrument. |
| 3 | 212-0577-XX | 4 | Screw, Machine 10-32x.625. Optional, use for attaching the instrument with bracket to the rack. |
Recommended installation tools
Use a screwdriver handle with No. 2 Phillips screw tip or a No. 2 Phillips screwdriver to install your rackmount kit.
Warranted characteristics
When the instrument is installed according to the instructions in this document, the rackmounted instrument meets all warranted requirements listed in the instrument specification. Instruments mounted using methods other than those described in these instructions might not meet their warranted requirements.
For tables of the warranted characteristics, see Specifications in the specification and performance verification manual that applies to your instrument model.
 | CAUTION:The rack is more susceptible to tipping when the instrument is installed. To prevent the rack from tipping, ensure that the rack is stable before accessing rear panel of the instrument. |
The ambient temperature inside the instrument rack will vary depending on the location of the instrument within the instrument rack. Tektronix recommends that you measure the ambient temperature in the desired rack location before you install the instrument to ensure the operating temperature does not exceed the rated ambient temperature limit. If necessary, refer to the Environmental Specifications in your product documentation for the operating temperature limits.
| CAUTION:The instrument might be damaged due to overheating. When installing multiple instruments in an instrument rack, the ambient temperature may go up. You assume the responsibility to provide adequate cooling to meet the ambient temperature requirements listed in the specifications. |
Clearance requirements
The rack in which the individual instrument is mounted must provide the following clearance requirements.
- At least 222 mm (8.75 in) of vertical space or 5 RU (rack units) of vertical space.
- A minimum inside depth of at least 14 mm (0.55 in) depth (from rack mounting ear to back of instrument).
- A minimum external clearance of at least 34 mm (1.34 in) frontwards from rack mounting ear.
- Airflow enters from underneath the instrument and exits at the top of the instrument. The rack mount bracket ensures clearance for adequate airflow.
- No additional clearance is needed on the left or right sides of the instrument for adequate airflow.
| CAUTION:Adhering to these requirements mounts the rack-adapted instrument with enough clearance for air circulation and accommodation of the power cord and mounting hardware. Failure to provide these clearances can result in overheating and can cause the instrument to operate improperly or fail. |
Install the rackmount on the instrument
Install the 2-RK rackmount onto the back of your 2 Series MSO instrument using the following instructions.
Before you begin
These instructions are for qualified service personnel who are familiar with servicing the product. If you need further details for disassembling or reassembling the product, refer to the appropriate product manual. Contact your nearest Tektronix, Inc., Service Center or Tektronix Factory Service for installation assistance.
Procedure
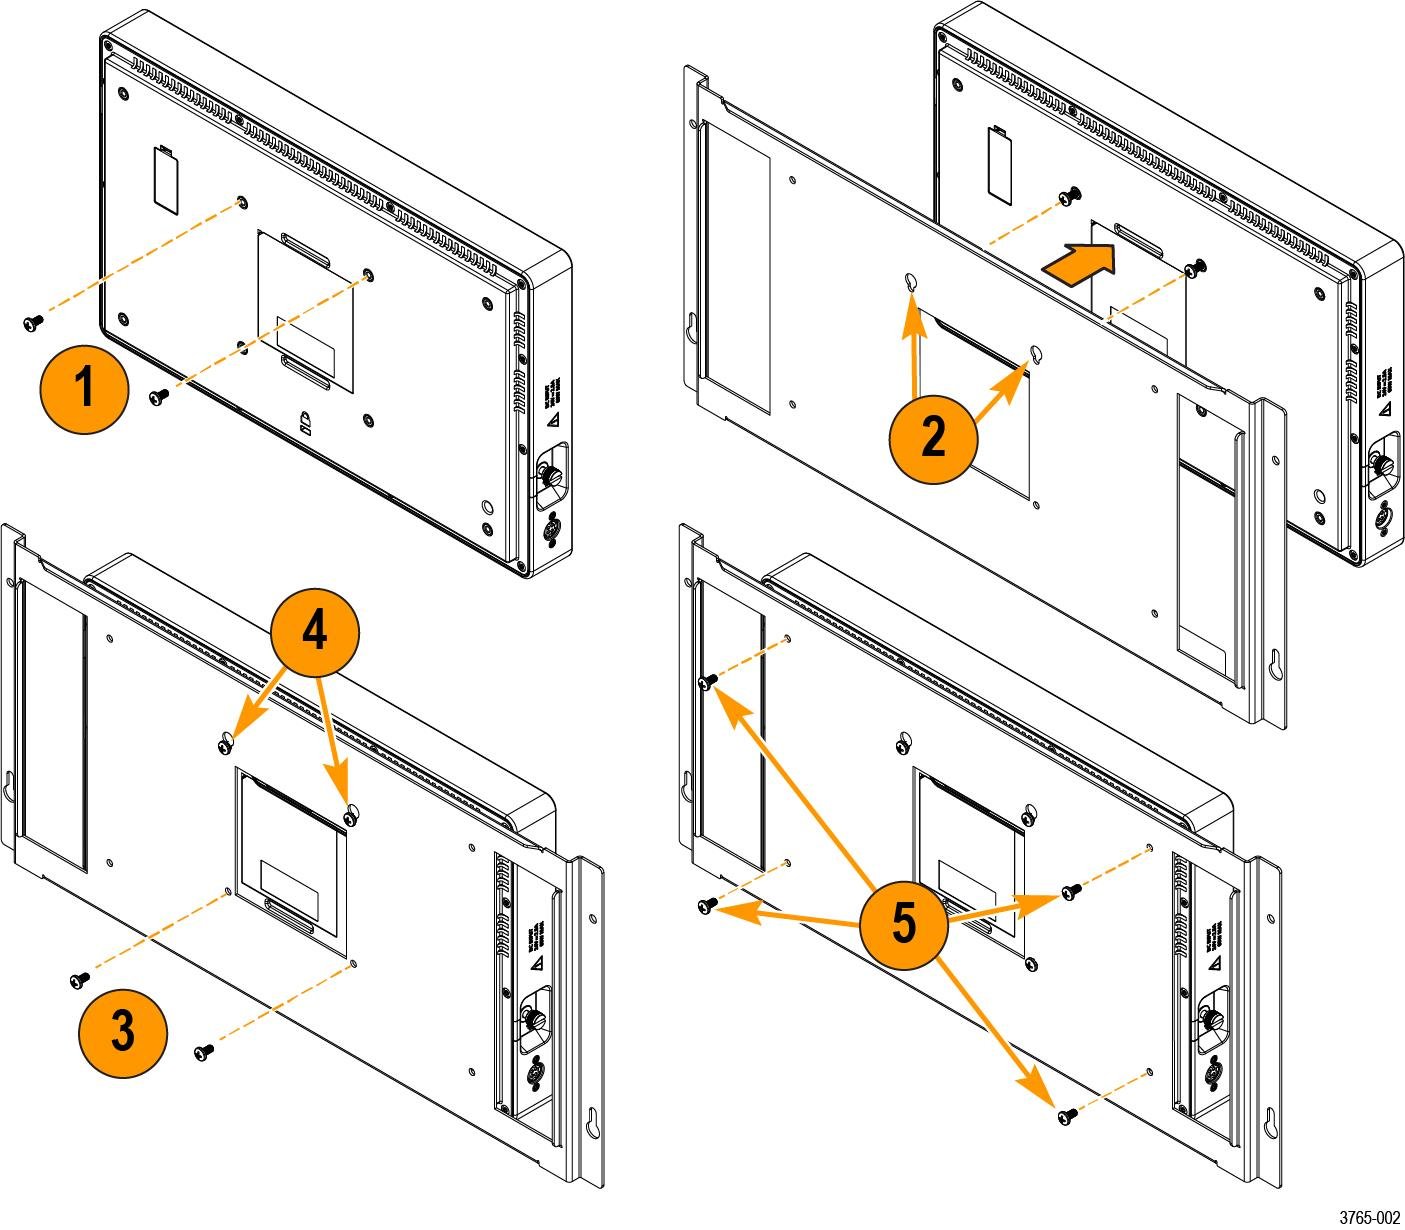
Install the instrument into the rack
Install the 2 Series MSO instrument with the rackmount into your rack.
Before you begin
Procedure
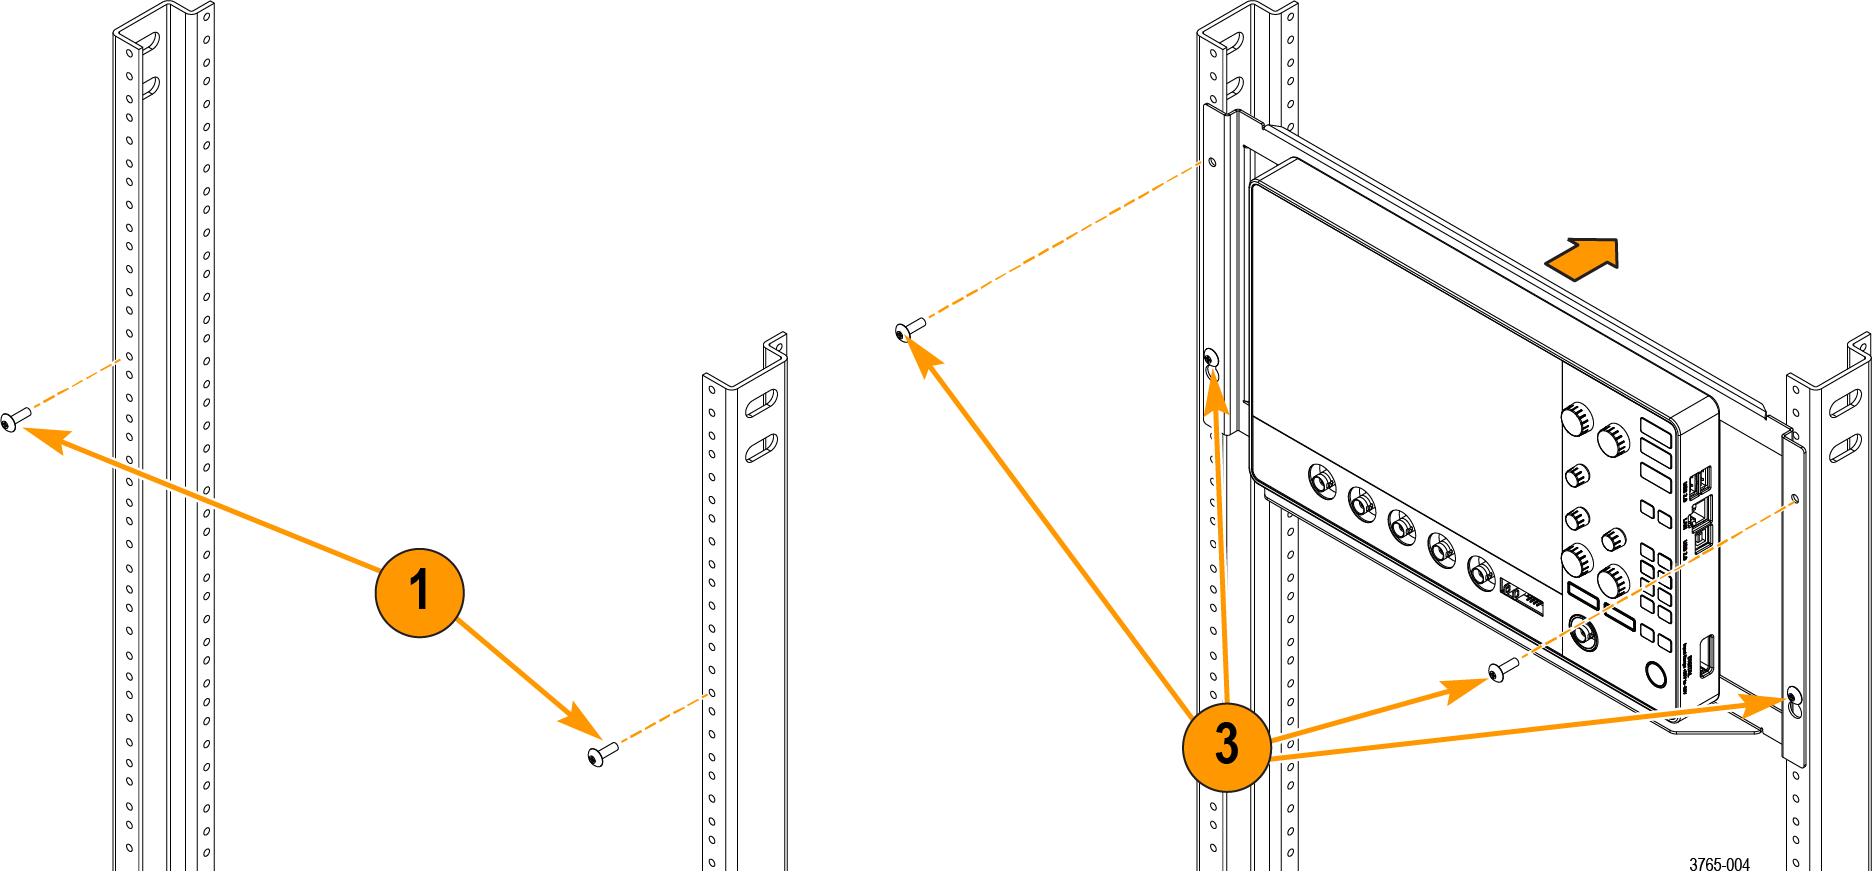
What to do next
Dimensions
The dimensions of the rackmount installed on the instrument.
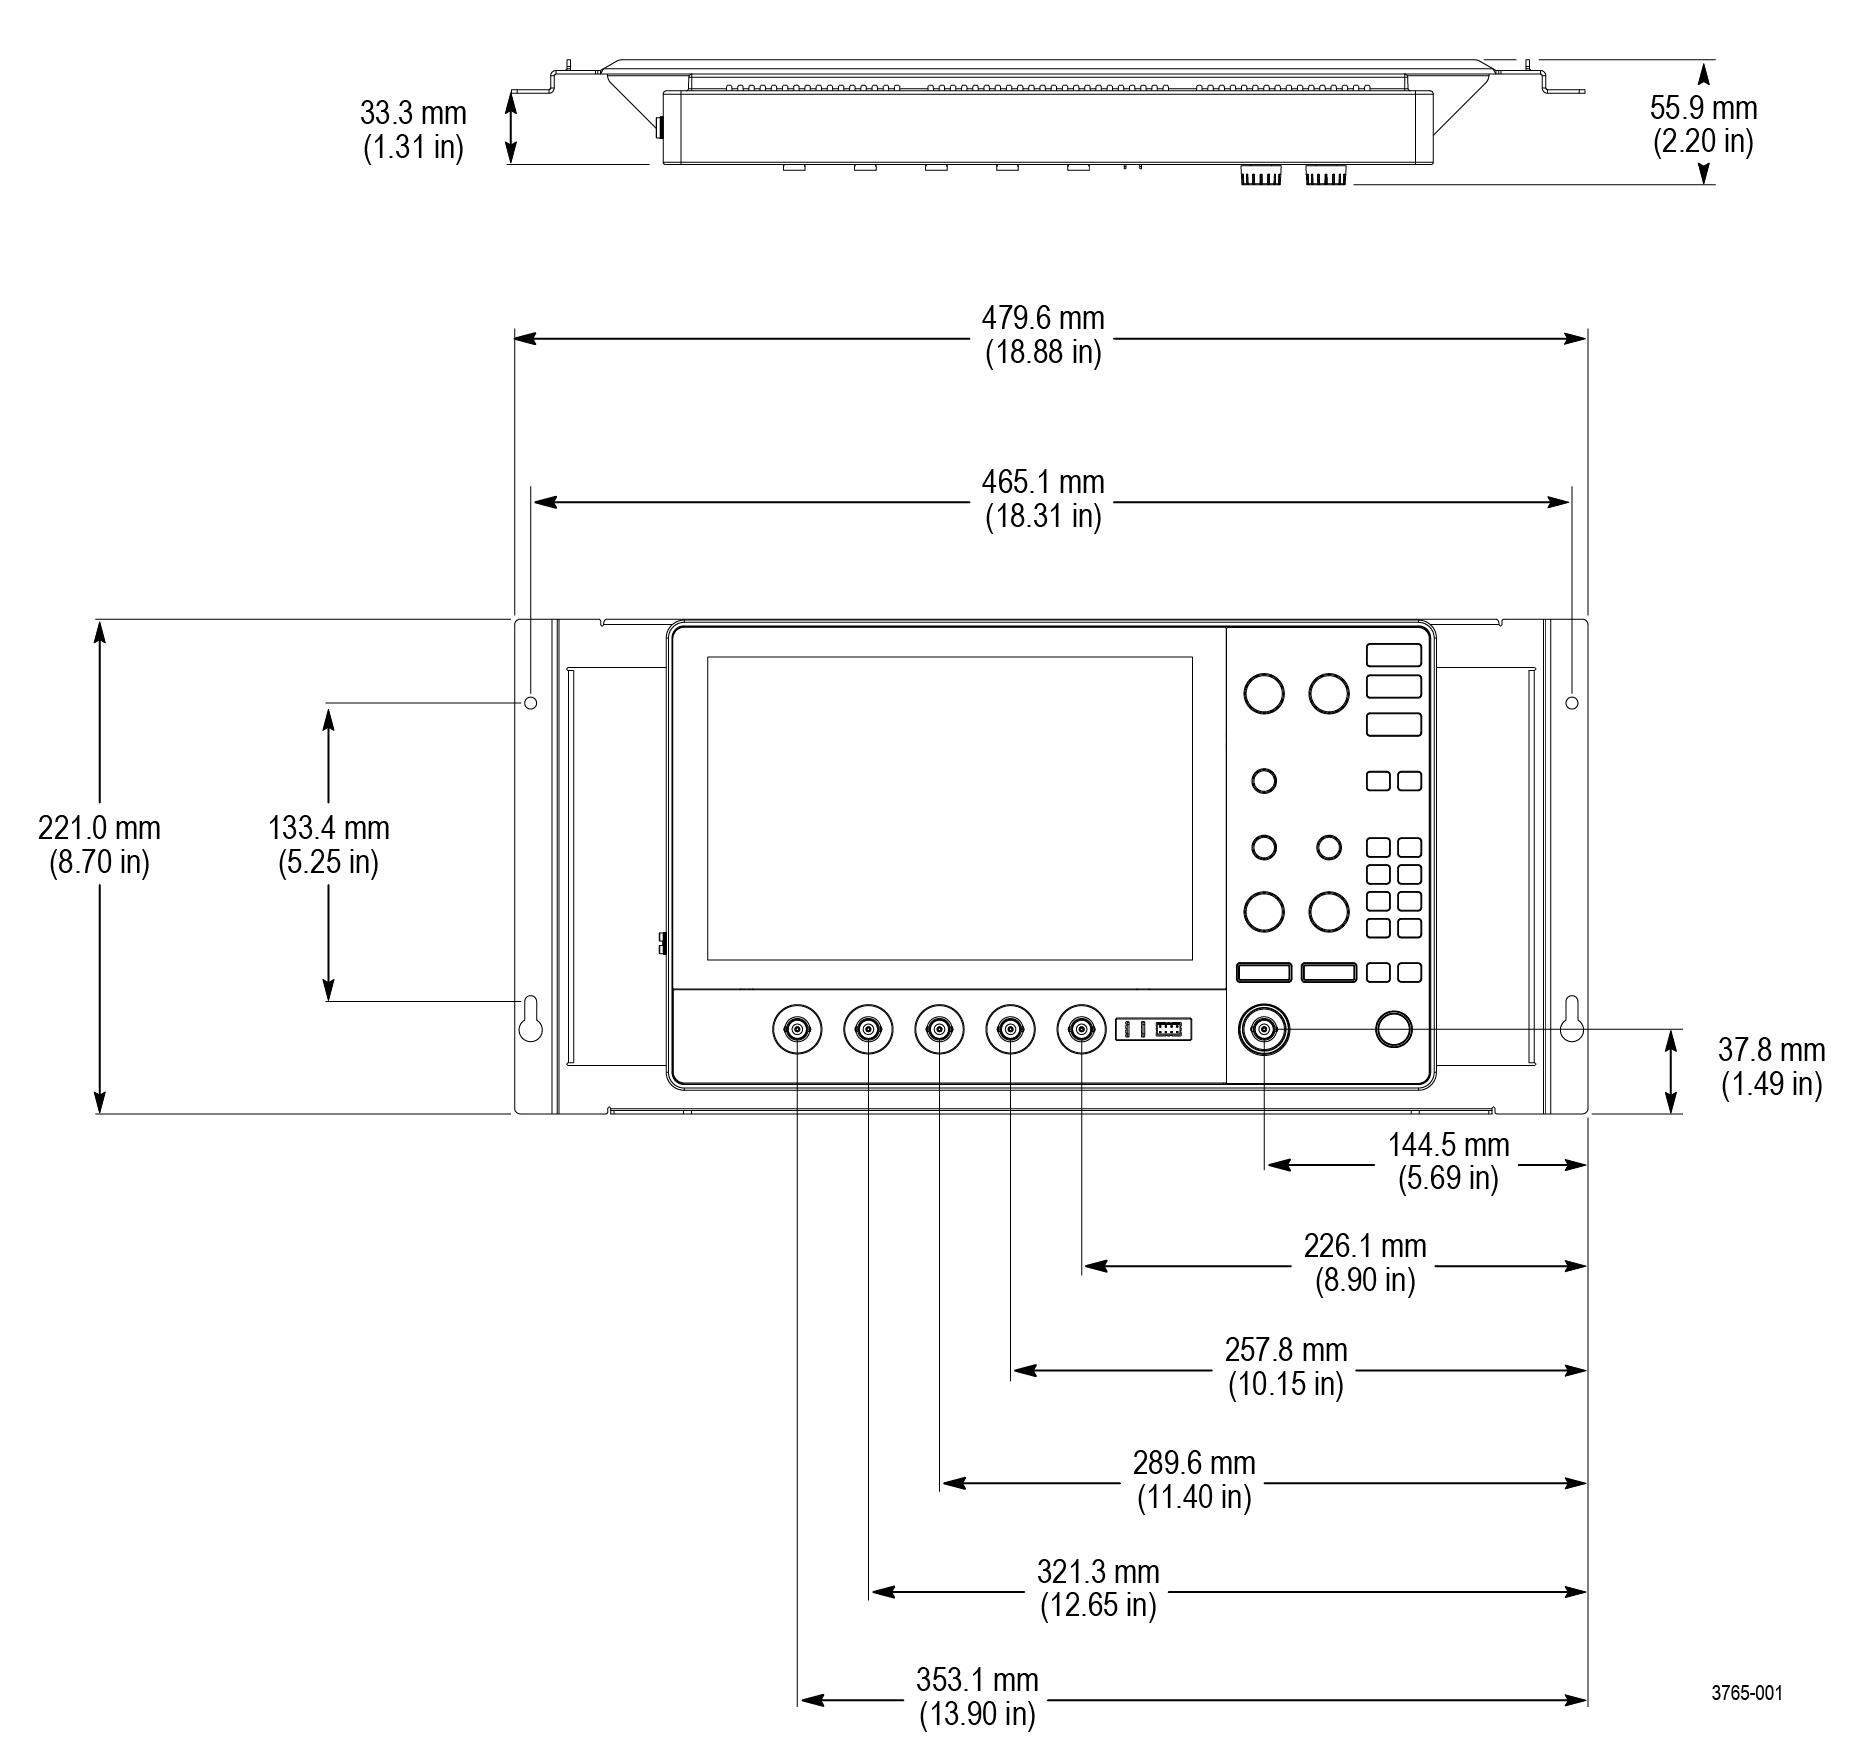
Install the optional side panels
The following is an optional procedure to install optional side panels to the 2-RK rackmount to control airflow while still allowing cable connections to the instrument.
Before you begin
- Download the PDF version of this document at https://www.tek.com/manual/oscilloscope/2-rk-rackmount-kit-instructions-2-series-mso.
- Download the MSO2 RACK FILLER PANEL.STL file from the attachments in the PDF version.
- Use the geometry from the STL file produce the side panels using the additive manufacturing method (3D printing) and material of your choice.
- Create both side panels from the STL file. The panels are designed to be reversible.
- Remove the four outer rackmount screws and set them aside. The four screws will be used to secure the two side panels.
Procedure
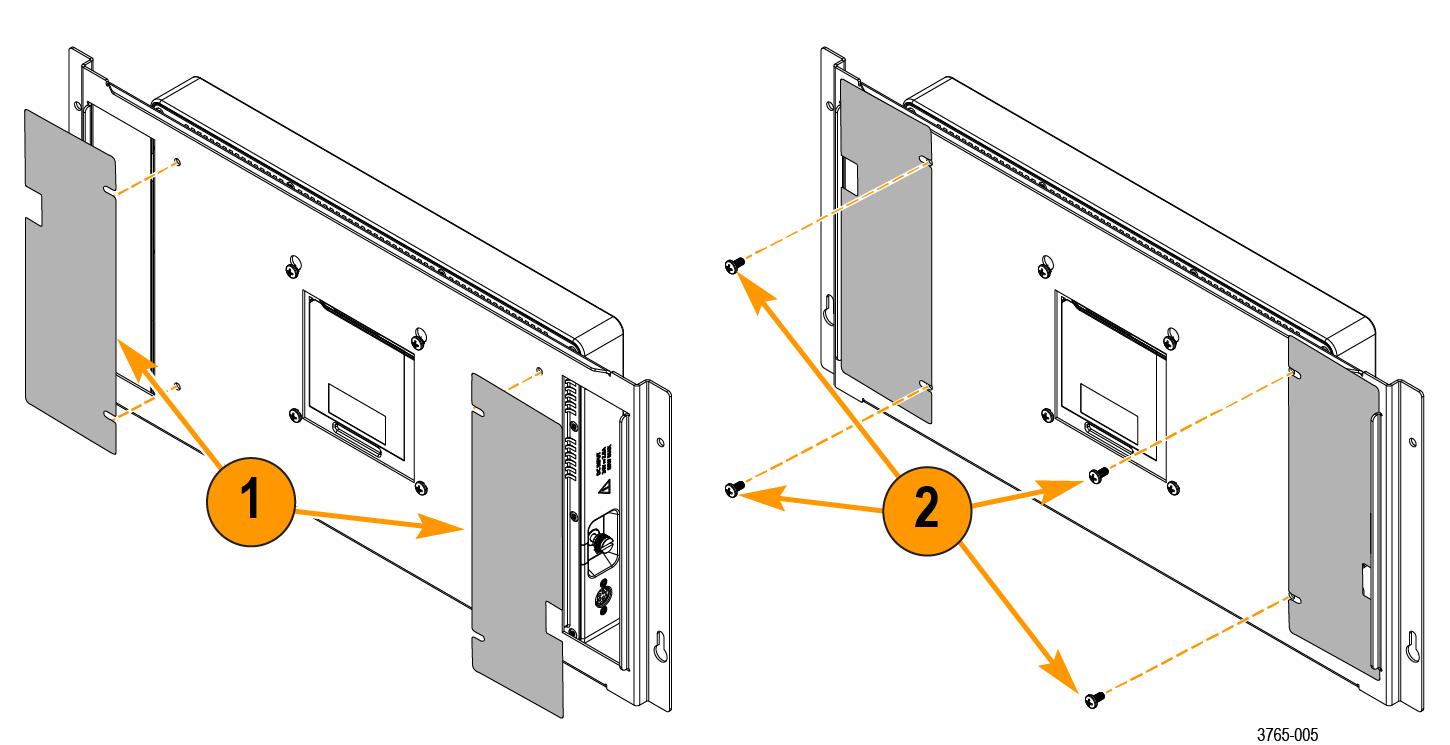
Results