Contactez-nous
Chat en direct avec un représentant Tek. Service disponible de 9 h à 17 h, CET jours ouvrables.
Appelez-nous au
Disponible de 9 h à 17 h CET jours ouvrables.
Télécharger
Télécharger des manuels, des fiches techniques, des logiciels, etc. :
Feedback
2-RK Rackmount Kit Instructions
This document supports installing the 2 Series MSO with the rackmount kit in a standard equipment rack.
Ce manuel s’applique à:
MSO22, MSO24, 2-RK, MSO22-EDU, MSO24-EDU
Informations sur les produits associés
- Type de manuel: Instructions d’installation sur site
- Référence: 071376501
- Date de publication:
En téléchargeant, vous acceptez les conditions générales de l’ accord sur le téléchargement de manuels.
Contrat de téléchargement de manuels
ATTENTION : Veuillez lire attentivement les conditions générales suivantes avant de télécharger des documents sur ce site Web. Tout téléchargement de manuels effectué sur le site Web de Tektronix vaut acceptation des conditions générales ci-dessous :
Manuels des produits actuellement pris en charge :
Tektronix octroie par les présentes l’autorisation aux propriétaires d’instruments Tektronix de télécharger et de reproduire les manuels proposés sur ce site Web, pour leur usage interne ou personnel. Les manuels relatifs aux produits actuellement pris en charge ne doivent pas être reproduits en vue d’une diffusion autre, excepté en cas de permission écrite spécifique octroyée par Tektronix, Inc.
Un manuel Tektronix peut être révisé au cours de la vie utile du produit, afin de refléter les modifications qui sont apportées à celui-ci. Différentes versions d’un même manuel peuvent donc exister pour un produit donné. Vérifiez que vous possédez le manuel correspondant à votre produit en vous référant au numéro de série de celui-ci.
Manuels des produits qui ne sont plus pris en charge :
Tektronix ne peut mettre à votre disposition les manuels relatifs aux instruments de mesure qui ne font plus l’objet d’une prise en charge sur le long terme. Tektronix octroie par les présentes l’autorisation à d’autres entités de reproduire et de diffuser des copies de manuels existants, y compris les manuels d’utilisation, les manuels de l’opérateur, les manuels d’entretien et autres documents similaires, qui (a) présentent une référence Tektronix et (b) qui concernent des instruments de mesure Tektronix qui ne sont plus pris en charge par Tektronix.
Un manuel Tektronix peut être révisé au cours de la vie utile du produit, afin de refléter les modifications qui sont apportées à celui-ci. Différentes versions d’un même manuel peuvent donc exister pour un produit donné. Vérifiez que vous possédez le manuel correspondant à votre produit en vous référant au numéro de série de celui-ci.
L’autorisation ci-dessus ne s’applique pas aux manuels et autres publications encore disponibles auprès de Tektronix, non plus qu’aux manuels et autres publications des équipements de production vidéo ou d’impression couleur.
Exclusion :
Tektronix ne garantit ni l’exactitude ni l’exhaustivité des informations, textes, graphiques, schémas, nomenclatures et autres éléments contenus dans les manuels ou autres publications, relatifs à des instruments de mesure, qui ne sont pas fournis par Tektronix ou qui ne sont pas produits ou diffusés conformément à l’autorisation stipulée ci-avant.
Tektronix se réserve le droit de modifier le contenu du présent site Web ou de ses produits, à tout moment et sans avis préalable.
Limitation de responsabilité :
TEKTRONIX NE SAURAIT ÊTRE TENU POUR RESPONSABLE EN CAS DE DOMMAGES, DE QUELQUE TYPE QUE CE SOIT (Y COMPRIS, SANS S’Y LIMITER, DE DOMMAGES IMMATÉRIELS OU ACCESSOIRES, DE PERTE DE BÉNÉFICES, D’INTERRUPTION DE L’ACTIVITÉ COMMERCIALE OU DE VIOLATION DES DROITS DE PROPRIÉTÉ INTELLECTUELLE) DÉCOULANT DE L’UTILISATION DU MANUEL D’UN INSTRUMENT DE MESURE OU DE TOUTE AUTRE PUBLICATION APPARENTÉE, PRODUITE OU DIFFUSÉE CONFORMÉMENT À L’AUTORISATION ÉTABLIE CI-AVANT.
Read Online
Kit description
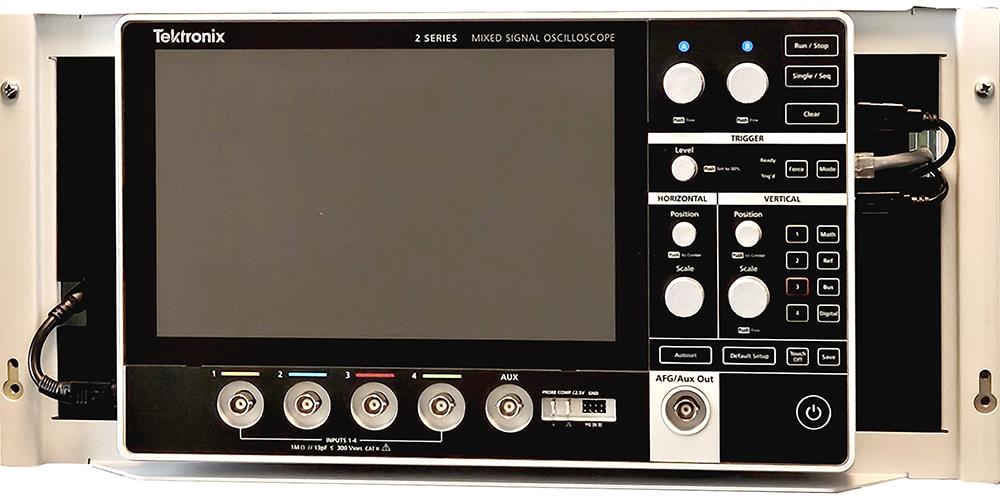
The 2-RK rackmount kit is a collection of parts that, once installed, configure the instrument for mounting into a standard 19-inch equipment rack.
This kit supports all 2 Series MSO instruments.
Parts list
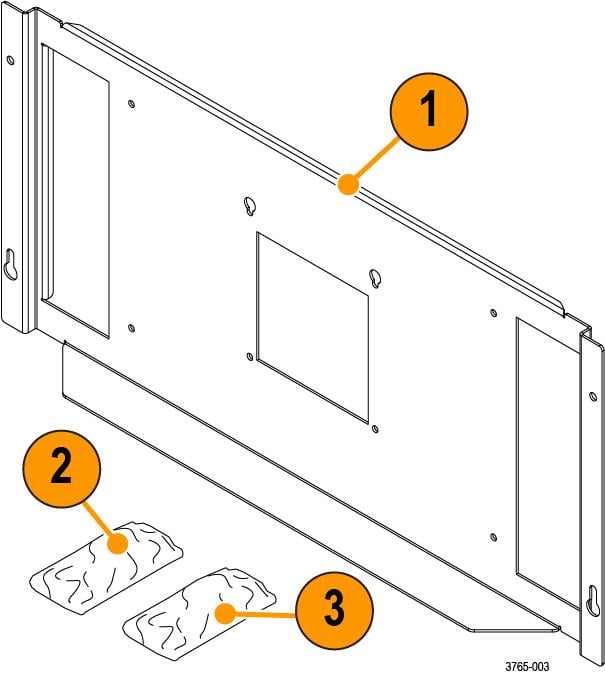
| Item | Part Number | Quantity | Description |
|---|---|---|---|
| 1 | 407-6248-XX | 1 | Rackmount bracket |
| 2 | 211-1732-XX | 8 | Screw, M4X.7X8mm. Use for attaching the bracket to the instrument. |
| 3 | 212-0577-XX | 4 | Screw, Machine 10-32x.625. Optional, use for attaching the instrument with bracket to the rack. |
Recommended installation tools
Use a screwdriver handle with No. 2 Phillips screw tip or a No. 2 Phillips screwdriver to install your rackmount kit.
Warranted characteristics
When the instrument is installed according to the instructions in this document, the rackmounted instrument meets all warranted requirements listed in the instrument specification. Instruments mounted using methods other than those described in these instructions might not meet their warranted requirements.
For tables of the warranted characteristics, see Specifications in the specification and performance verification manual that applies to your instrument model.
 | CAUTION:The rack is more susceptible to tipping when the instrument is installed. To prevent the rack from tipping, ensure that the rack is stable before accessing rear panel of the instrument. |
The ambient temperature inside the instrument rack will vary depending on the location of the instrument within the instrument rack. Tektronix recommends that you measure the ambient temperature in the desired rack location before you install the instrument to ensure the operating temperature does not exceed the rated ambient temperature limit. If necessary, refer to the Environmental Specifications in your product documentation for the operating temperature limits.
| CAUTION:The instrument might be damaged due to overheating. When installing multiple instruments in an instrument rack, the ambient temperature may go up. You assume the responsibility to provide adequate cooling to meet the ambient temperature requirements listed in the specifications. |
Clearance requirements
The rack in which the individual instrument is mounted must provide the following clearance requirements.
- At least 222 mm (8.75 in) of vertical space or 5 RU (rack units) of vertical space.
- A minimum inside depth of at least 14 mm (0.55 in) depth (from rack mounting ear to back of instrument).
- A minimum external clearance of at least 34 mm (1.34 in) frontwards from rack mounting ear.
- Airflow enters from underneath the instrument and exits at the top of the instrument. The rack mount bracket ensures clearance for adequate airflow.
- No additional clearance is needed on the left or right sides of the instrument for adequate airflow.
| CAUTION:Adhering to these requirements mounts the rack-adapted instrument with enough clearance for air circulation and accommodation of the power cord and mounting hardware. Failure to provide these clearances can result in overheating and can cause the instrument to operate improperly or fail. |
Install the rackmount on the instrument
Install the 2-RK rackmount onto the back of your 2 Series MSO instrument using the following instructions.
Before you begin
These instructions are for qualified service personnel who are familiar with servicing the product. If you need further details for disassembling or reassembling the product, refer to the appropriate product manual. Contact your nearest Tektronix, Inc., Service Center or Tektronix Factory Service for installation assistance.
Procedure
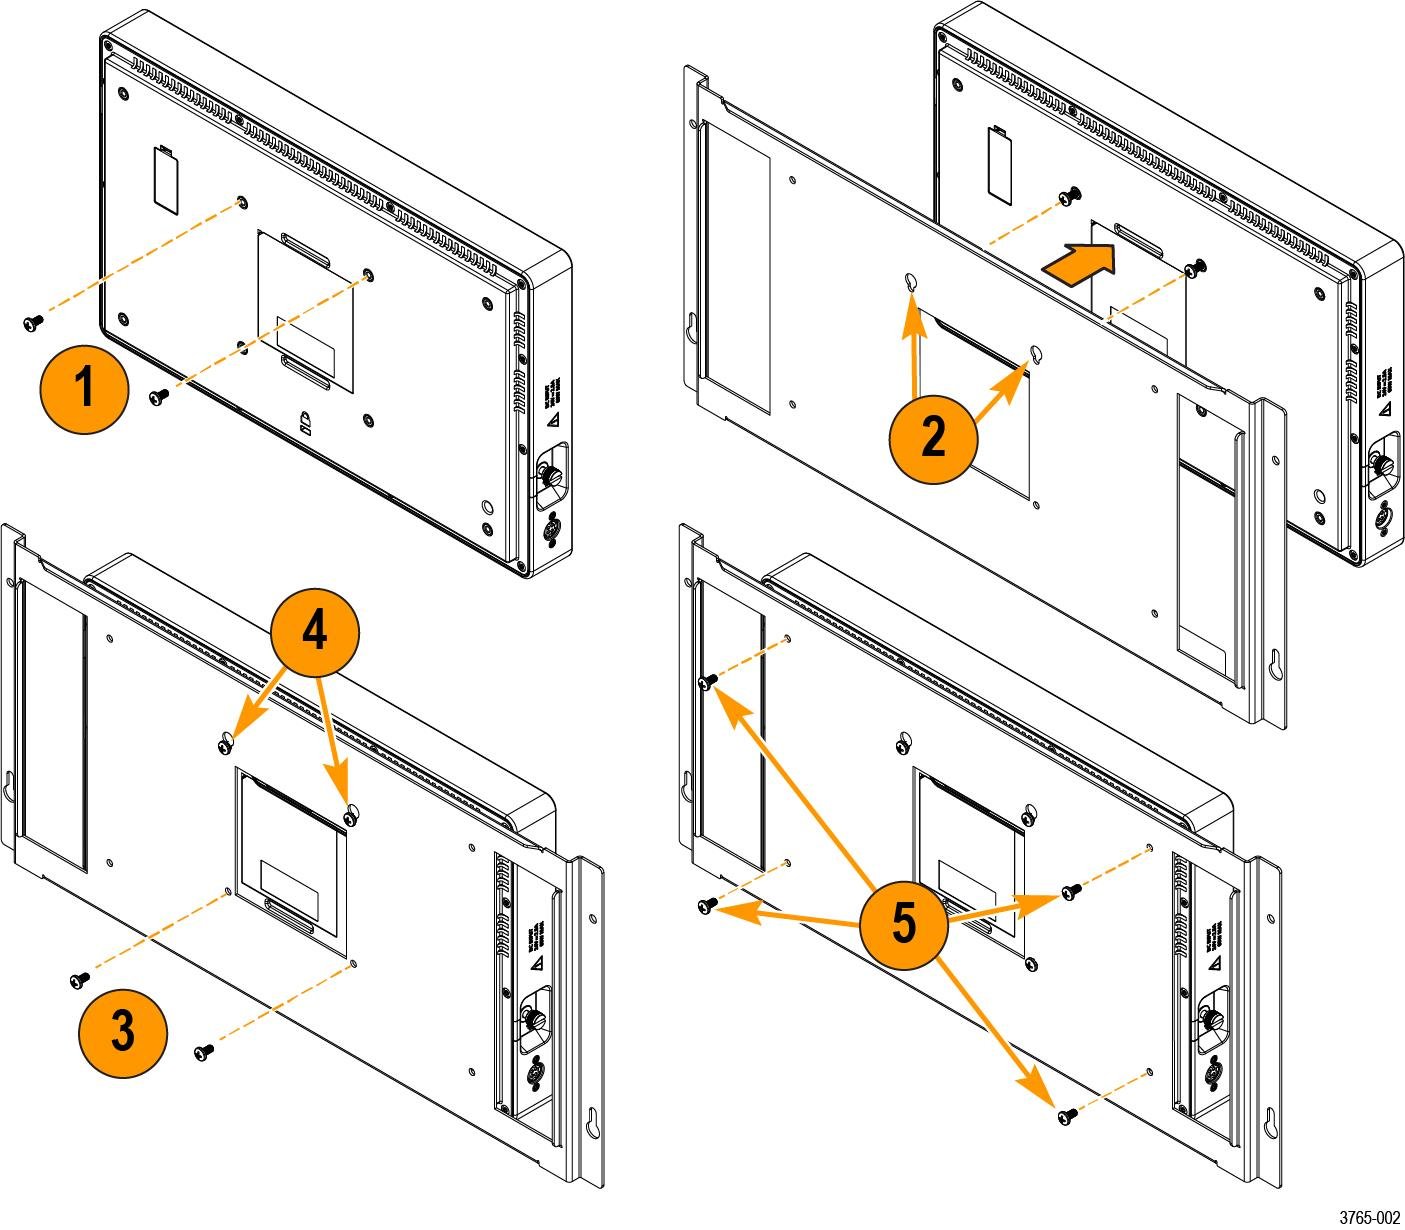
Install the instrument into the rack
Install the 2 Series MSO instrument with the rackmount into your rack.
Before you begin
Procedure
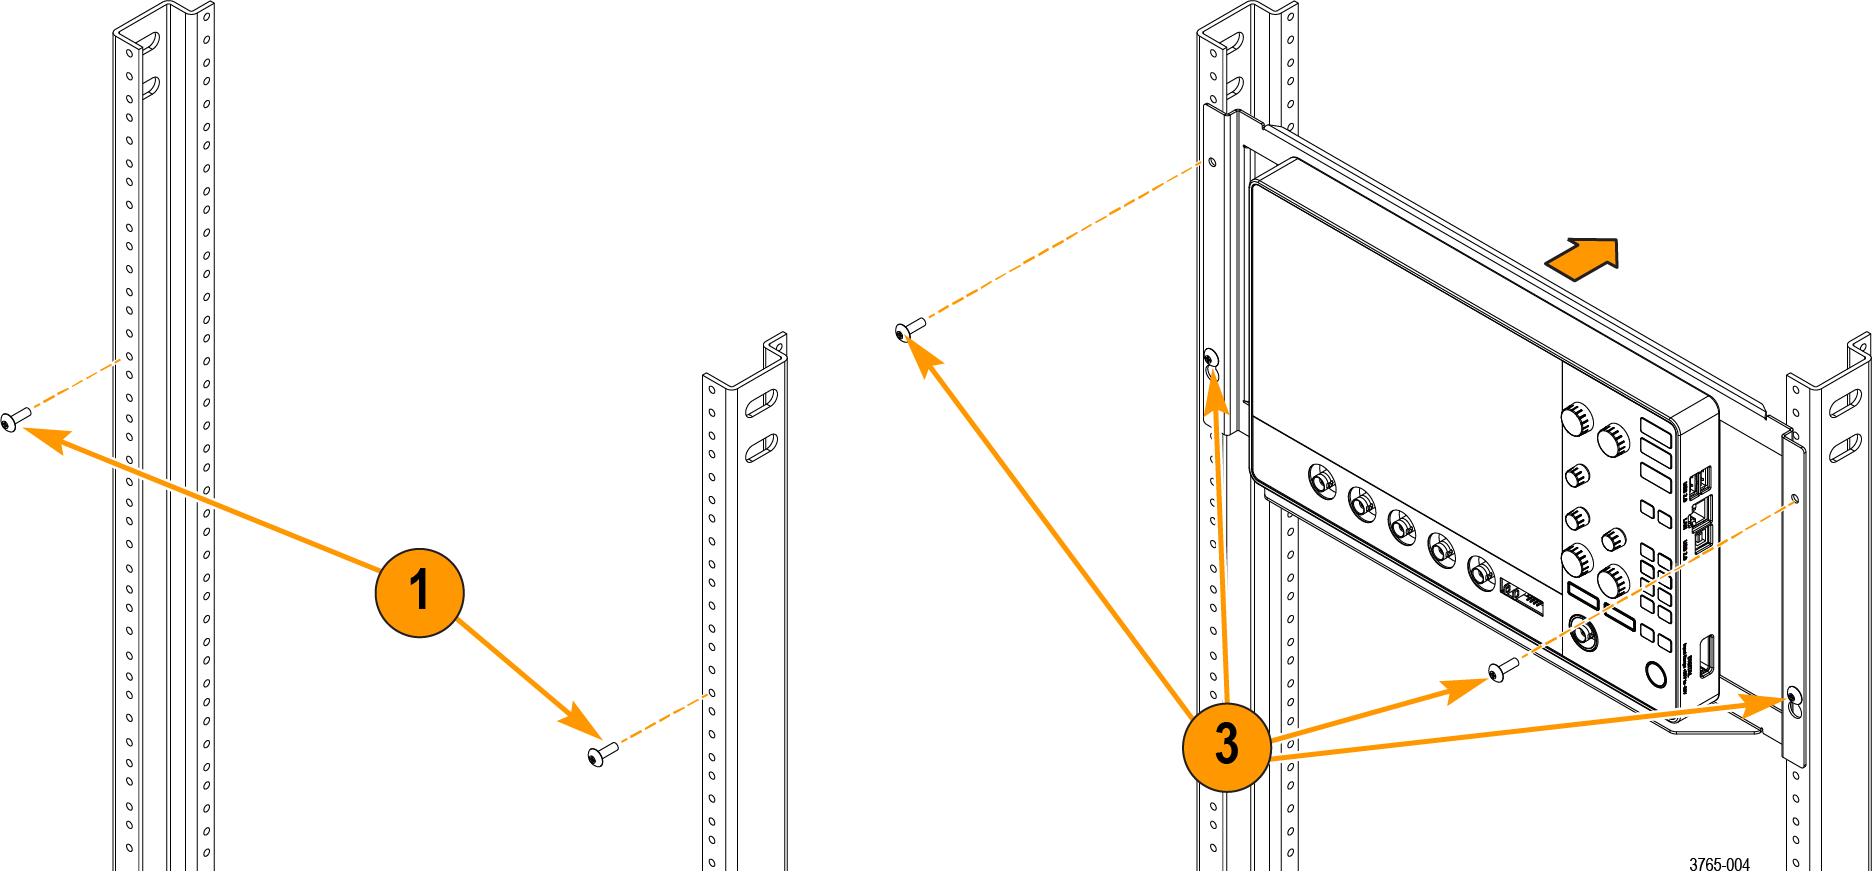
What to do next
Dimensions
The dimensions of the rackmount installed on the instrument.
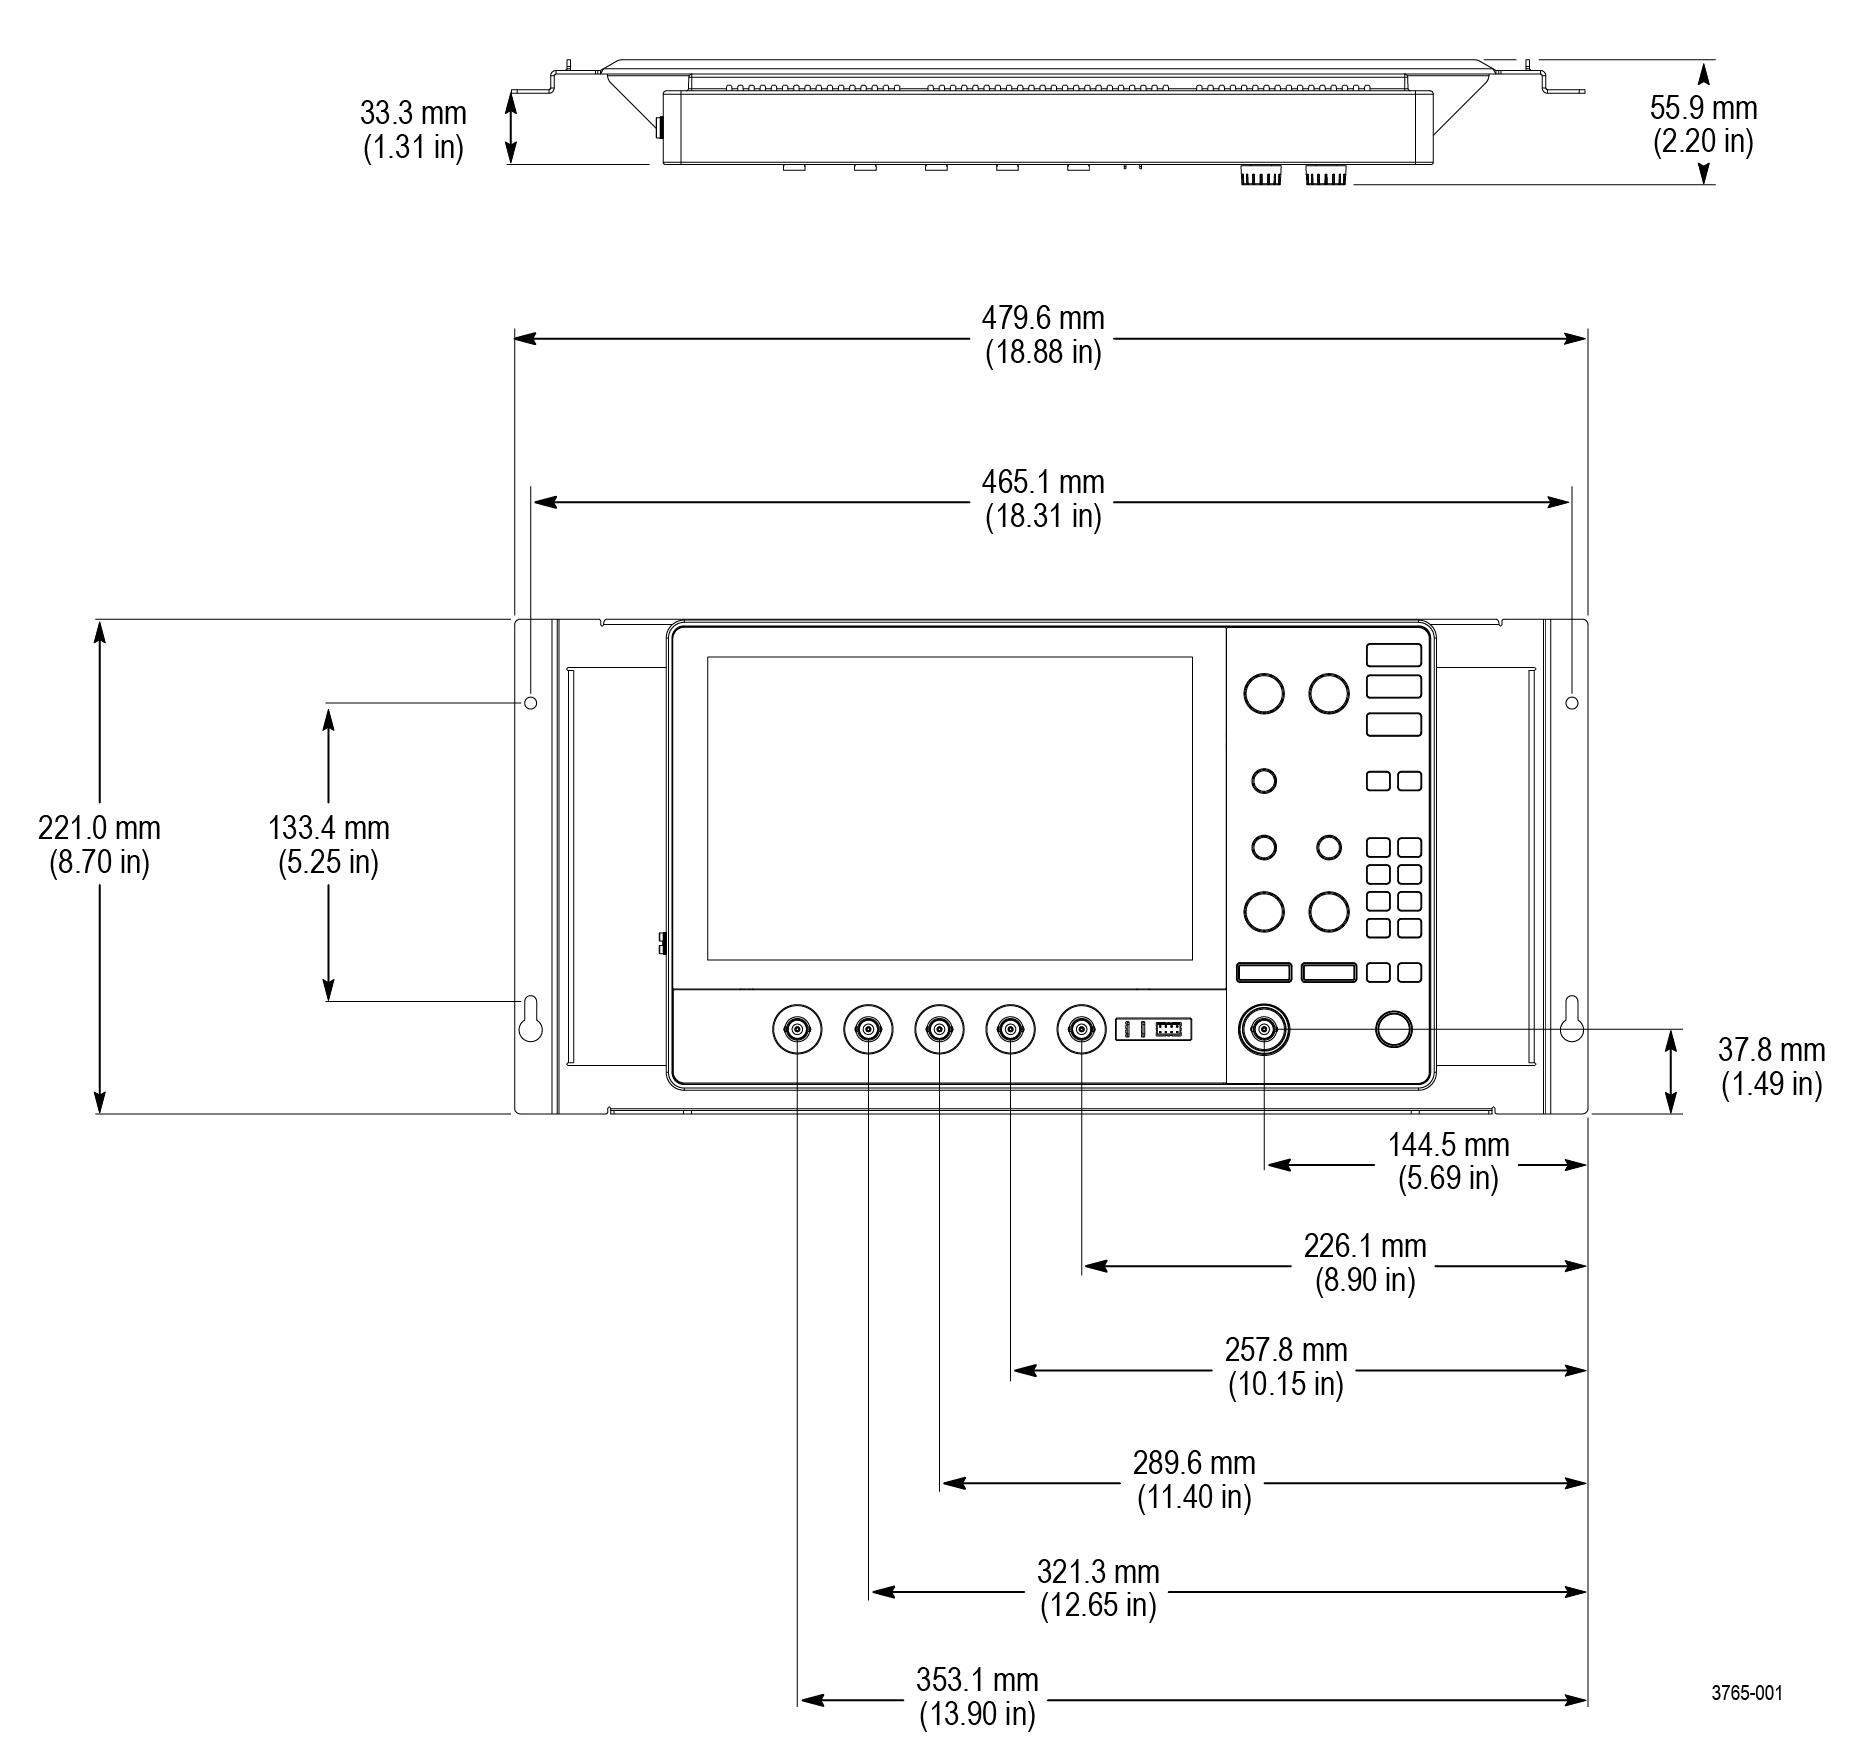
Install the optional side panels
The following is an optional procedure to install optional side panels to the 2-RK rackmount to control airflow while still allowing cable connections to the instrument.
Before you begin
- Download the PDF version of this document at https://www.tek.com/manual/oscilloscope/2-rk-rackmount-kit-instructions-2-series-mso.
- Download the MSO2 RACK FILLER PANEL.STL file from the attachments in the PDF version.
- Use the geometry from the STL file produce the side panels using the additive manufacturing method (3D printing) and material of your choice.
- Create both side panels from the STL file. The panels are designed to be reversible.
- Remove the four outer rackmount screws and set them aside. The four screws will be used to secure the two side panels.
Procedure
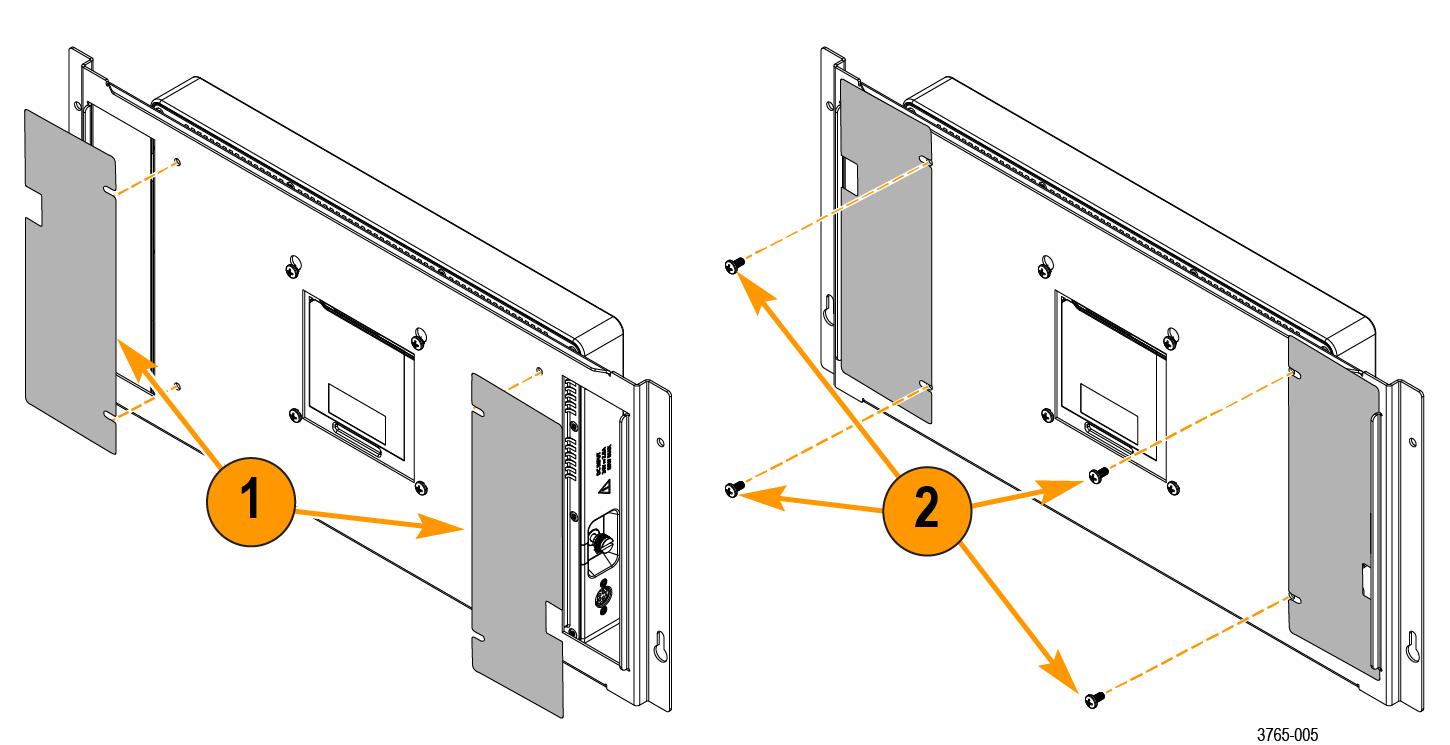
Results