Contact us
Live Chat with Tek representatives. Available 6:00 AM - 4:30 PM
Call us at
Available 6:00 AM – 5:00 PM (PST) Business Days
Download
Download Manuals, Datasheets, Software and more:
Feedback
2-RK Rackmount Kit Instructions
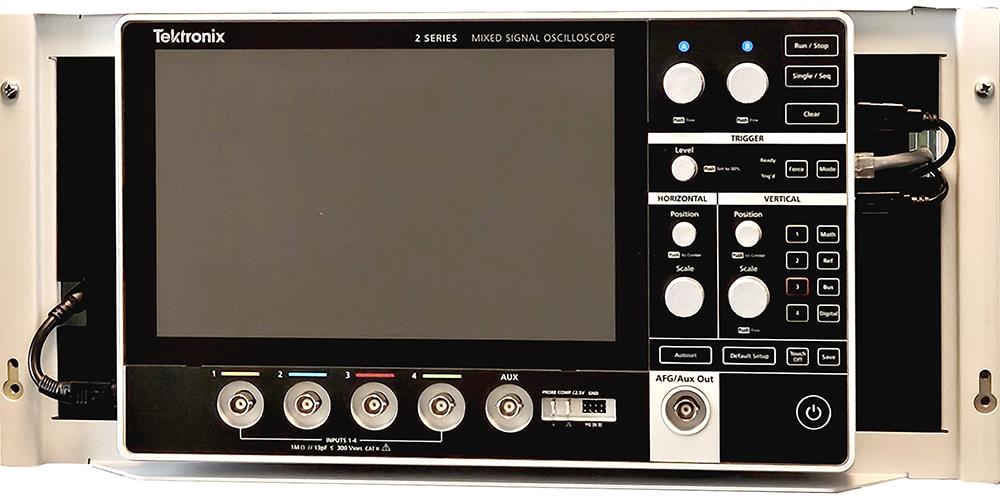
This document supports installing the 2 Series MSO with the rackmount kit in a standard equipment rack.
This manual applies to:
MSO22, MSO24, 2-RK, MSO22-EDU, MSO24-EDU
Related Product Information
Bằng cách tải xuống, bạn đồng ý với các điều khoản và điều kiện của Thỏa thuận Tải xuống Hướng dẫn sử dụng.
Thỏa thuận Tải xuống Tài liệu Hướng dẫn
CHÚ Ý: vui lòng đọc kỹ các điều khoản và điều kiện sau trước khi tải xuống bất kỳ tài liệu nào từ trang web này. Bằng cách tải xuống hướng dẫn sử dụng từ trang web của Tektronix, bạn đồng ý với các điều khoản và điều kiện sau:
Hướng dẫn sử dụng cho các sản phẩm hiện đang được hỗ trợ:
Tektronix theo đây cấp phép và quyền cho chủ sở hữu các thiết bị Tektronix được tải xuống và sao chép các tài liệu hướng dẫn trên trang web này cho mục đích sử dụng nội bộ hoặc cá nhân của riêng họ. Tài liệu hướng dẫn cho các sản phẩm hiện đang được hỗ trợ không được sao chép để phân phối cho người khác trừ khi được Tektronix, Inc. cấp phép bằng văn bản cụ thể.
Hướng dẫn sử dụng của Tektronix có thể đã được sửa đổi để phản ánh các thay đổi được thực hiện đối với sản phẩm trong vòng đời sản xuất của sản phẩm đó. Do đó, các phiên bản hướng dẫn sử dụng khác nhau có thể tồn tại đối với bất kỳ sản phẩm cụ thể nào. Cần cẩn thận để đảm bảo rằng người dùng có được phiên bản hướng dẫn sử dụng phù hợp cho số sê-ri sản phẩm cụ thể.
Tài liệu hướng dẫn cho các sản phẩm không còn được hỗ trợ:
Tektronix không thể cung cấp tài liệu hướng dẫn cho các sản phẩm đo lường không còn đủ điều kiện hỗ trợ lâu dài. Tektronix theo đây cấp phép và quyền cho người khác sao chép và phân phối các bản sao của bất kỳ tài liệu hướng dẫn sản phẩm đo lường nào của Tektronix, bao gồm tài liệu hướng dẫn sử dụng, tài liệu hướng dẫn vận hành, tài liệu hướng dẫn dịch vụ và tương tự, mà (a) có Số bộ phận của Tektronix và (b) dành cho sản phẩm đo lường không còn được Tektronix hỗ trợ.
Tài liệu hướng dẫn của Tektronix có thể được sửa đổi để phản ánh các thay đổi được thực hiện đối với sản phẩm trong vòng đời sản xuất. Do đó, các phiên bản tài liệu hướng dẫn khác nhau có thể tồn tại cho bất kỳ sản phẩm cụ thể nào. Cần thận trọng để đảm bảo rằng người dùng có được phiên bản tài liệu hướng dẫn phù hợp cho số sê-ri sản phẩm cụ thể.
Giấy phép và quyền này không áp dụng cho bất kỳ tài liệu hướng dẫn hoặc ấn phẩm nào khác vẫn có sẵn từ Tektronix, hoặc cho bất kỳ tài liệu hướng dẫn hoặc ấn phẩm nào khác dành cho sản phẩm sản xuất video hoặc sản phẩm máy in màu.
Tuyên bố miễn trừ trách nhiệm:
Tektronix không đảm bảo tính chính xác hoặc đầy đủ của thông tin, văn bản, đồ họa, sơ đồ mạch, danh sách bộ phận hoặc tài liệu khác có trong bất kỳ hướng dẫn sử dụng sản phẩm đo lường nào hoặc ấn phẩm khác không do Tektronix cung cấp hoặc được sản xuất hoặc phân phối theo sự cho phép và giấy phép nêu trên.
Tektronix có thể thay đổi nội dung của trang web này hoặc các sản phẩm của mình bất cứ lúc nào mà không cần thông báo.
Giới hạn Trách nhiệm pháp lý:
TEKTRONIX SẼ KHÔNG CHỊU TRÁCH NHÁCH VỀ BẤT KỲ TỆN HẠI NÀO (BAO GỒM, KHÔNG GIỚI HẠN, BẤT KỲ TỆN HẠI DO HẬU QUẢ HOẶC NGẪU NHIÊN, TỆN HẠI DO MẤT LỢI NHUẬN, GIÁN ĐOẠN KINH DOANH, HOẶC DO VI PHẠM QUYỀN SỞ HỮU TRÍ TUỆ) PHÁT SINH TỪ VIỆC SỬ DỤNG BẤT KỲ TÀI LIỆU HƯỚNG DẪN SẢN PHẨM ĐO LƯỜNG HOẶC ANH PHẨM NÀO KHÁC DO TEKTRONIX SẢN XUẤT HOẶC PHÂN PHỐI THEO GIẤY PHÉP VÀ QUYỀN NÊU TRÊN.
Read Online
Kit description
The 2-RK rackmount kit is a collection of parts that, once installed, configure the instrument for mounting into a standard 19-inch equipment rack.
This kit supports all 2 Series MSO instruments.
Parts list
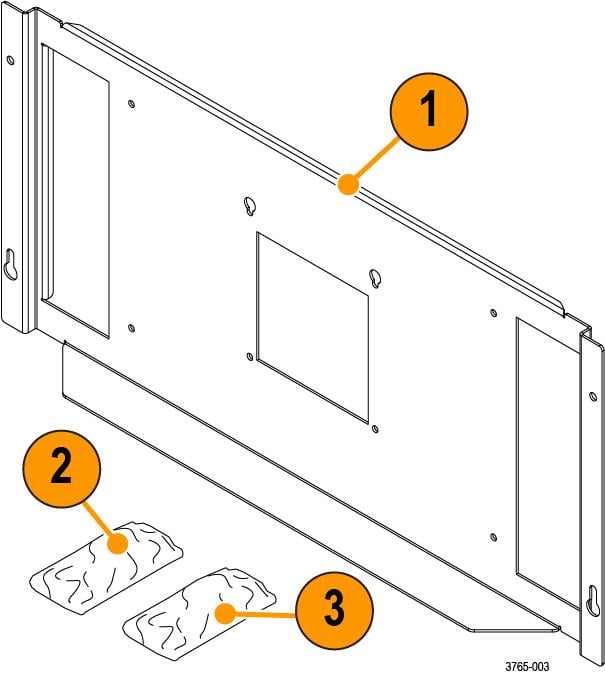
| Item | Part Number | Quantity | Description |
|---|---|---|---|
| 1 | 407-6248-XX | 1 | Rackmount bracket |
| 2 | 211-1732-XX | 8 | Screw, M4X.7X8mm. Use for attaching the bracket to the instrument. |
| 3 | 212-0577-XX | 4 | Screw, Machine 10-32x.625. Optional, use for attaching the instrument with bracket to the rack. |
Recommended installation tools
Use a screwdriver handle with No. 2 Phillips screw tip or a No. 2 Phillips screwdriver to install your rackmount kit.
Warranted characteristics
When the instrument is installed according to the instructions in this document, the rackmounted instrument meets all warranted requirements listed in the instrument specification. Instruments mounted using methods other than those described in these instructions might not meet their warranted requirements.
For tables of the warranted characteristics, see Specifications in the specification and performance verification manual that applies to your instrument model.
 | CAUTION:The rack is more susceptible to tipping when the instrument is installed. To prevent the rack from tipping, ensure that the rack is stable before accessing rear panel of the instrument. |
The ambient temperature inside the instrument rack will vary depending on the location of the instrument within the instrument rack. Tektronix recommends that you measure the ambient temperature in the desired rack location before you install the instrument to ensure the operating temperature does not exceed the rated ambient temperature limit. If necessary, refer to the Environmental Specifications in your product documentation for the operating temperature limits.
| CAUTION:The instrument might be damaged due to overheating. When installing multiple instruments in an instrument rack, the ambient temperature may go up. You assume the responsibility to provide adequate cooling to meet the ambient temperature requirements listed in the specifications. |
Clearance requirements
The rack in which the individual instrument is mounted must provide the following clearance requirements.
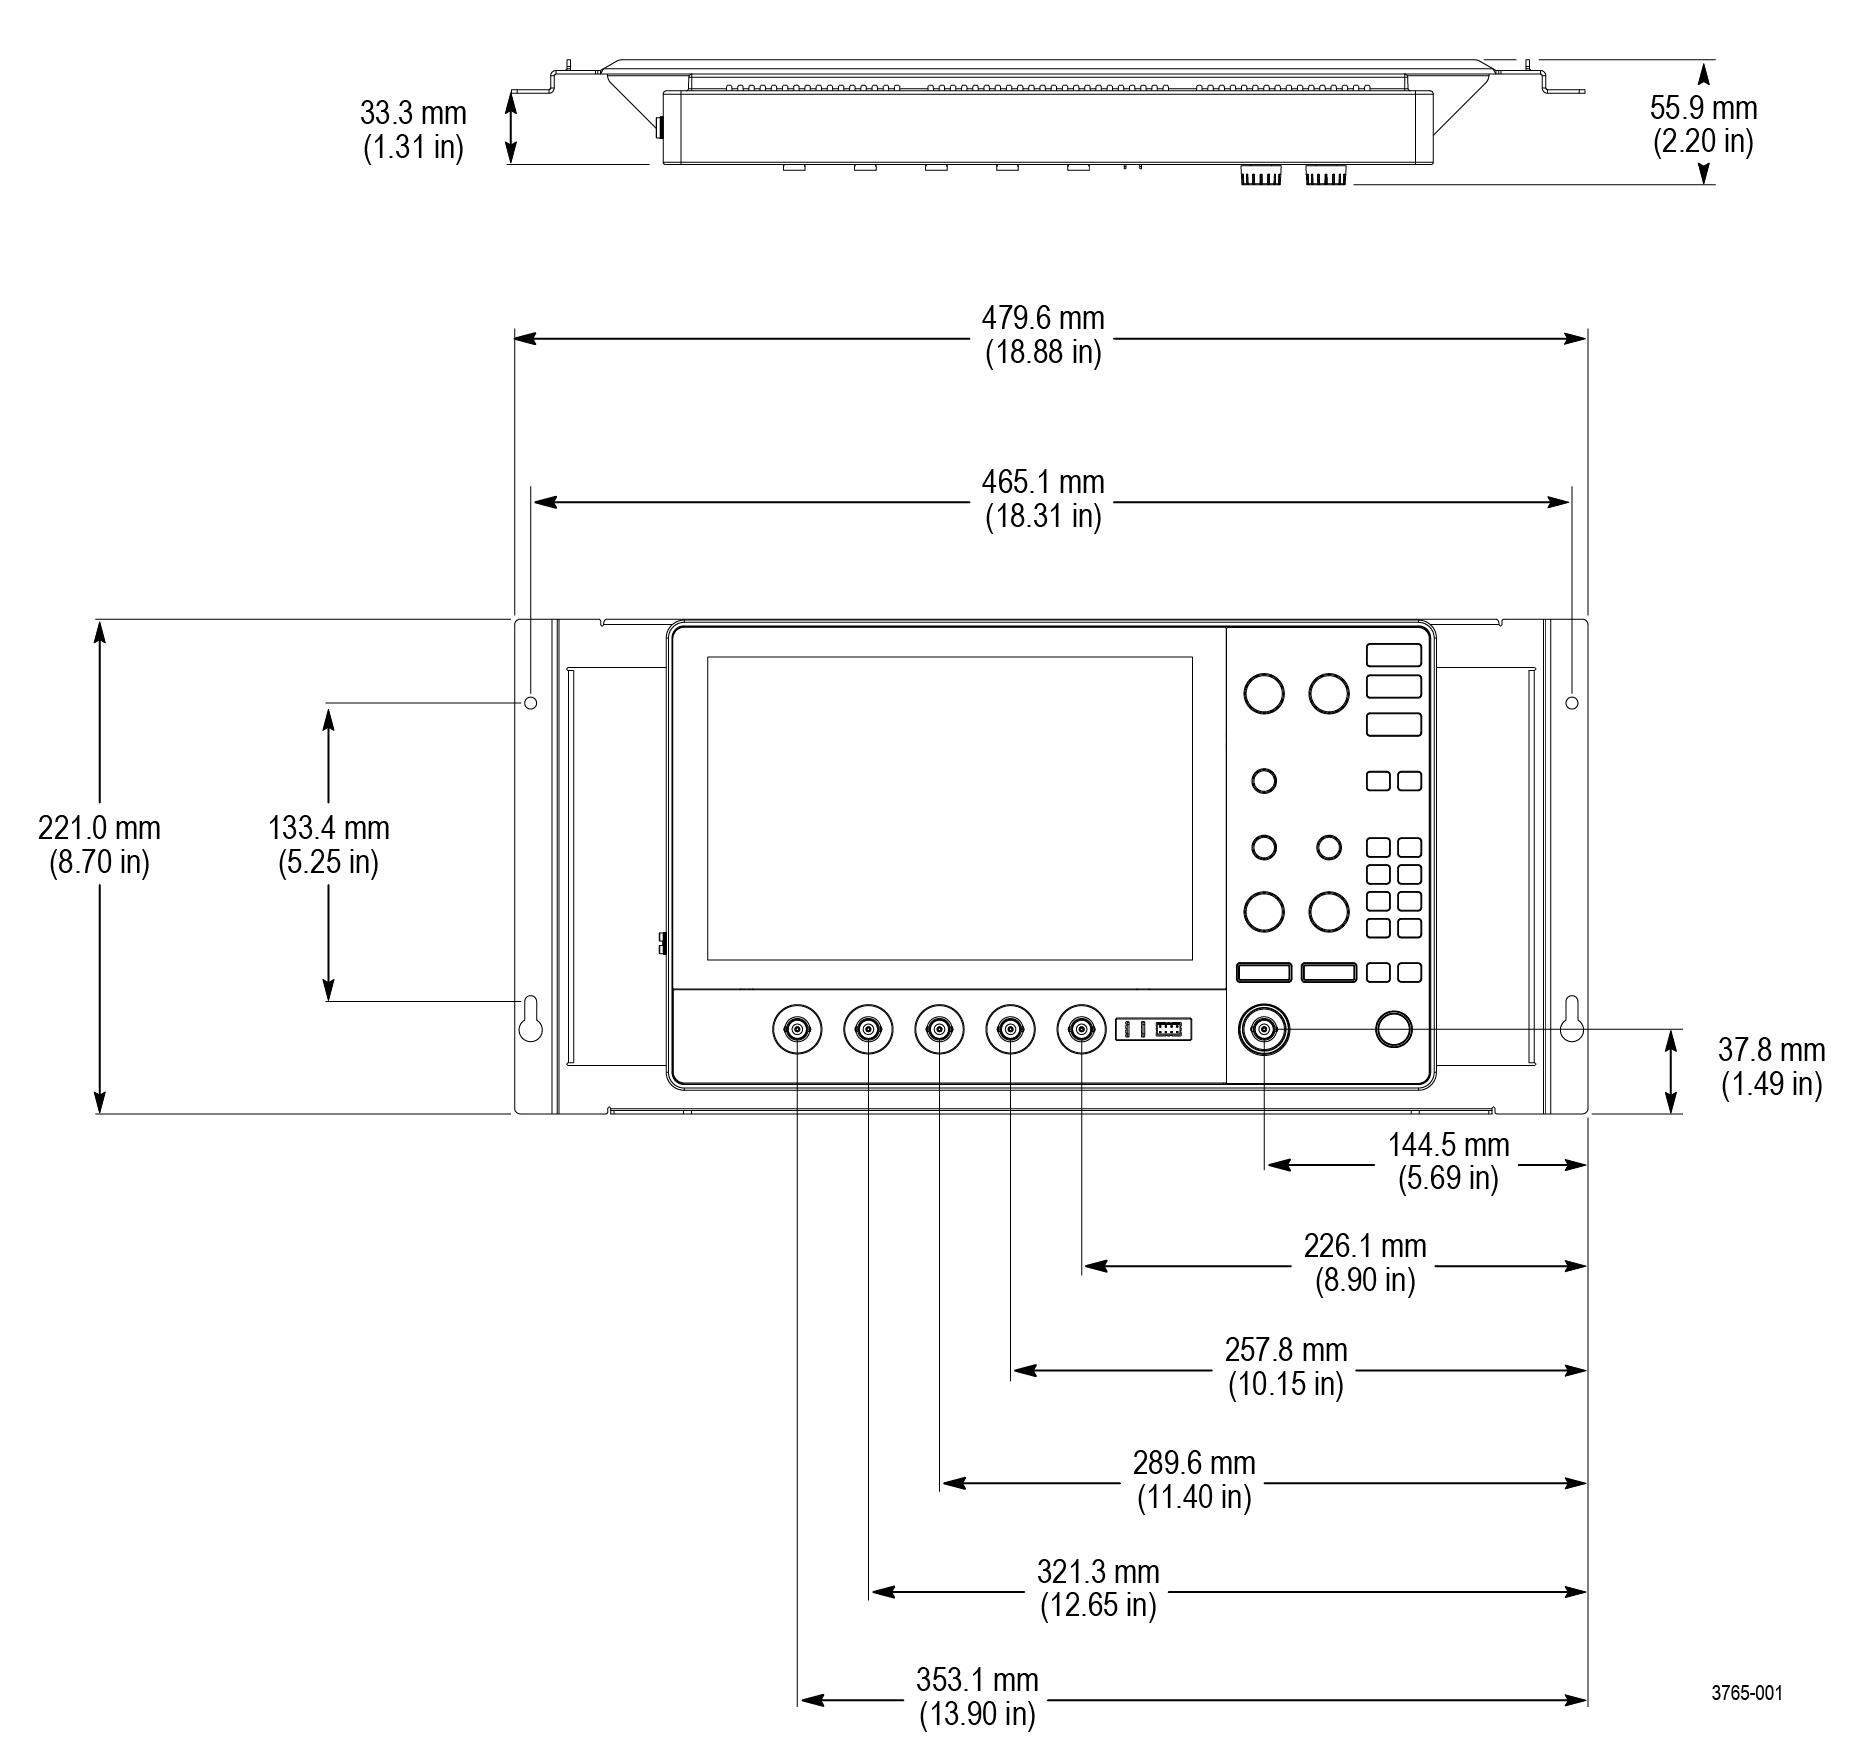
- At least 222 mm (8.75 in) of vertical space or 5 RU (rack units) of vertical space.
- A minimum inside depth of at least 14 mm (0.55 in) depth (from rack mounting ear to back of instrument).
- A minimum external clearance of at least 34 mm (1.34 in) frontwards from rack mounting ear.
- Airflow enters from underneath the instrument and exits at the top of the instrument. The rack mount bracket ensures clearance for adequate airflow.
- No additional clearance is needed on the left or right sides of the instrument for adequate airflow.
| CAUTION:Adhering to these requirements mounts the rack-adapted instrument with enough clearance for air circulation and accommodation of the power cord and mounting hardware. Failure to provide these clearances can result in overheating and can cause the instrument to operate improperly or fail. |
Install the rackmount on the instrument
Install the 2-RK rackmount onto the back of your 2 Series MSO instrument using the following instructions.
Before you begin
These instructions are for qualified service personnel who are familiar with servicing the product. If you need further details for disassembling or reassembling the product, refer to the appropriate product manual. Contact your nearest Tektronix, Inc., Service Center or Tektronix Factory Service for installation assistance.
Procedure
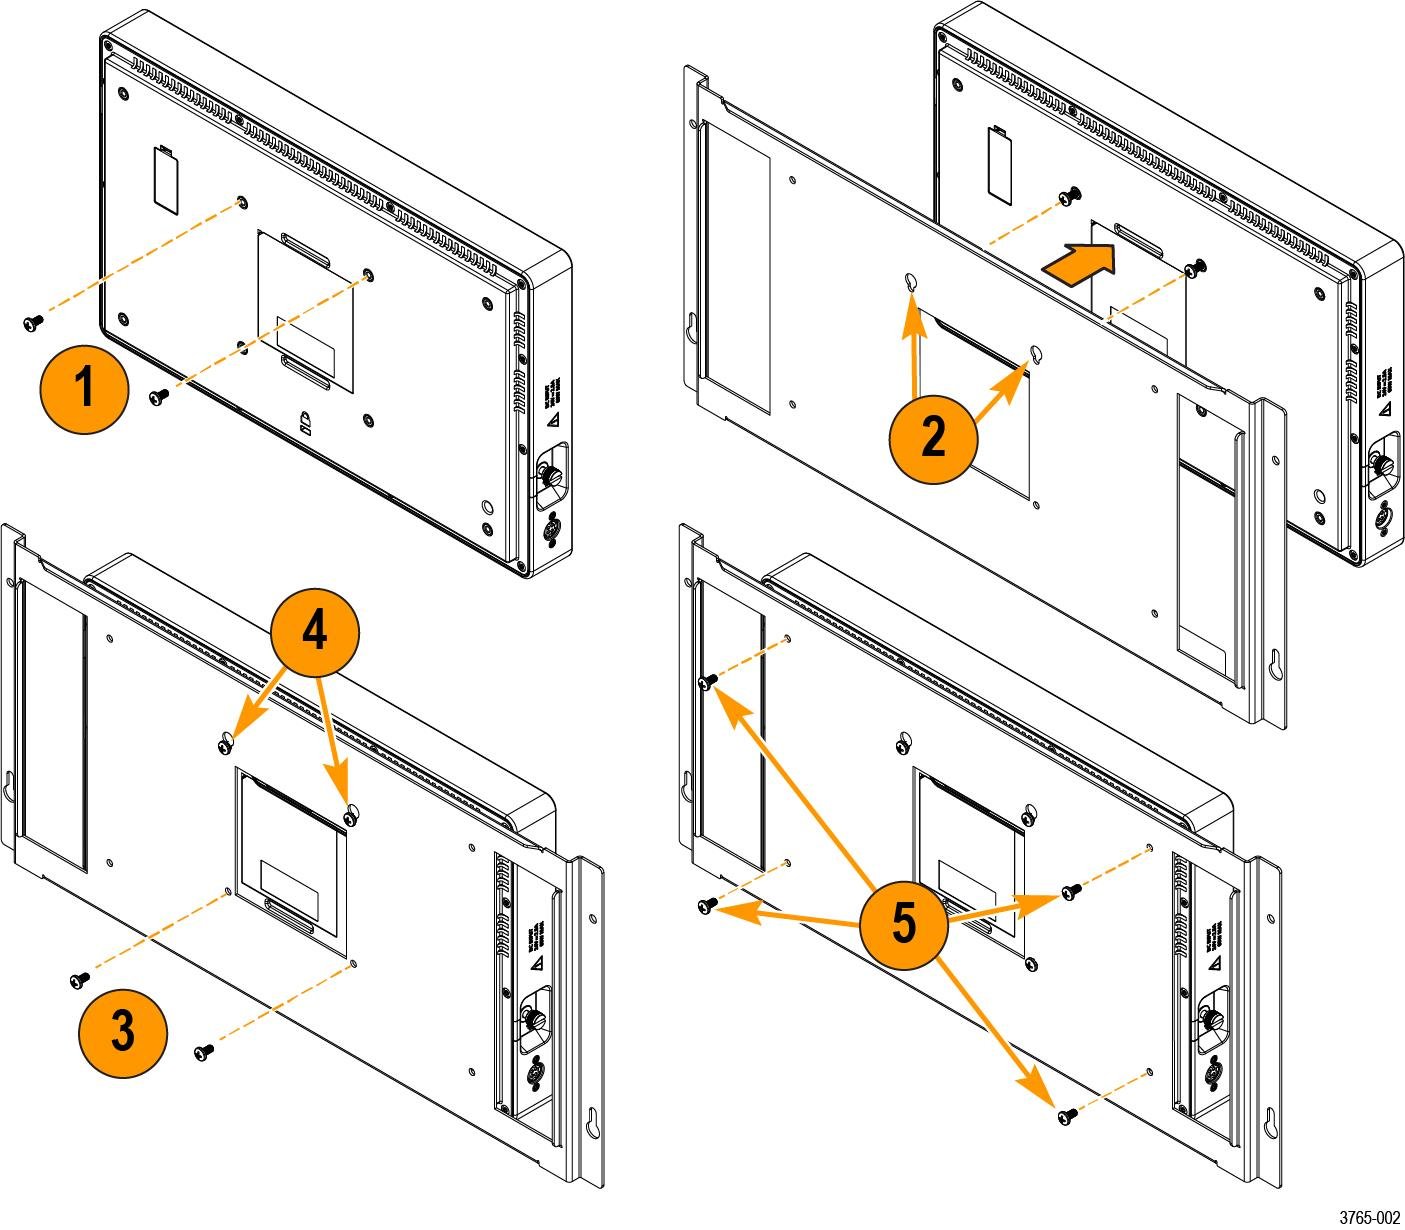
Install the instrument into the rack
Install the 2 Series MSO instrument with the rackmount into your rack.
Before you begin
Procedure
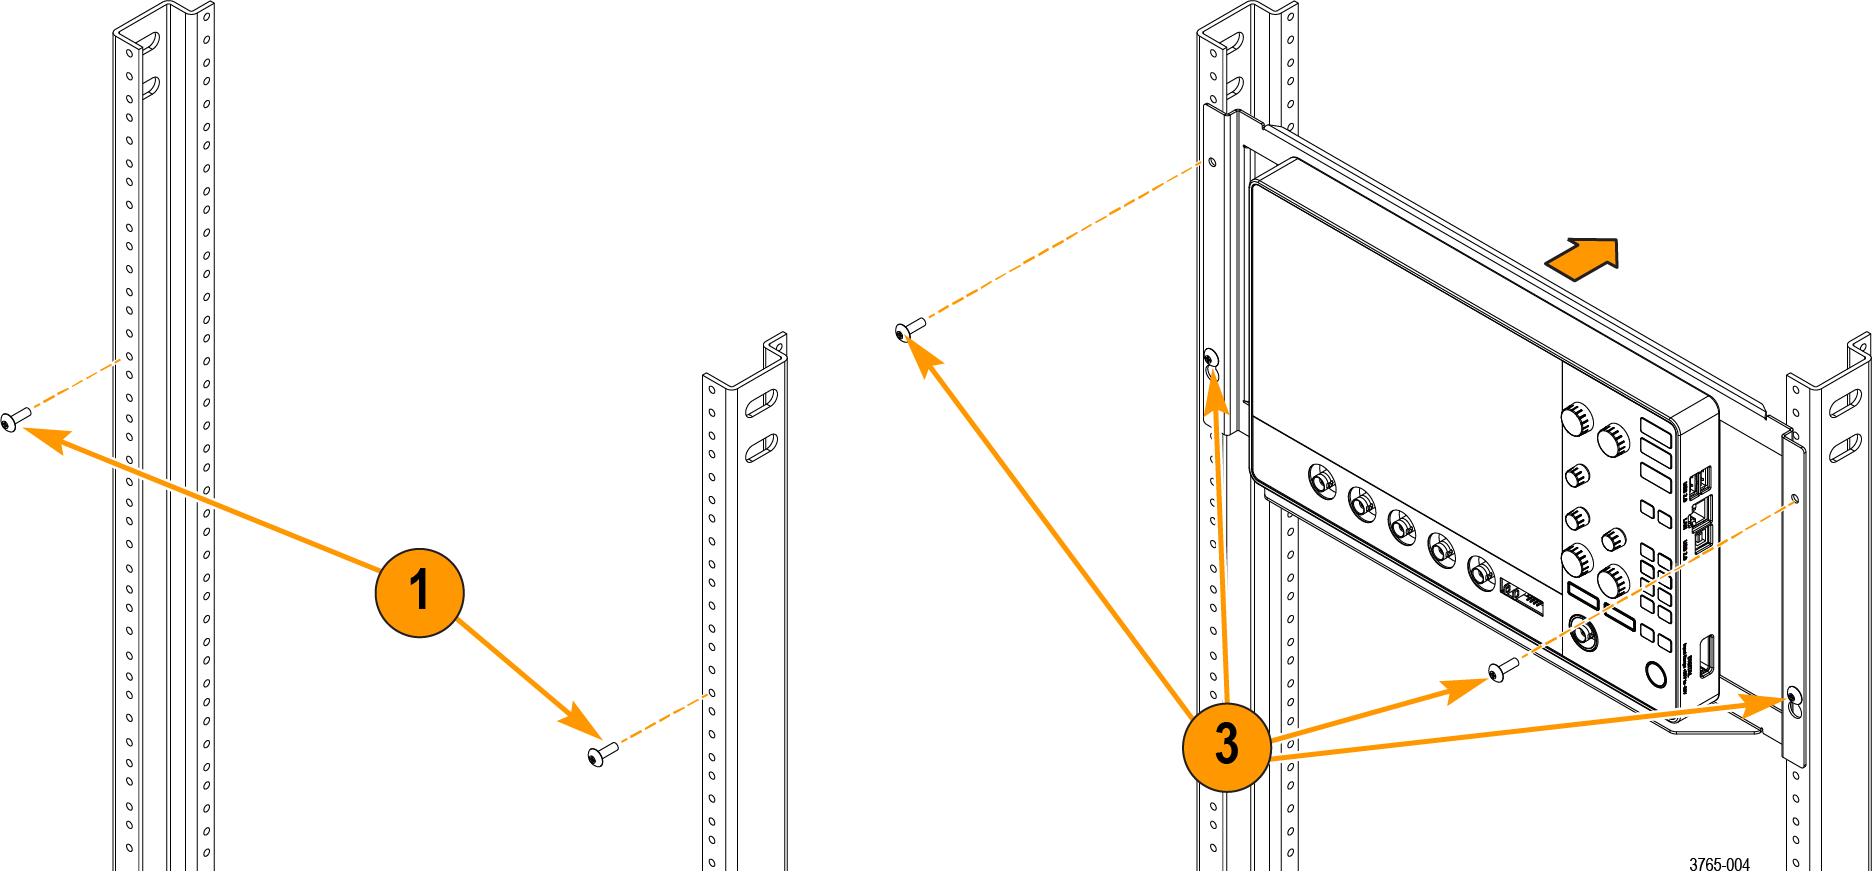
What to do next
Dimensions
The dimensions of the rackmount installed on the instrument.
Install the optional side panels
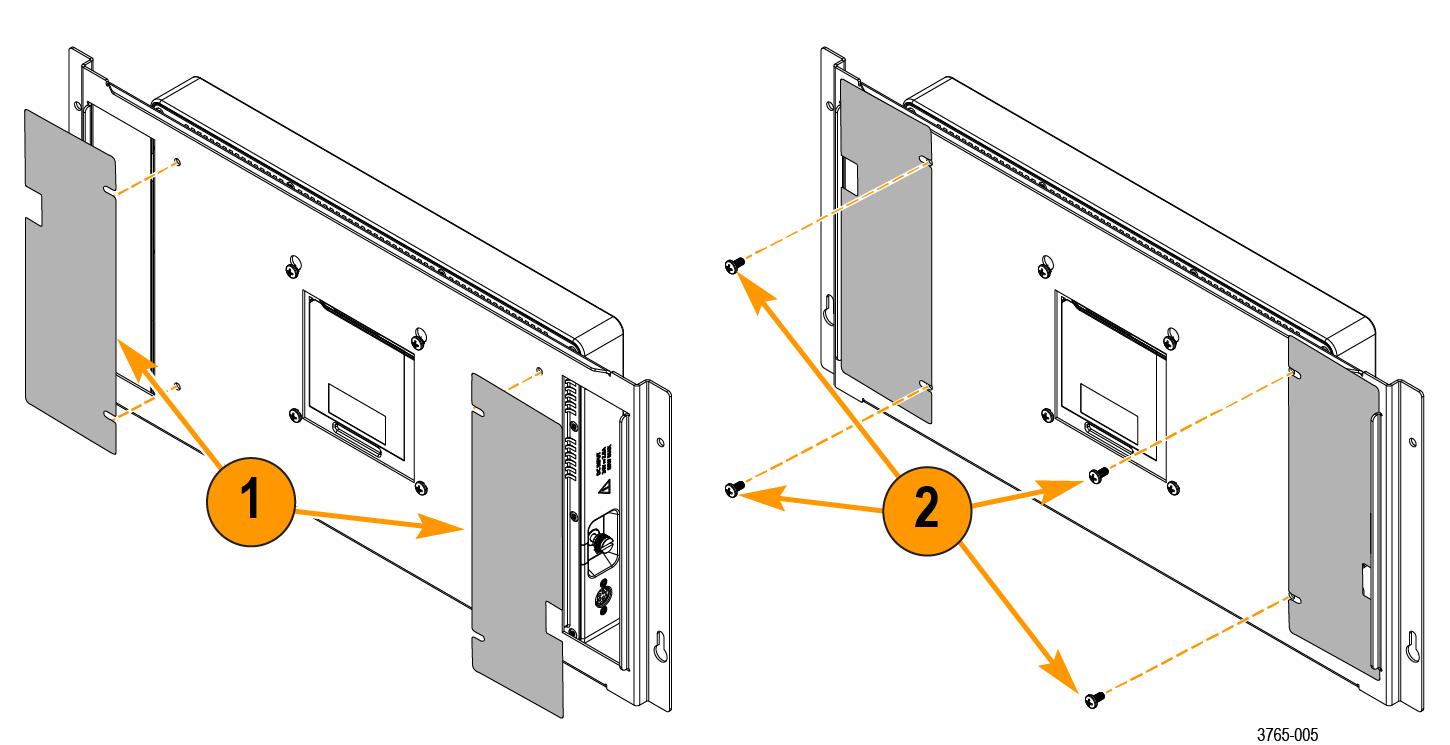
The following is an optional procedure to install optional side panels to the 2-RK rackmount to control airflow while still allowing cable connections to the instrument.
Before you begin
- Download the PDF version of this document at https://www.tek.com/manual/oscilloscope/2-rk-rackmount-kit-instructions-2-series-mso.
- Download the MSO2 RACK FILLER PANEL.STL file from the attachments in the PDF version.
- Use the geometry from the STL file produce the side panels using the additive manufacturing method (3D printing) and material of your choice.
- Create both side panels from the STL file. The panels are designed to be reversible.
- Remove the four outer rackmount screws and set them aside. The four screws will be used to secure the two side panels.
Procedure
Results