

연락처
텍트로닉스 담당자와 실시간 상담 6:00am-4:30pm PST에 이용 가능
전화 문의
9:00am-6:00PM KST에 이용 가능
다운로드
매뉴얼, 데이터 시트, 소프트웨어 등을 다운로드할 수 있습니다.
피드백
2 Series MSO Declassification and Security Instructions
This document contains procedures to sanitize or remove memory devices from your 2 Series MSO.
이 매뉴얼은 다음에 적용됩니다.:
MSO22, MSO24, MSO22-EDU, MSO24-EDU
관련 제품 정보
다운로드하면 매뉴얼 다운로드 계약 약관에 동의하게 됩니다.
설명서 다운로드 계약
참고: 이 웹 사이트에서 문서를 다운로드하기 전에 아래 약관을 주의 깊게 읽어보십시오. 텍트로닉스 웹 사이트에서 설명서를 다운로드하면 아래 약관에 동의한 것으로 간주됩니다.
현재 지원되는 제품의 설명서:
Tektronix 장비 소유자에게는 내부 또는 개인용으로 이 웹 사이트에서 설명서를 다운로드하고 복제할 수 있는 권한 및 사용권이 부여됩니다. 현재 지원되는 제품의 설명서는 Tektronix, Inc.에서 별도로 서면으로 승인하지 않는 한 다른 사람에게 배포하기 위해 복제될 수 없습니다.
Tektronix 설명서는 제조 기간 동안 제품의 변경 내용을 반영하도록 개정될 수 있습니다. 따라서 특정 제품에 대해 서로 다른 설명서 버전이 존재할 수 있습니다. 특정 제품 시리얼 넘버에 대해 올바른 설명서 버전을 가져오도록 주의를 기울여야 합니다.
더 이상 지원되지 않는 제품의 설명서:
Tektronix는 장기간 지원에 더 이상 적합하지 않은 측정 제품용 설명서를 제공할 수 없습니다. Tektronix는 Tektronix에서 더 이상 지원하지 않는 (a) Tektronix 부품 번호 (b) 측정 제품용 사용 설명서, 작업자 설명서, 서비스 설명서 등을 비롯한 Tektronix 측정 제품 설명서 복사본을 복제하고 배포할 수 있는 권한 및 사용권을 제공합니다.
Tektronix 설명서는 제조 기간 동안 제품의 변경 내용을 반영하도록 개정될 수 있습니다. 따라서 특정 제품에 대해 서로 다른 설명서 버전이 존재할 수 있습니다. 특정 제품 시리얼 넘버에 대해 올바른 설명서 버전을 가져오도록 주의를 기울여야 합니다.
이 권한 및 사용권은 Tektronix에서 계속해서 제공되는 모든 설명서나 기타 출판물 또는 비디오 프러덕션 제품이나 컬러 프린터 제품용 설명서나 기타 출판물에는 적용되지 않습니다.
부인:
Tektronix는 Tektronix에서 제공하지 않거나 위에서 언급된 권한 및 사용권에 따라 작성 또는 배포된 모든 측정 제품 설명서나 기타 출판물에 포함된 정보, 텍스트, 그래픽, 도식, 부품 목록 또는 기타 자료의 정확성 또는 완전성을 보장하지 않습니다.
Tektronix는 언제든지 예고 없이 이 웹 사이트나 제품의 콘텐츠를 변경할 수 있습니다.
책임의 제한:
TEKTRONIX는 위에서 언급된 권한 및 사용권에 따라 작성 또는 배포된 기타 출판물이나 모든 측정 제품 설명서 사용으로 인한 손해(결과적, 우박적 손해, 이익 손실, 업무 중단, 지적 재산권 침해)에 대해 책임을 지지 않습니다.
Read Online
Preface
This document helps customers with data security concerns to clear or sanitize 2 Series MSO instruments. Instruments in this series contain a processor system with a non-removable mass storage.
These products have data storage (memory) devices and data export interfaces (USB and Ethernet). The following instructions explain how to sanitize the instrument.
Reference
- National Industrial Security Program Operating Manual (NISPOM), DoD 5220.22–M, Chapter 8
- Defense Security Service Manual for the Certification and Accreditation of Classified Systems under the NISPOM
Supported products
Tektronix 2 Series Mixed Signal Oscilloscope products are covered by this document.
Terms
- Clear: This removes data from media/memory before reusing it in a secured area. All reusable memory is cleared to deny access to previously stored information by a standard means of access.
- Erase: This is equivalent to clear.
- Media: Storage/data export device. A device that stores or exports data from the instrument, such as a USB flash drive or USB port.
- Sanitize: This removes the data from media/memory so that the data cannot be recovered using any known technology. This is typically used when the device is moved (temporarily or permanently) from a secured area to a non-secured area.
- Remove: This is a physical means to clear the data by removing the memory device from the instrument. Instructions are available in the product service manual.
- User-Accessible: The user can directly retrieve the memory device contents.
- User-Modifiable: The memory device can be written to by the user during normal instrument operation, using the instrument user interface or remote control.
- Volatile memory: Memory that loses data when the instrument is powered off.
- Nonvolatile memory: Memory that retains data when the instrument is powered off.
- Power off: Some instruments have a “Standby” mode, in which power is still supplied to the instrument. For clearing data, putting the instrument in Standby mode does not qualify as powering off. For these products, you must either push a rear-panel OFF switch or remove the power source from the instrument.
- Instrument Declassification: A term that refers to procedures that must be undertaken before an instrument can be removed from a secure environment. Declassification procedures include memory sanitization, memory removal, and sometimes both.
Clear and sanitize procedures
The following tables list the volatile and nonvolatile memory devices in the standard instrument and listed options.
Procedures to clear or sanitize these devices, if any, are given in each table.
Terms
- User data – Describes the type of information stored in the device. Refers to waveforms or other measurement data representing signals connected to the instrument by users.
- User settings – Describes the type of information stored in the device. Refers to instrument settings that can be changed by the user.
- Both – Describes the type of information stored in the device. It means that both user data and user settings are stored in the device.
- None – Describes the type of information stored in the device. It means that neither user data nor user settings are stored in the device.
- Directly – Describes how data is modified. It means that the user can modify the data.
- Indirectly – Describes how data is modified. It means that the instrument system resources modify the data and that the user cannot modify the data.
Volatile memory devices
These are the memory capacities at the time of publishing this document, but are subject to change.
| Type and size | Function | Type of user info stored | Backed up by battery | Method of modification | Data input method | Location | User accessible | To clear | To sanitize |
|---|---|---|---|---|---|---|---|---|---|
| SDRAM 2 GB (All models) | System memory | Both | No | Indirectly | Written by processor system and application software operations | Main board | No | Unplug the instrument and remove all battery packs for at least 30 seconds | Unplug the instrument and remove all battery packs for at least 30 seconds |
| CMOS RAM 13 bytes | Holds clock and boot configuration data | None | Yes | Indirectly | Boot operations | Main board | No | Cannot be cleared | Remove the Main board |
| FPGA <20 MB | Acquisition system | None | No | None | Written by processor | Main board | No | Unplug the instrument and remove all battery packs for at least 30 seconds | Unplug the instrument and remove all battery packs for at least 30 seconds |
Non-volatile memory devices
These are the memory capacities at the time of publishing this document but are subject to change.
| Type and Size | Function | Type of user info stored | Method of modification | Data input method | Location | User accessible | To clear | To sanitize |
|---|---|---|---|---|---|---|---|---|
| eMMC 4 GB or 8 GB | Stores application software and user data | Both | Directly | Application software operations and file operations | Main board | Yes | Run TekSecure | Remove the Main board |
How to sanitize an instrument
- Remove all external USB memory devices and store or destroy the USB memory devices in accordance with your organization’s guidelines.
- Follow the instructions in the Main board removal instructions to get access to and remove the Main board, which contains user data and settings. Store or destroy the Main board in accordance with your organization’s guidelines.
- Reassemble the instrument without the Main board and return it to Tektronix. The instrument will then be repaired and calibrated as necessary.
In North America, contact the Tektronix Customer Care Center (1-800-833-9200) for assistance with returning the instrument to a repair center. Worldwide, visit tek.com to find contacts in your area.
Main board removal instructions
- Disconnect the AC power adapter from the instrument.
- If installed, remove all batteries from the instrument.
- If installed, remove the battery pack from the instrument.
- Place the instrument on a work surface with the display facing up.
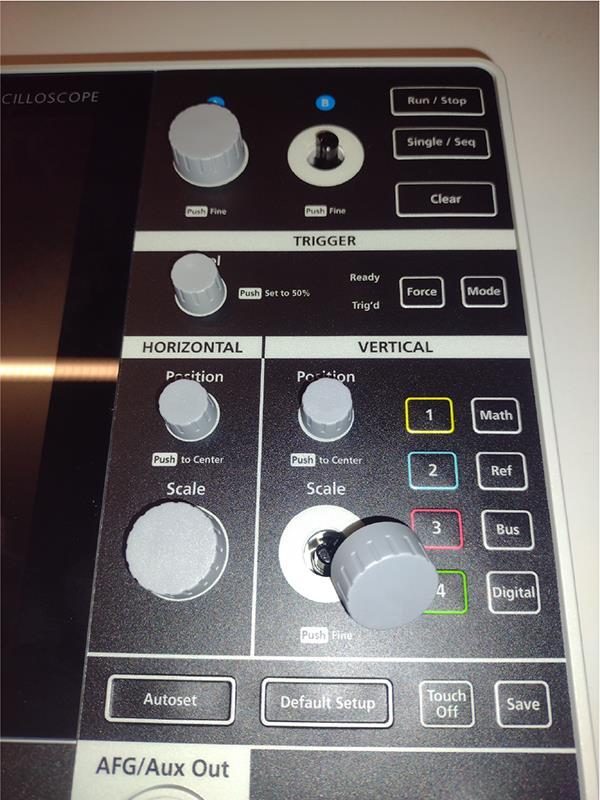
- Remove the seven knobs from the front of the instrument.

- Flip the instrument cover so the display is facing down.
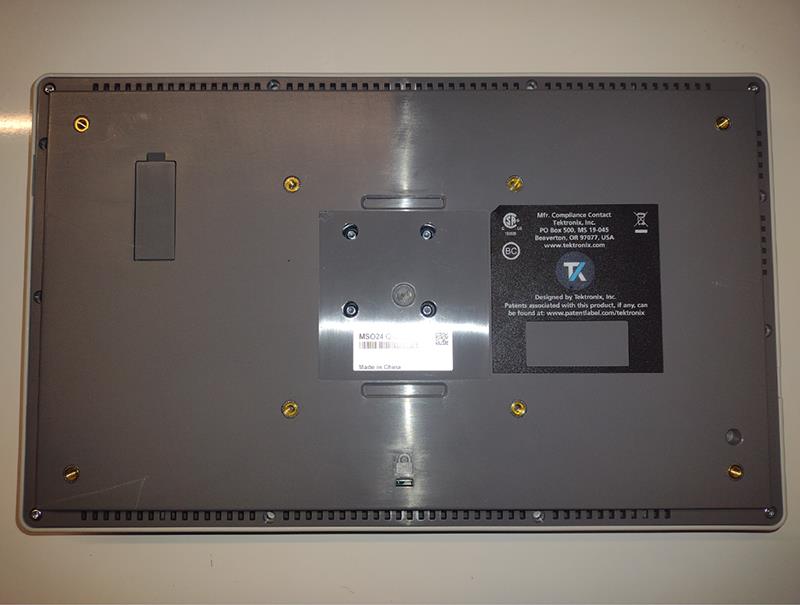
- Remove the rectangular label from the back of the instrument. Stick the label on the back of the instrument so that it is out of the way and not covering any screws.
- Using a T-10 screwdriver, remove the 16 PT thread forming screws from the back of the instrument.
- Remove the back cover of the instrument and set it aside.
The large circuit board visible inside the instrument is the Main board.
- Disconnect the power cable from the Main board by pressing on the tab near the wire-end of the connector and sliding the connector away from the board.
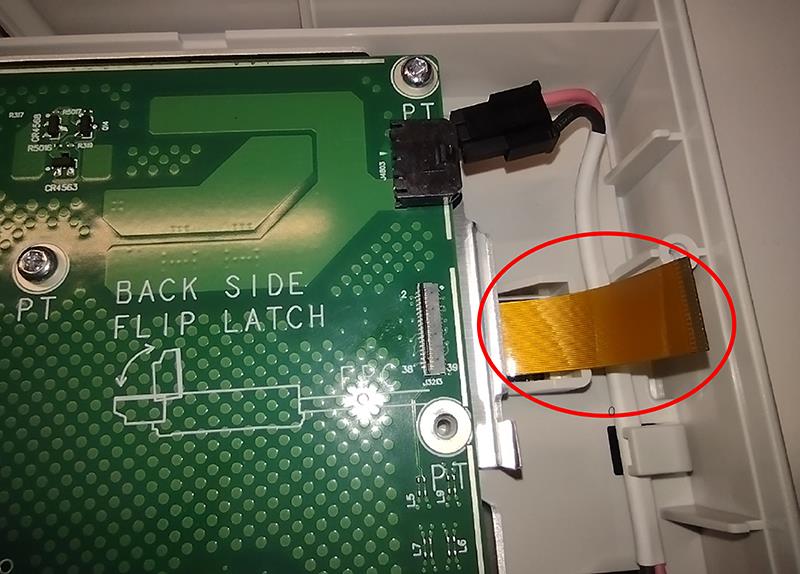
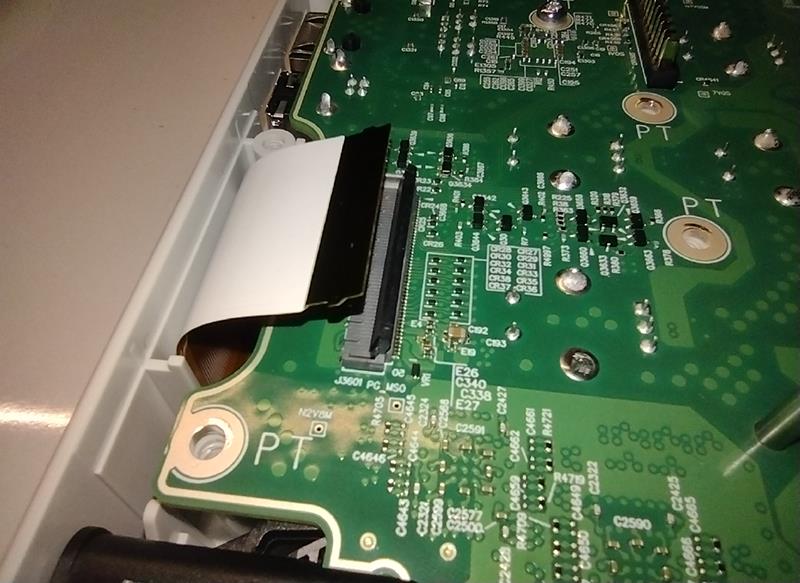
- Disconnect the display cable from the Main board by flipping up the latch on the backside of the connector and sliding the cable out. Use the illustration printed on the Main board near the connector for reference.
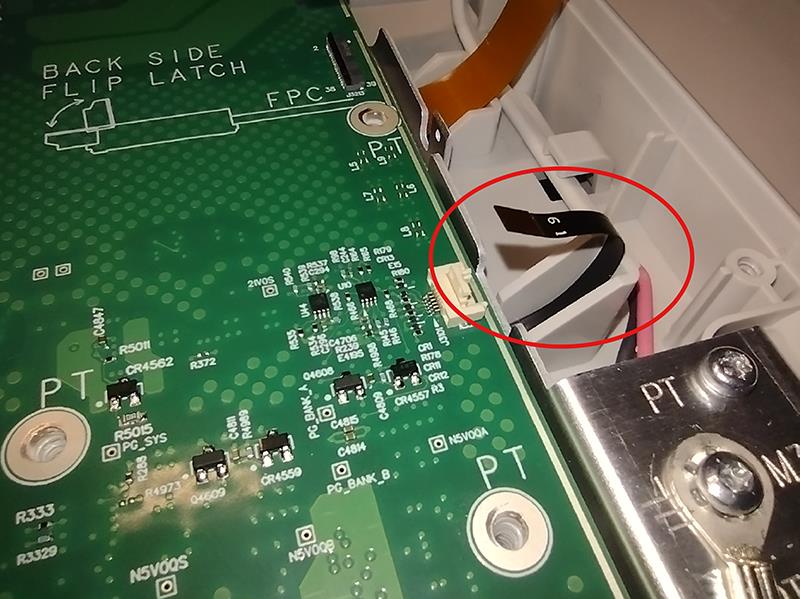
- Disconnect the touch screen cable from the Main board by flipping up the latch on the cable-side of the connector and sliding the cable out of the connector.
- Disconnect the front panel cable from the Main board by flipping up the latch on the cable-side of the connector and sliding the cable out of the connector. This cable includes hook features, so the cable must be lifted out of the connector while sliding it out.
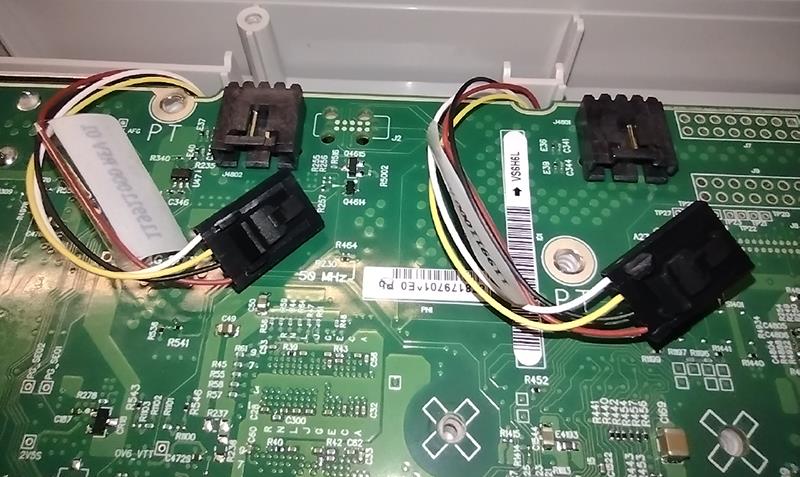
- Disconnect the two fan cables from the Main board by pressing on the tab on the connector and sliding the connector away from the board.
- Remove the 24 screws from the Main board.
- Slowly work around the edges of the Main board and lift the board straight out of the enclosure.
- Reattach the back cover using the PT thread forming screws from the instrument.
Repair charges
Replacement of damaged and missing hardware is charged according to the rate at the time of replacement.