Engineers across many industries use automation to extend the capabilities of their test instruments. Many engineers choose the free programming language Python to accomplish this. There are many significant advantages that make Python a great programming language for automation:
- Versatility
- Easy to teach and learn
- Code readability
- Widely available knowledge bases and modules
There are two main use cases for automation:
- Routines that mimic human behavior to automate the front panel and save time e.g., automated compliance testing. Rather than sitting down at the scope, adding appropriate measurements, and writing down the results every time you need to test a new part, the engineer develops a script that does all of that and displays the result.
- Uses that extend the functionality of the instrument; for example: measurement logging, validation, or quality assurance. Automation allows the engineer to execute complex tests without many of the downsides inherent to those tests. There’s no need for an operator to set up the scope and manually record the results, and the test can be performed the same way every time.
This how-to guide will cover what you need to get started programming scopes in Python, including the basics of programmatic interfaces and how to download and run an example.
What is a Programmatic Interface?
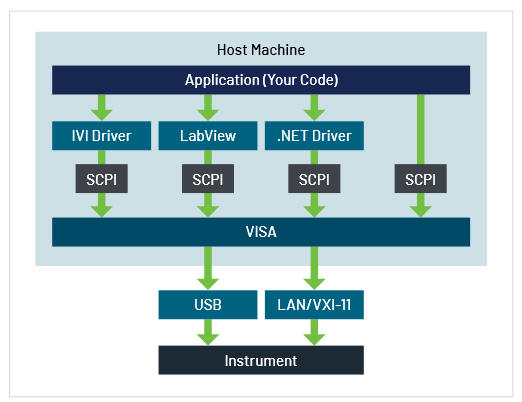
A programmatic interface (PI) is a boundary or set of boundaries between two computing systems that can be programmed to execute specific behaviors. For our purposes, it’s the bridge between the computer that runs every piece of Tektronix test equipment, and the application written by an end user. To narrow this even further, it is a set of commands that can be sent remotely to an instrument which then processes those commands and executes a corresponding task. The PI Stack (Figure 1) shows the flow of information from the host controller down to the instrument. The application code written by the end user defines the behavior of the target instrument. This is usually written in one of the development platforms popular in the industry such as Python, MATLAB, LabVIEW, C++, or C#. This application will send data using the Standard Commands for Programmable Instrumentation (SCPI) format, which is a standard supported by most test and measurement equipment. SCPI commands are often sent through a Virtual Instrument Software Architecture (VISA) layer, which is used to facilitate the transfer of data by including additional robustness (e.g., error checking) to the communication protocol. In some cases, applications may call a driver which will then send one or more SCPI commands to the VISA layer.
What is the tm_devices Package?
tm_devices is a device management package developed by Tektronix that includes a multitude of commands and functions to help users easily automate tests on Tektronix and Keithley products using the programming language Python. It can be used in the most popular IDEs for Python and supports code-completion aids. This package makes coding and test automation simple and easy for engineers with software skills of any level. Installation is also simple and uses pip, Python’s package-management system.
Setting up your Environment
This section will guide you through the prerequisites and installations to prepare you to do development work with tm_devices. It also includes instructions that support virtual environments in Python (venvs) to make your projects easier to manage and maintain, especially if you are just trying this package out before committing to its usage. Note: If you have an environment without direct access to the internet you will have to modify your steps using the commands in the appendix. If you are having problems feel free to post in the github discussions for assistance.
Installation and Prerequisites Overview
- Install Python
- Python ≥ 3.8
- PyCharm – PyCharm Installation, Starting a project, and tm_devices installation
- VSCode – VSCode Installation, Starting a project, and tm_devices installation
PyCharm Community (free) edition
PyCharm is a is a popular Python IDE used by software developers across all industries. PyCharm has an integrated unit tester which allows users to run tests by file, class, method, or all tests within a folder. Like most modern IDE’s it has a form of code completion that speeds up your development tremendously over a basic text editor.
We will walk through the installation PyCharm community edition (free), followed by installing tm_devices in the IDE and setting up a virtual environment to develop in.
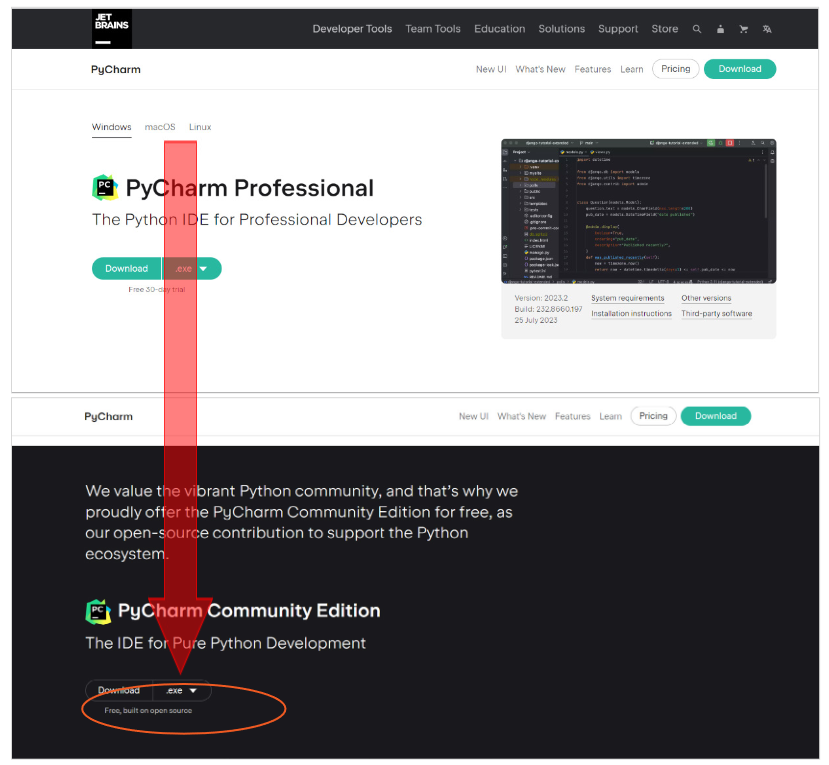
1. Go to https://www.jetbrains.com/pycharm/
2. Scroll past PyCharm Professional to PyCharm Community Edition, click download
3. You should be able to proceed with just the default installation steps. We do not require anything unique.
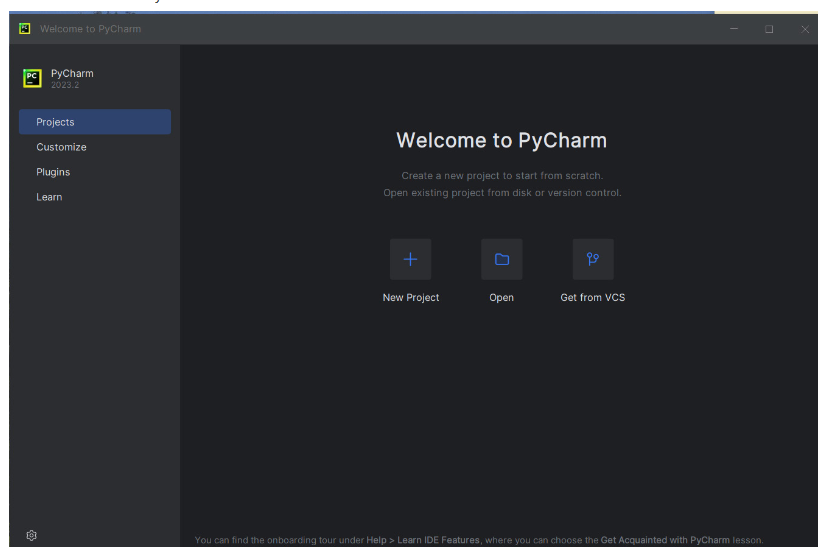
4. Welcome to PyCharm!
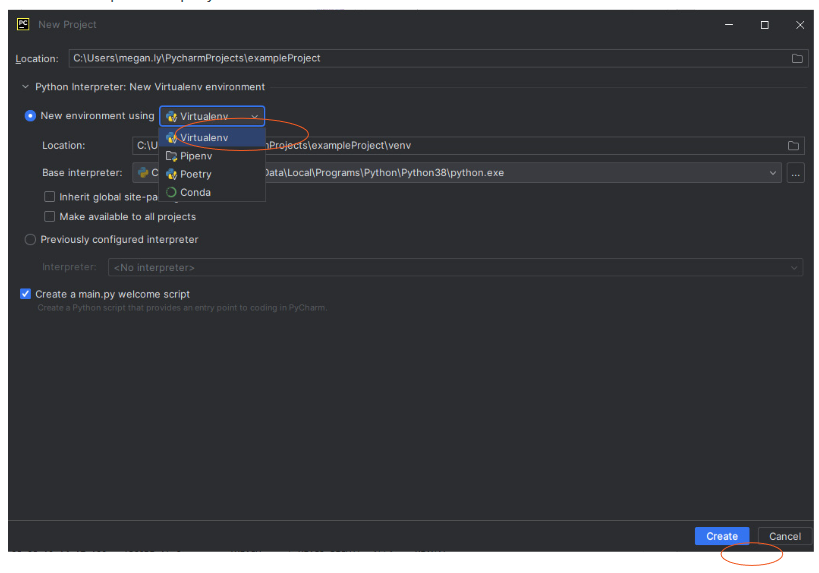
5. Now you will need to create a new project and make sure to set up a virtual environment. Click “New Project”
6. Confirm path for project, make sure “Virtualenv” is selected
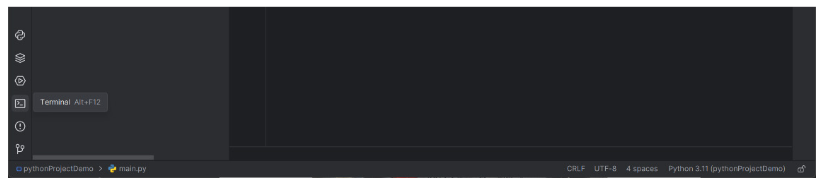
7. Open a terminal. If your view does not include the labeled button at the bottom look for this:
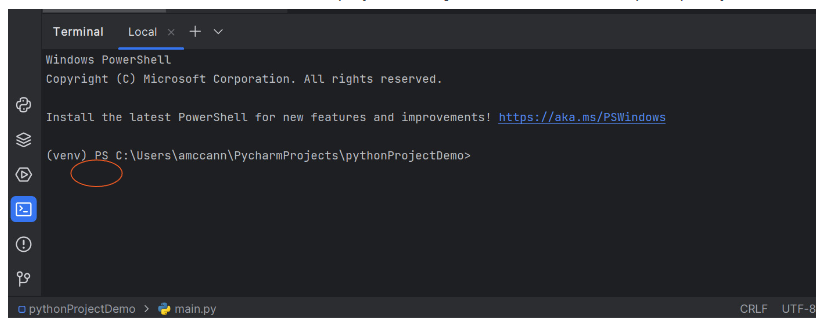
8. Confirm virtual environment is set up by checking for (venv) before the prompt in your terminal
9. Install driver from the terminal Type: pip install tm_devices
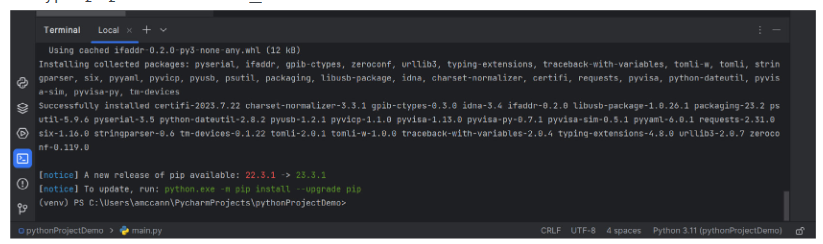
10. Your terminal should be error free! Happy hacking!
Visual Studio Code
Visual Studio Code is another popular free IDE that software developers across all industries use. It is great for most languages and has extensions for most languages that make coding in this IDE very convenient and efficient. Visual Studio Code provides IntelliSense which is an extremely useful tool when developing as it aids in code completion, parameter information, and other information regarding objects and classes. Conveniently, tm_devices supports code completion that describes the command tree of the objects and classes.
We have an excellent guide on the installation of both Python and Visual Studio Code, including information on virtual environment setup here.
Example Code
In this section we will step through pieces of a simple code example and highlight some necessary components to use tm_devices effectively.
Imports

These two lines are critical to the effective usage of tm_devices. In the first line we import the DeviceManager. This will handle the boilerplate connecting and disconnecting of multiple device classes.
In the second line we import a specific driver, in this case the MSO5B.
We setup a context manager with the DeviceManager:

And then when we use the device manager and driver together:

We can instantiate an instrument with a specific command set that matches its model. Just input your instrument’s IP address (other VISA addresses work as well).
With these four lines complete, we are able to start writing meaningful and specific automation for the MSO5B!
Code Snippets
Let’s take a look at a few simple actions -
Setting the Trigger type to Edge

Here’s how you would add and query a peak-to-peak measurement on CH1:

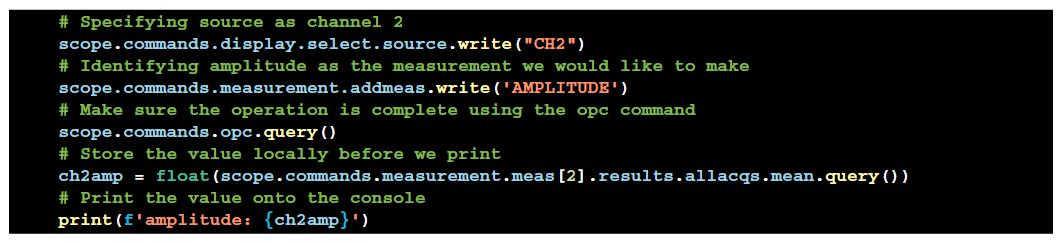
If you wanted to take an amplitude measurement on CH2:
Using IntelliSense/Code Completion
IntelliSense – Microsoft’s name for Code Completion is a very powerful feature of IDE’s we have tried to exploit as much as possible.
One of the core barriers to automation with test and measurement devices is the SCPI command set. It is a dated structure with syntax not widely supported in the development community.
What we have done with tm_devices is create a set of Python commands for each SCPI command. This allowed us to generate Python code from existing command syntax to avoid manual development of the drivers, as well as create a structure that is familiar to existing SCPI users. It also maps to the lower-level code that might require intentional debugging during your program creation. The structure of the Python commands mimics the SCPI (or in some Keithley cases TSP) commands structure so if you are familiar with SCPI you will be familiar with these.
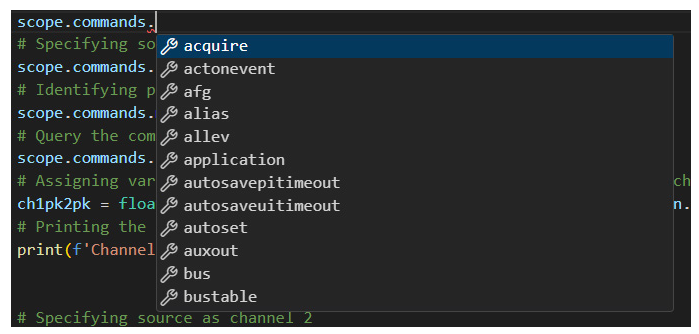
This is an example of how IntelliSense shows all the commands available with the previously typed command:
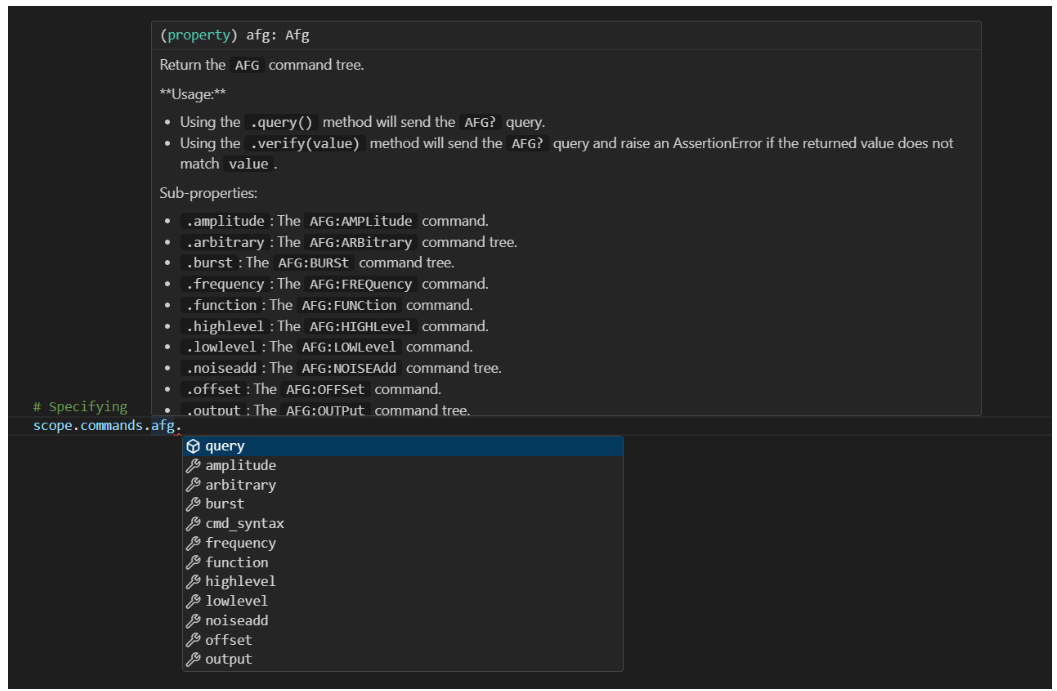
In the scrollable list that appears after the dot on scope we can see an alphabetical list of scope command categories:
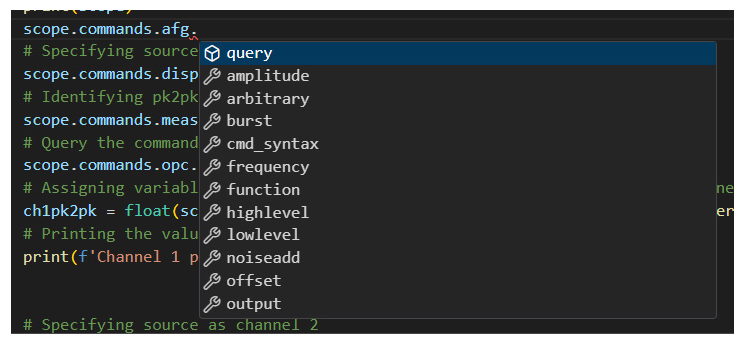
Choosing afg we are able to then see a list of AFG categories:
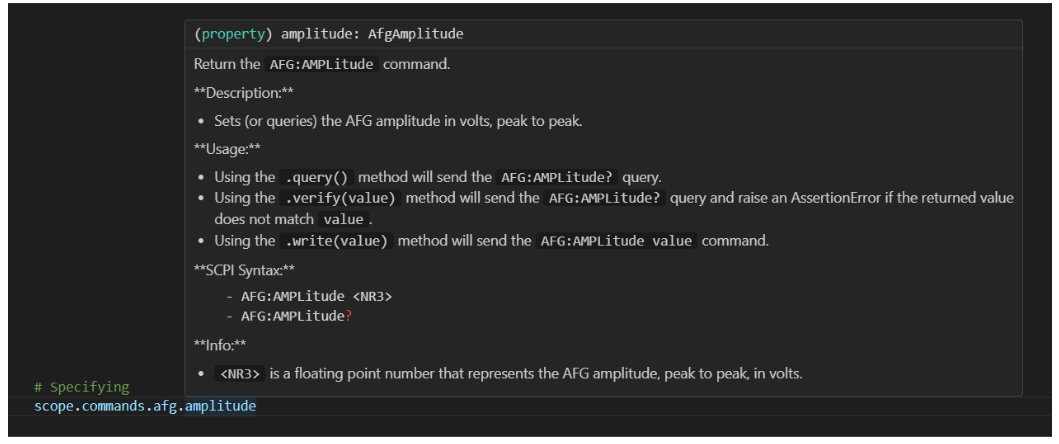
Final command written with the help of IntelliSense:

Docstring Help
As you code, or as you are reading someone else’s code, you can hover over different parts of the syntax to get that level’s specific help documentation. The closer you are to the full command syntax the more specific it will get.
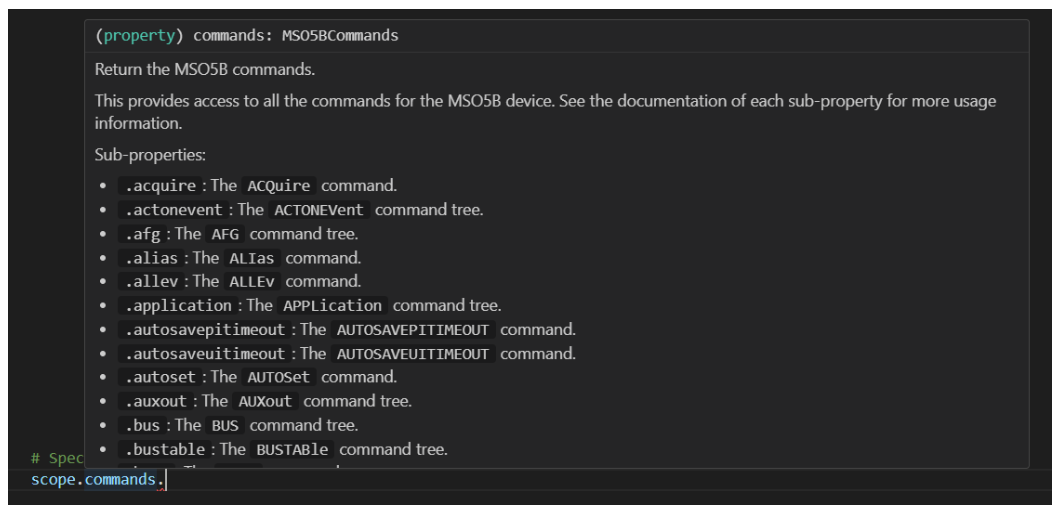
Depending on your IDE conditions you can display both IntelliSense and docstring help at the same time.
With this guide you have seen some of the benefits of Tek’s python driver package tm_devices and can start your automation journey. With the easy setup, code completion, and built-in help you will be able to learn without leaving your IDE, speed up your development time, and code with higher confidence.
There are contribution guidelines in the Github repo if you wish to improve the package. There are plenty of more advanced examples highlighted in the documentation and within the package contents in the Examples folder.
Extra Resources
tm_devices · PyPI – Package driver download and information
tm_devices Github - Source code, issue tracking, contribution
tm_devices Github - Online Documentation
Troubleshooting
Upgrading pip is usually a good first step to troubleshooting:
In your terminal type: Python.exe -m pip install -upgrade pip
Error: whl looks like a filename, but file does not exist OR .whl is not a supported wheel on this platform.

Solution: Pip installing wheel so that it recognizes the file format.
In your terminal type: pip install wheel
If you are needing to install wheel offline you can follow similar instructions as Appendix A, but it requires the tar.gz download instead of the .whl file.
Appendix A – Offline Installation of tm_devices
1. On a computer with internet, download the package along with all dependencies to the specified path location using:
pip download --dest <path to destination> wheel setuptools tm_devices
2. Copy the files to your computer that does not have internet access
3. Then, follow the instructions from the main guide for whichever IDE you are using but swap the install command for the following:
pip install --no-index --find-links <new path of files> tm_devices
Find more valuable resources at TEK.COM
Copyright © Tektronix. All rights reserved. Tektronix products are covered by U.S. and foreign patents, issued and pending. Information in this publication supersedes that in all previously published material. Specification and price change privileges reserved. TEKTRONIX and TEK are registered trademarks of Tektronix, Inc. All other trade names referenced are the service marks, trademarks or registered trademarks of their respective companies.
052124 46W-74037-1