Engineers across many industries use automation to extend the capabilities of their oscilloscopes, and many engineers are using Python. The free programming language Python has significant advantages for automation:
- Versatility
- Easy to teach and learn
- Code readability
- Widely available knowledge bases and modules
There are two main use cases for automation:
- Routines that mimic human behavior to automate the front panel and save time, e.g., automated compliance testing. Rather than sitting down at the scope, adding the appropriate measurements, and writing down the results every time you need to test a new part, the engineer develops a script that does all of that and displays the result.
- Uses that extend the functionality of the instrument, for example measurement logging, validation, or quality assurance. Automation allows the engineer to execute complex tests without many of the downsides inherent to those tests. There’s no need for an operator to set up the scope or manually record the results, and the test can be performed the same way every time.
This technical brief will cover what you need to get started programming scopes in Python, including the basics of programmatic interfaces and how to download and run an example.
What Is a Programmatic Interface?
A programmatic interface (PI) is a boundary or set of boundaries between two computing systems that can be programmed to execute specific behaviors. For our purposes, it’s the bridge between the computer that runs in every piece of Tektronix test equipment and the application written by the end user. To narrow this even further, it is a set of commands that can be sent remotely to an oscilloscope and the system on that oscilloscope that processes and executes them.
The PI Stack (Figure 1) shows the flow of information from the host controller down to the instrument. The application code written by the end user defines the behavior of the target instrument. This is usually written in one of the development platforms popular in the industry, such as Python, MATLAB, LabVIEW, C++, or C#.
This application will send SCPI commands, which are the standard format for almost all test and measurement equipment, to the VISA layer. In some cases, the application will call a driver, which will then send one or more SCPI commands to the VISA layer.
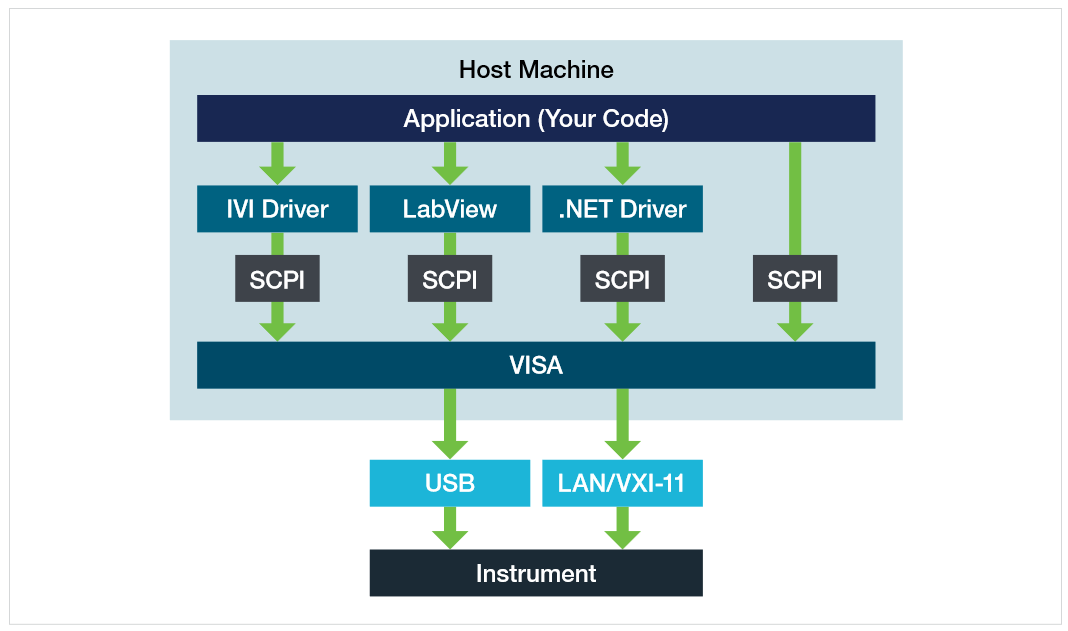
The VISA layer negotiates the connection with the instrument over either the USB or LAN interface. VISA opens and closes the remote session with the instrument, writes and reads data on the bus, and maintains the health of the connection with synchronization, flushing and other miscellaneous functions. This layer abstracts a lot of the technical minutia required for communication, like resource addresses and buffer management.
The instrument will then read and write information directly on the USB or LAN interface. Depending on what commands are issued, it may change settings in the scope application or provide the response to a query.
All of the systems above the physical communication interface are also mirrored in the scope, but we can consider it a "black box" since we can’t modify those systems. Each major instrument vendor provides an implementation of the VISA standard to use with their products. All of the basic functionality is included in the standard requirements, so any vendor's VISA should work well enough to control an instrument.
How to Get Started with Automation
To get started quickly, you should install a few development tools on your PC:
- Install NI VISA:
- Download the installer from National Instruments. The URL is subject to change, but the installer can be found by searching "NI VISA."
- Use the default settings.
- Install Python:
- Download the installer from https://www.python.org/.
- Install Python using "Install Now" and enable "Add Python 3.x to PATH" - this will make it easier to install modules.
- Install pyvisa:
- Open Windows cmd (command line)
- Press Win+R to open Run
- Type "py -m pip install pyvisa"
Downloading and Running an Example
To demonstrate running a Python program, we are using a file on the Tektronix GitHub page at https://github.com/tektronix/Programmatic-Control-Examples under Oscilloscopes – Touchscreen Oscilloscopes & High Speed Digitizers. The program is called SimplePlotExample.
- Pull the file from GitHub. One way is to open the source code then right-click Raw and choose, "Save link as".
- Open IDLE (the default Python editor) and open the file that was just saved. IDLE will open up the text editor, which shows the code.
- Run the code to see what happens. There are two ways to do so in IDLE: click Run->Run Module or simply press F5 on the keyboard. The screen in Figure 3 shows that there is a problem with the code.

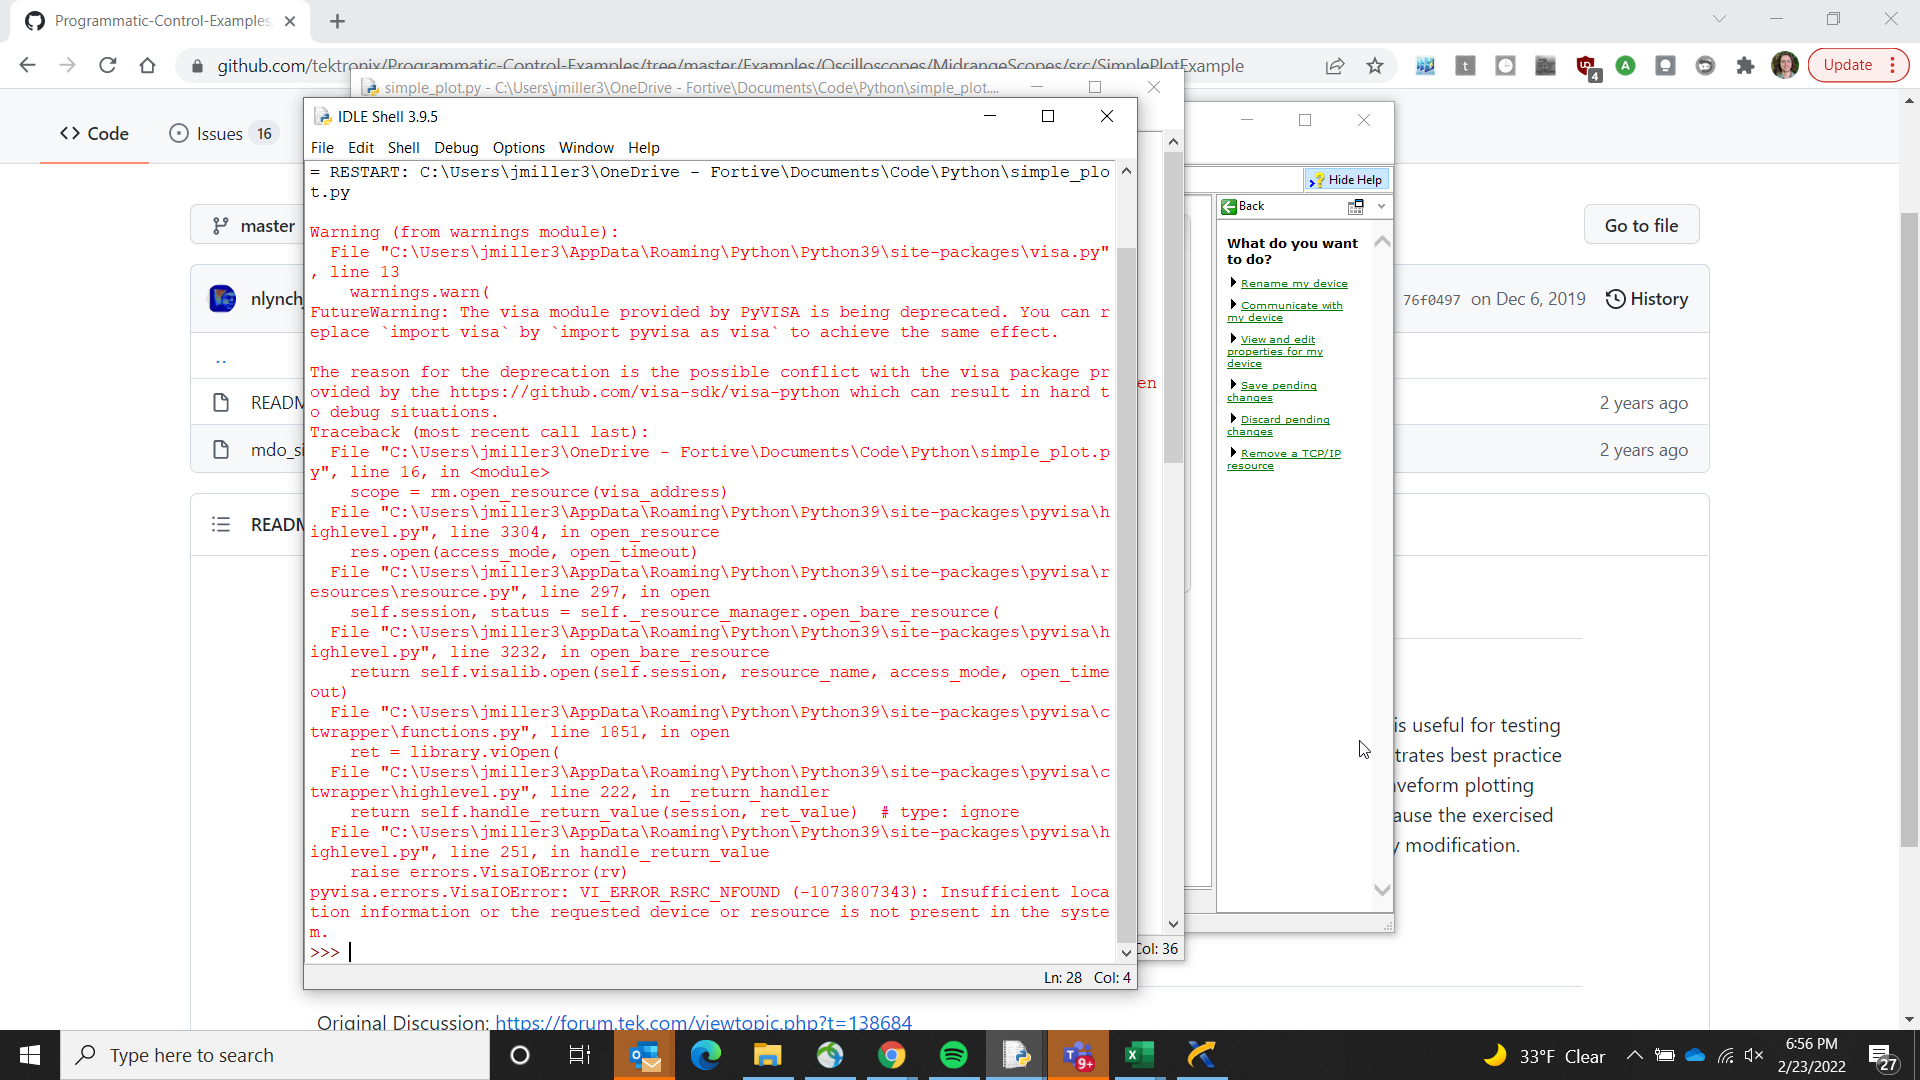
The first thing to do when using any example script is to look at the VISA address, which is the network name that tells VISA where to find the instrument. This example code specifies a USB address, which means the user would need to have the exact same oscilloscope connected to his or her PC as the author of this script did when it was written and published it to GitHub.
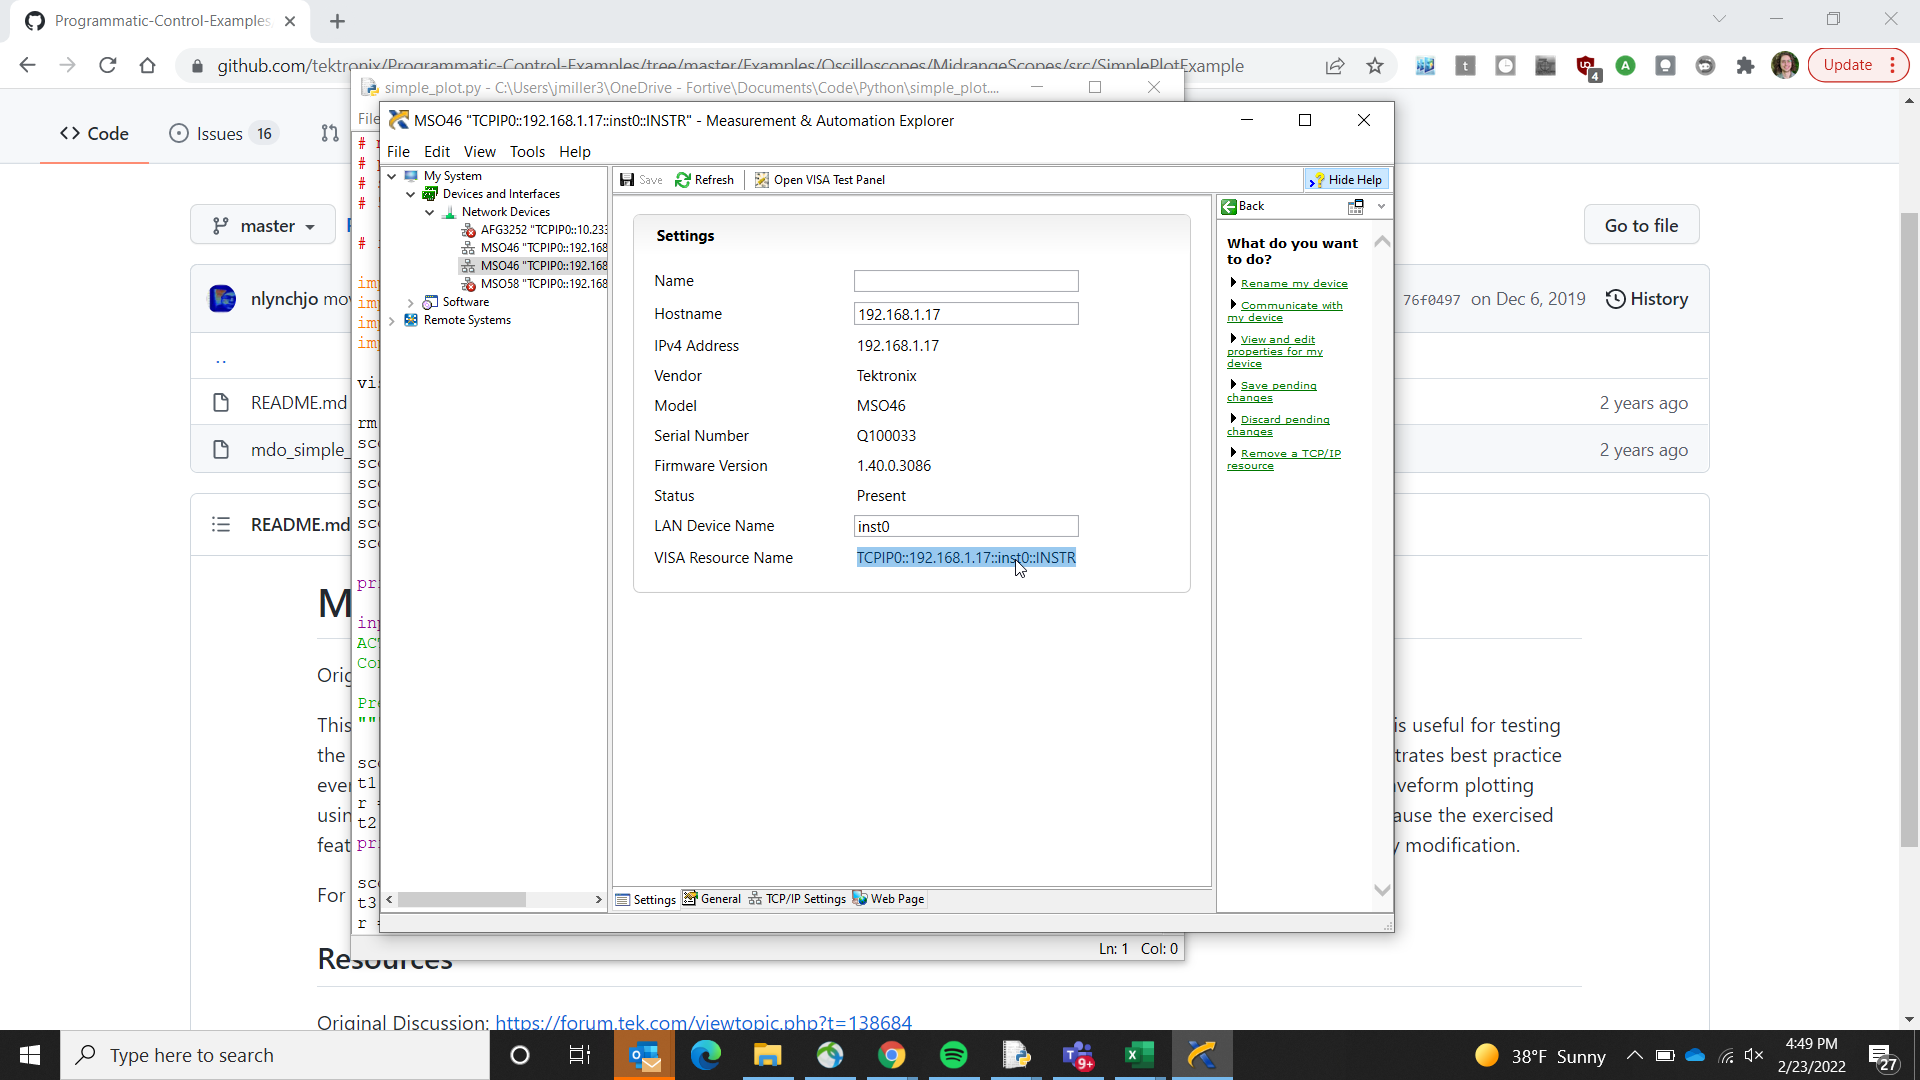
To correct the VISA address, open NI MAX, which was installed as part of NI-VISA. NI MAX will allow the user to connect to oscilloscopes, troubleshoot those connections, and send single individual commands as needed.
For this example, we are using a LAN connection. In Figure 4, you can see any oscilloscopes on the network in the tree structure on the left. The instrument at address 192.168.1.17 is a 4 Series Mixed Signal Oscilloscope, which will be used as an example for this technical brief. (You will see a different address for a different oscilloscope on your network.)
Take the VISA resource name from NI-VISA and paste it into the program, then run the code again.
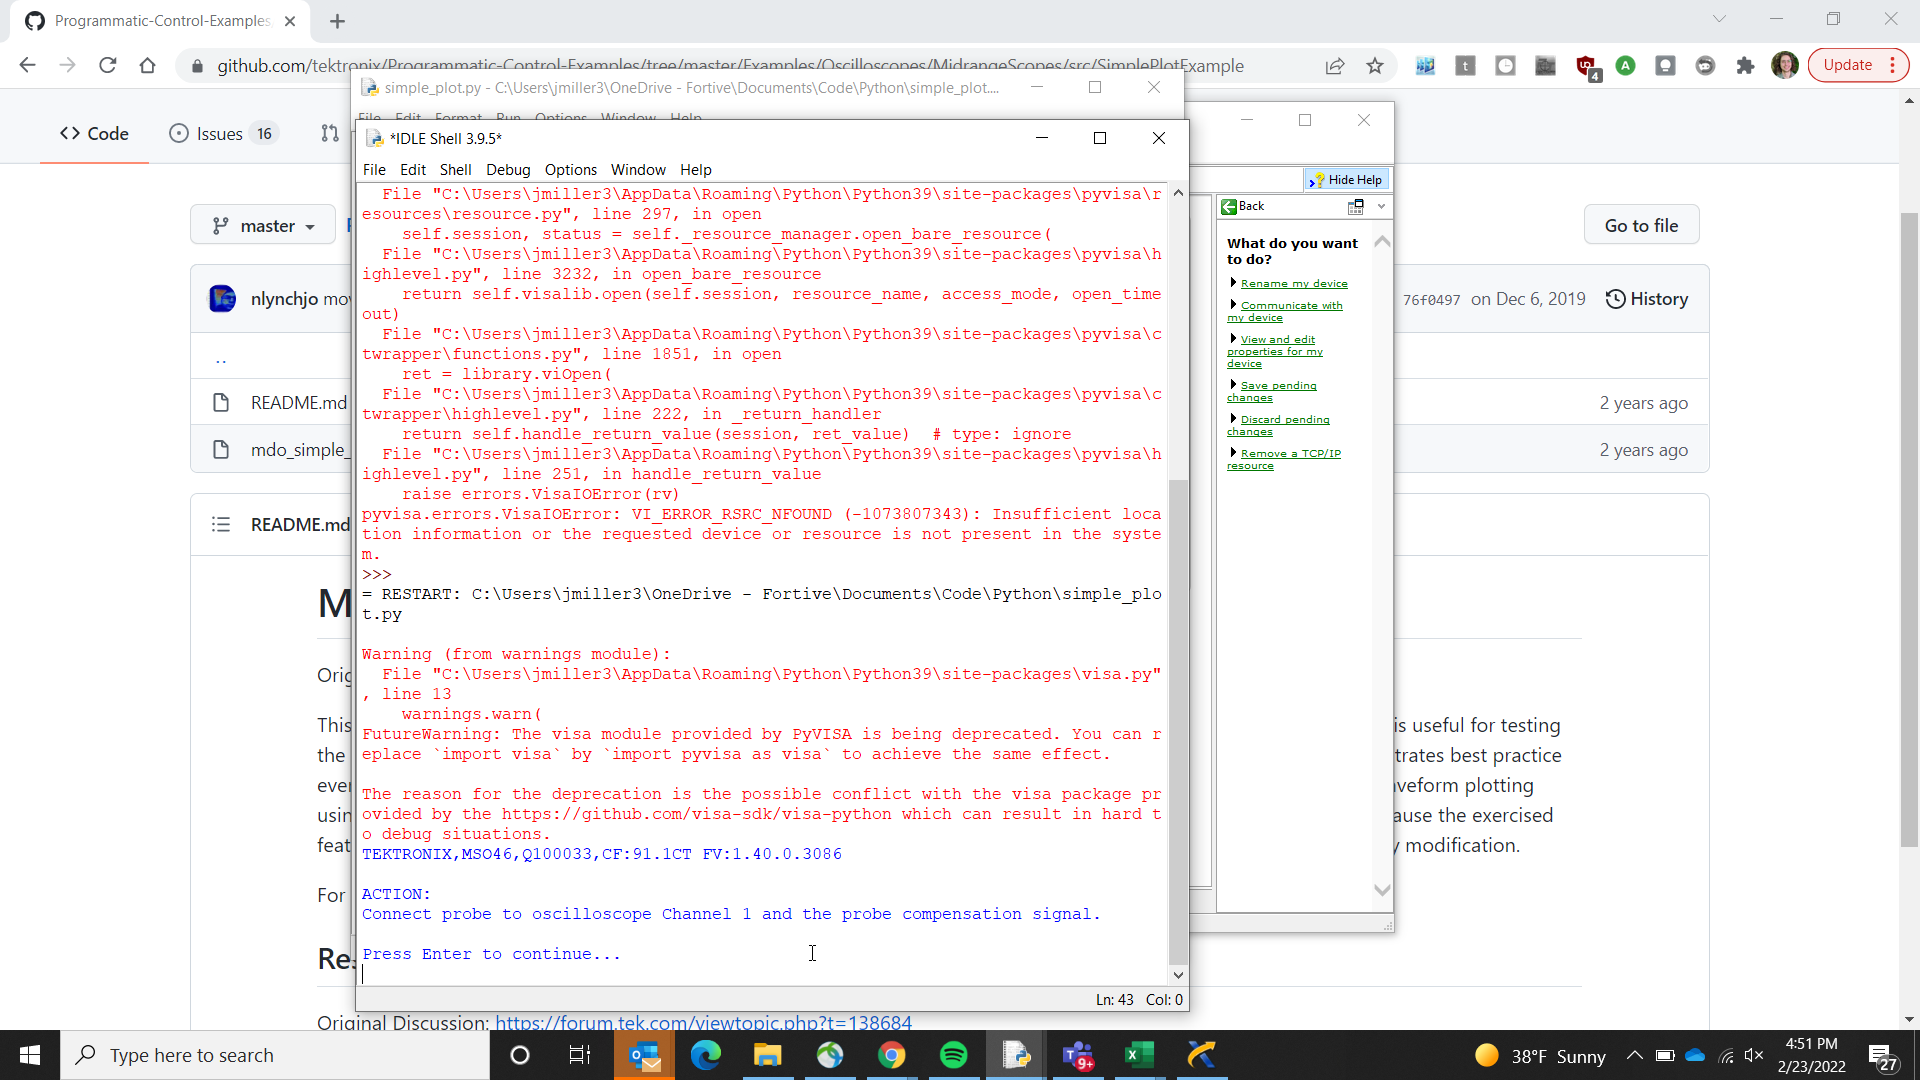
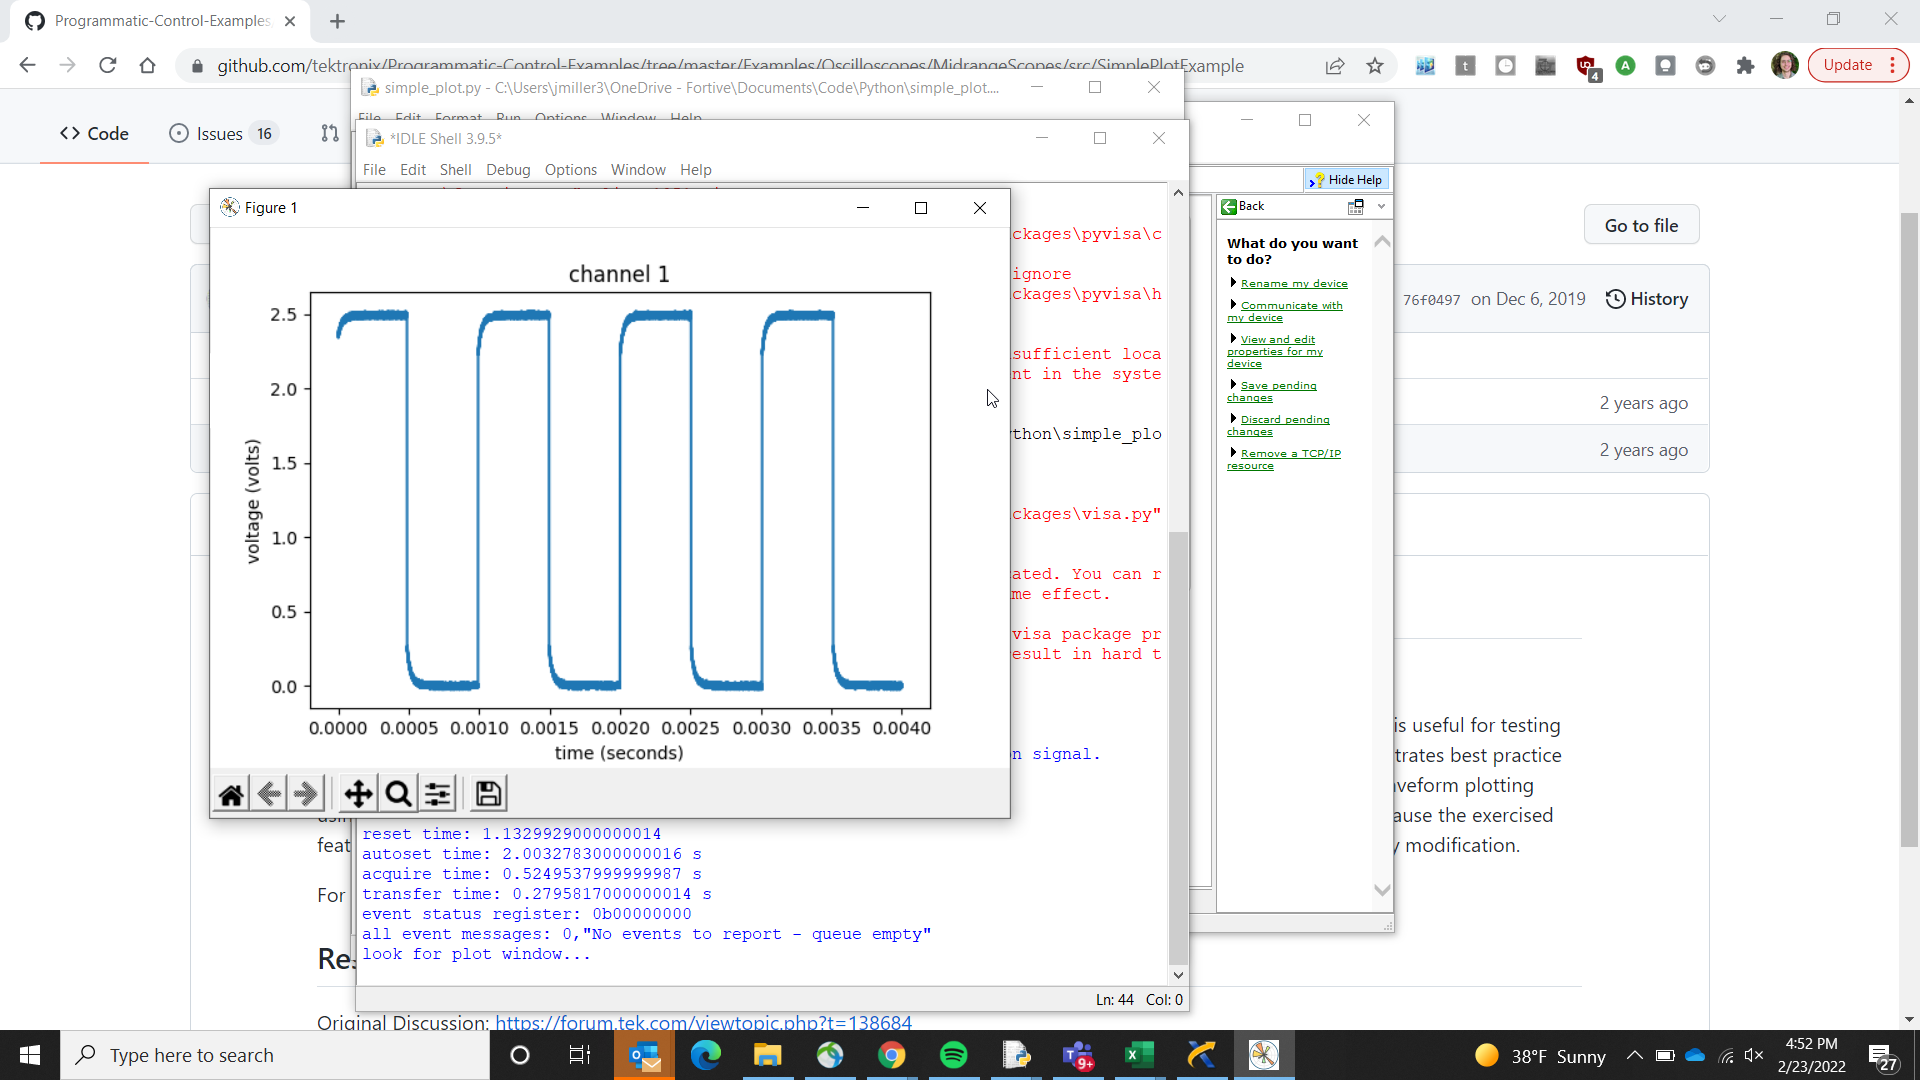
The example code now runs correctly. It pauses for a moment to ask the user to install a probe on Channel 1 and connect it to the probe compensation signal on the oscilloscope.
After connecting the probe, hit Enter to continue. This results in a scope trace on the PC.
Key Python SCPI Commands for Scope Automation
Standard Commands for Programmable Instruments (SCPI) instructions are used to change settings and get measurements from instruments. A versatile instrument, such as an oscilloscope, may support hundreds of commands. The general syntax of SCPI commands is very similar among various manufacturers and instruments, making it easier to communicate with different instruments. Most SCPI commands have a “set” form for changing settings, and a "query" form for getting information back from the instrument. The precise syntax for a given instrument is typically documented in a Programmer Manual, which is generally available on the instrument manufacturer’s website. The programmatic interface manual for the 4, 5 and 6 Series MSOs is a good example.
A comprehensive description of SCPI commands is beyond the scope of this technical brief, but there are several commands that you should get to know right away:
- IDN?: Tells you what instrument is connected and provides a handshake and sanity check.
- OPC?: A synchronization command that returns only when operations are complete.
- ESR?: Tells you there is an error. This must be sent before ALLEV?.
- ALLEV?: Explains the error.
Taking the Next Steps
It is common for developers to copy and paste code from examples; this not only saves time but also helps them learn along the way. Browse the code examples on the Tektronix Github for finished solutions and inspiration!
Python is one of the preferred software environments to use automation to extend the capabilities of an oscilloscope due to the portability, ease of use and scalability it offers. If you have repetitive or complex tasks to perform with your oscilloscope, using Python and starting with pre-written example programs can provide a quick path to a solution.
Find more valuable resources at TEK.COM
Copyright © Tektronix. All rights reserved. Tektronix products are covered by U.S. and foreign patents, issued and pending. Information in this publication supersedes that in all previously published material. Specification and price change privileges reserved. TEKTRONIX and TEK are registered trademarks of Tektronix, Inc. All other trade names referenced are the service marks, trademarks or registered trademarks of their respective companies.
031622 48W-73878-0