Temperature measurement is vital in many processes, during product development, in safety systems and a host of other applications. For the majority of these applications, a temperature sensor in contact with a solid surface, or immersed in a fluid, can be used. The most commonly used contact sensors are thermistors, thermocouples, and RTDs (resistance temperature detectors).
An RTD frequently is the sensor of choice when sensitivity and application flexibility are the most important application criteria. They can be manufactured in a variety of configurations and used for measurements covering a wide temperature range. When a 100ohms RTD is properly excited (~1mA), it will produce a 400 µV/°C signal, which is 10 times greater sensitivity than a K thermocouple.
Although RTD sensors themselves are expensive compared to thermistors and thermocouples, the total temperature measurement system cost is moderate. Thermocouples measure relative temperatures and therefore require reference junctions and circuits, whereas thermistors and RTDs can measure absolute temperatures in a more direct manner. An RTD system may actually cost less than a thermocouple system because it produces a higher level signal and does not require a reference. Besides the sensors, important criteria for instrument selection and system design include measurement circuits, instrument and test system hardware, and various accuracy issues.
RTD Basics
The RTD's operating principle is based on an increase in resistance as temperature increases. Most commonly, RTDs are made from platinum, nickel and copper, all of which have a temperature coefficient (TC) of resistivity around 0.4%/°C. Platinum is the most versatile material because of its wide temperature range (-200°C to 850°C), excellent reproducibility, long-term stability, and resistance to chemicals and corrosion. The nominal or base resistance of an RTD determines its absolute change in resistance with a change in temperature, i.e., its overall sensitivity. Platinum RTDs typically are available in 100, 200, 500 and 1000ohms nominal resistance values at 0°C. Another consideration in selecting an RTD is its physical construction. The two most common designs for platinum RTDs are wirewound and a thin film serpentine structure. Wirewound RTDs are constructed with a specified length of precision wire wound into a coil on a cylindrical ceramic, glass or mica insulator. Thin film serpentine structures are laid down on the surface of a ceramic insulator and then laser trimmed to the desired base resistance value. Both types are built into probes and other packaging styles.
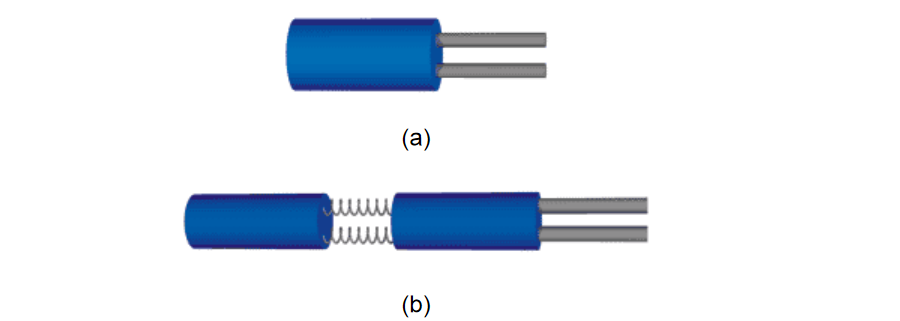
Figure 1..Platinum RTDs come in (a) thin film designs and (b) wirewound. Both can be mounted in probes and other packaging styles. Thin film units are more rugged than wirewound units, and are faster to respond to temperature changes. Moreover, thin film units are less expensive than wirewounds because the amount of platinum used is far less. However, their temperature range is not as great as wirewound units. Also, the excitation current usually is lower for thin film units because they are more sensitive to self heating, which may lower somewhat the measurable output signal and accuracy. (However, self heated RTDs are sometimes used as hot-wire anemometers.)
Measurement Circuits
RTDs are inherently 2-wire devices. A 2-wire measurement has the RTD as one leg of a resistance bridge circuit with a DC source supplying excitation current to the RTD. Voltage across the bridge is measured and resistance calculated as R=V/I. The calculated result includes the resistance of the test leads as well as the RTD resistance, which significantly reduces accuracy. This has led to the development of more accurate 3-wire and 4-wire measurement techniques.
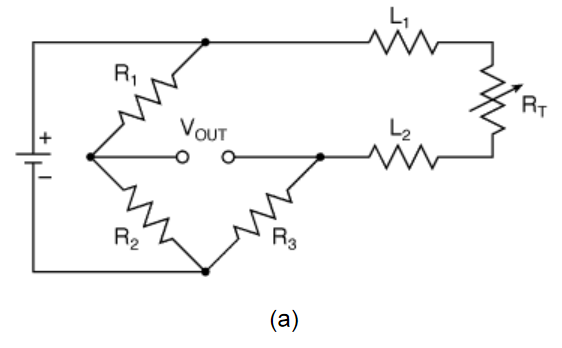
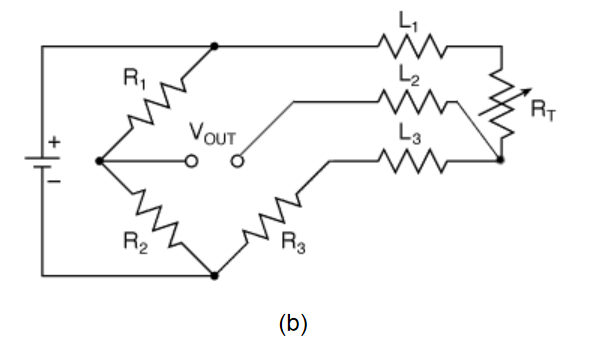
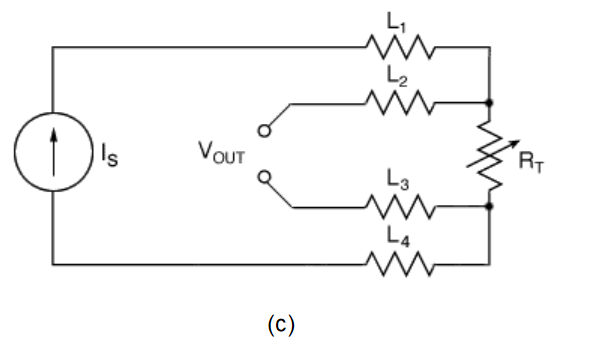
Figure 2.The 2-wire RTD measurement circuit (a) is the least expensive; the 3- wire circuit (b) provides better accuracy, especially for long lead runs; the 4-wire circuit (c) has the best accuracy
A 4-wire, or Kelvin, measurement uses one pair of leads to supply excitation current to the RTD and a second set of instrument leads to measure voltage directly across the RTD. Combined with an instrument having high input impedance, 4-wire measurements minimize lead voltage drop and provide the greatest accuracy. This is technique of choice in research labs and other sensitive applications.
The 3-wire technique is useful when there is significant distance between the sensor and the instrument. A bridge circuit is utilized with an instrument that has a high-impedance DC op-amp input circuit. The third wire is connected between one end of the RTD and the HI SENSE terminal of the instrument. This insures that little or no current flows through that lead, so its resistance is not much of a factor in the measurement. By using equal wire lengths and diameters for the other two leads, their voltage drops cancel out. While not as accurate as the 4- wire method, the 3-wire technique provides acceptable accuracy in many industrial applications, and simplifies wiring since only three-wire cables are needed.
Instrumentation
Instrumentation for RTD measurements includes dedicated temperature meters, digital multimeters (DMMs), source-measurement units (SMUs), miniaturized network instruments and data acquisition systems. A dedicated temperature meter is suitable when only temperature measurements are needed in a test setup and there are a limited number of RTDs involved. The same is true of miniaturized instruments. However, in both cases, multiple instruments may be networked to a host PC.
DMMs allow not only temperature measurements but also AC and DC voltage and current, ohms, frequency counting, diode testing, etc. They can be equipped with scanner cards that have up to 20 inputs channels, which can accommodate a different variable on each channel or multiple RTDs with different nominal resistance values. Also, Kelvin measurements are usually easy to make since many DMMs have both source and sense terminals that allow 4-wire test configurations.
An SMU provides a tightly integrated, precision power source and measuring instrument for automatic computer controlled testing. When used with a switching matrix and PC, hundreds of RTD outputs (and other signals) can be measured in a matter of minutes. This type of instrument is not normally used for simply monitoring temperatures. However, the flexibility of multiple sourcing levels and easy monitoring of self-heating effects, makes an SMU ideal for characterizing RTDs in a manufacturing environment.
A PC-based data acquisition system also allows a large number of sensors. Depending on data acquisition board design, its measurement precision and sensitivity may be somewhat lower than a benchtop DMM or SMU. A miniaturized network instrument is a hybrid device that has the accuracy of a benchtop instrument, typically allows four to eight RTD inputs and is connected to a host PC for data display and analysis.
RTD and Instrumentation Accuracy
Several accuracy issues must be considered when making temperature measurements with an RTD. The principal ones are:
- The measurement circuit (discussed earlier)
- The RTD itself, including a certain amount of nonlinearity
- Calibration
- Inherent instrument accuracy
- Transmitters vs. hard-wired RTD connections
- RTD contact mounting
First, we need to distinguish the difference between accuracy, repeatability and precision. Accuracy is defined as how well the complete instrumentation system indicates the true temperature being measured. RTD sensor accuracy refers to how closely its resistance matches that of a standard RTD's tabulated or calculated value at the given temperature. Repeatability is the system's ability to reproduce the same reading when successive measurements are made at the same temperature. For the sensor itself, repeatability is a function of the RTD's stability. Precision is a more qualitative term. Among a group a RTDs, precision is how well their resistance-temperature curves match. The degree of mismatch defines the level of uncertainty in temperatures measured by those sensors. Clearly, an RTD's transfer function, or resistance-temperature curve, is a key parameter in making accurate, repeatable measurements. The transfer function of an RTD is not perfectly linear. For example, a platinum RTD with a nominal TC of 0.385%/°C varies from 0.44 at -200°C to 0.29 at +850°C. If your measurement range is narrow enough, you may be able to ignore this nonlinearity. Over the range of 0-100°C, using a constant value of 0.385 (i.e., a linear transfer function) results in about ±0.5 to 1°C accuracy.
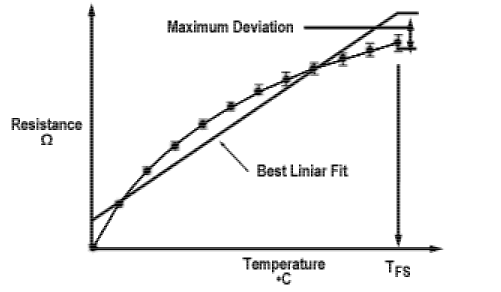
Figure 3.A platinum RTD transfer function is not perfectly linear. For precise measurements, the Callendar-Van Dusen equation is used to calculate temperature based on measured resistance, instead of relying on a best linear fit to the R-T curve. (See text.)
For broader temperature ranges and precision work, there is a standard polynomial conversion formula that can be easily implemented in software. Called the Callendar-Van Dusen equation, this is a 4th order polynomial that can be expressed as:
RT = R0 + R0α[T - δ(T/100 - 1)(T/100) - β(T/100 - 1)(T/100)3]
where R0 = resistance at 0°C, and RT = resistance at temperature T. For T>0°C, the b term can be ignored and the equation becomes quadratic. Callendar-Van Dusen constants and the R0 value normally are supplied by the manufacturer with each RTD. Typical constants are listed in Table 1.
Typical Callendar Van Dusen Constants for Platinum RTDs
| Alpha | .00375 | .00385 | .00392 |
| Delta | 1.605 | 1.4999 | 1.52 |
| Beta | 0.16 | 0.10863 | 0.11 |
Source: Honeywell HyCal Sensing Products
For temperature measurements, many DMMs include RTD conversion curves using nominal alpha values for the most common types of RTDs, which may be programmed into the DMM by the manufacturer and not easy to change. Some higher-end DMMs allow the user to set the actual R0, Alpha, and Beta values for specific RTDs. If you have a DMM that lets you enter scaling factors of the form (mx + b), you can enter your own value of alpha and R0 (m = a, b = R0), which calibrates for both zero offset and full scale. This works well for the range 0- 100°C.
For higher order polynomial conversions, a PC facilitates temperature calculations, particularly when using instruments without built-in conversion routines. For DMMs and SMUs, this typically means connecting the instruments and PC on an external GPIB bus, programming with the Standard Commands for Programmable Instruments (SCPI) and writing simple routines in C, Visual Basic or another language supported by the instrument. These routines may also be required for PC-based data acquisition systems, depending on the software used. An instrument must also be calibrated for R0 with a fixed calibration resistor traceable to NIST. When calibrated, inherent instrument accuracy will seldom be an issue. For example, benchtop DMMs are available for less than $1000 with 6- 1/2-digit resolution and measurement uncertainty of less than ±100ppm on the 1000ohms scale. This allows measurement of temperature changes as small as 0.01°C, with absolute accuracy of about ±0.15°C for the RTD's full temperature range, even at the upper end near 850°C.
For example, a 100ohms RTD will have a resistance of 390.26ohms at 850°C. Ideally, a 6-1/2-digit DMM would read this as 390.260ohms. The resistance and DMM reading changes 0.290ohms/°C, or 0.003ohms per 0.01°C. Therefore, a 0.01°C change typically is observable as a three-count change in the DMM display. If the DMM has an accuracy of ±80ppm of reading and ±10ppm of range, then the absolute accuracy of the resistance reading is ±(80ppm x 390 + 10ppm x 1000) or ±0.041ohms, which translates into about ±0.13°C uncertainty.
Other Accuracy Issues
The accuracy of a well calibrated RTD and instrument can be nullified by poor mounting techniques or connections. Proper mounting ensures that the sensor's temperature and its output signal reflects that of the object or fluid being measured. The integrity of that signal must be maintained between the RTD and the instrument.
One method of getting the sensor signal to the instrument is by hard-wired direct connection. This is acceptable if the wire runs are short, the environment is not electrically noisy, and accuracy requirements are not high. (See earlier discussion of 3-wire and 4-wire measurement circuits.)
For better signal integrity over greater distances, an RTD temperature transmitter can be used. Conditioning the basic RTD signal near the measurement point reduces the chances it will be degraded by noise pickup or a ground loop, and provides voltage isolation to protect the measurement equipment. There are even miniaturized instruments available that provide fully conditioned RTD signals and a data communication interface to connect the signals to a host computer for data logging and analysis. In the case of transmitters with 4-20mA or 1-10V outputs, zero and span controls must be properly adjusted to maintain the accuracy of the RTD signal.
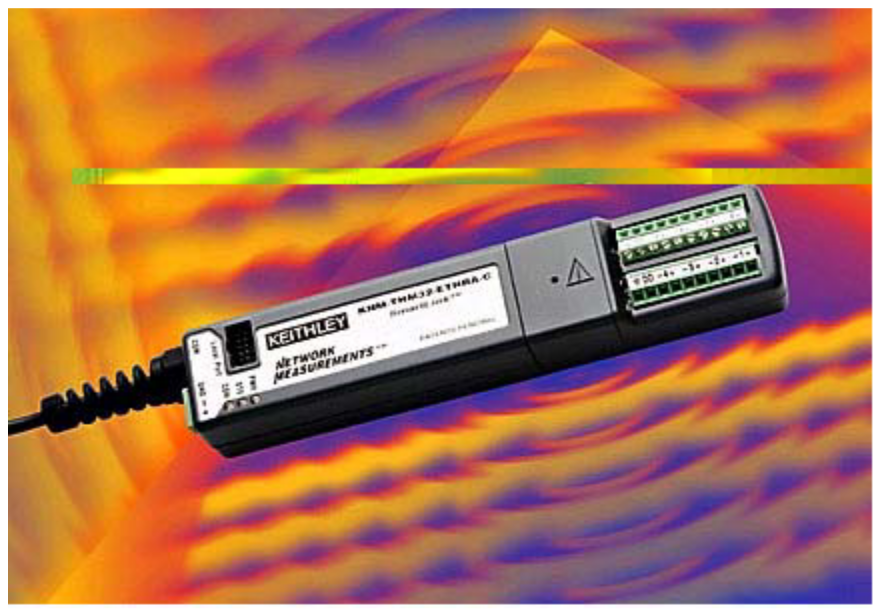
Figure 4. Miniaturized network instruments are now available that can be located only inches away from RTDs, providing precision measurements and fully processed signals for transmission over noise immune communication links. It also is challenging to ensure that an RTD measures the desired temperature. For contact measurements, the most important steps are: Minimize thermal resistance between the sensor and the surface. This requires intimate contact and may also require the use of thermal cement or grease. Thermal transfer also takes place through the sensor leads, so they should also be at the same temperature as the object being measured. Insulate the sensor from other thermal influences. For example, isolate a surface sensor from convection currents in the surrounding air. Minimize heat conduction errors. Eliminate any mass between the sensor and the measurement site. This is especially important if the mass is a metal or other high conductivity material in contact with a temperature different than that being measured.
Use a sensor with metal packaging, as opposed to plastic. Besides a reduction in thermal resistance, this provides a faster response time. In gas stream measurements, avoid stratification problems. If the gas flow does not provide turbulent mixing, multiple probes may be required at different locations in the stream. Individual readings can be recorded or averaged, as appropriate to the application.
Many RTD and instrument manufacturers have expert application staffs to help resolve these difficulties. Their web sites also provide instant information in the form of answers to frequently asked questions and free measurement software.

