By Andrew Kirby
Making simple electrical measurements is something that every engineer is familiar with. These measurements are the usual: current, voltage, and resistance. In a typical benchtop setting, these measurements are made one at a time, using the front panel of a given instrument. The knobs of the power supply are turned to the appropriate voltage, the current limit is set, the DMM is carefully clipped onto the circuit, and the value is the jotted down in a notebook or typed into a spreadsheet for later analysis. If a new measurement is needed, each component must be adjusted manually, this takes time, but if you’re only doing it a handful of times, it isn’t too bad.
Further on in your career though, whether that be industry, academia, or otherwise, benchtop measurements are not the only thing test and measure equipment is used for. At this level, it becomes important to make lots of measurements on various parameters, sometimes at regular intervals over a long period of time. Or maybe, in a production line setting, verification testing on each unit coming through a line, as they come through the line. In this application, it is important to not slow down the line too much by keeping up a high level of throughput. Obviously, we can’t use our same strategy of manually hooking up each unit, adjusting the necessary knobs, looking up at the reading on the front panel, then writing the reading down in a notebook. We need to automate this, but how?
Luckily, those same benchtop instruments have hidden functionality. It’s easy to think of them as isolated units, cut off from each other and from the rest of the world. To a freshly minted engineer, these instruments are only their front control panels, but, if you turn the instrument around, you’ll likely find an array of various communication ports, hidden away on the rear panel. To automate our measurements, we will need to use some of those. Connecting a USB cable, LAN cable, GPIB cable, or anything else all accomplish the task of setting up a pathway for a separate computer to communicate with an instrument.
The next thing we need is a way to remotely and automatically press all the buttons we need to press to get the instrument to do what we need it to do at any given moment; we need a command set: something to call to command the instrument to do a certain thing. Changing the function to voltage, setting the range, taking a measurement, clearing a reading buffer, these are all examples of actions that can be done by a command set. One such command set is the Standard Commands for Programmable Instruments, or SCPI (pronounced “Skippy”). Keithley Instruments’ solution to this is the Test Script Processor (TSP) command set. At a base level, these two sets function in the same way, and many Keithley products support both sets. However, TSP offers some additional functionality such as built in control structures and the ability to run the whole thing from the instrument, without needing to continually communicate to a controlling computer, but we’ll talk about that in a bit. So, think of the commands in a command set like virtual button pushes, only much more useful.

Of course, simply sending commands from a computer is no better than pushing the buttons on the front panel unless the computer can do it all automatically. We need some sort of control structure to force these commands to execute when and how we want them to. For example, if some condition is met, like a temperature reading goes above a certain point, we want the instrument to make 1000 readings, each 100 milliseconds apart. How could we do something like this? We could use a separate programming language to handle all the logic, sending commands from our chosen command set when this separate language decides. If we’ve chosen TSP as our command set, we can use the fact that TSP is a Turing complete programming language itself and write a script with commands and logic without using any other programming language. Since this script doesn’t rely on a separate programming language, we can even load it directly on the instrument itself and run our whole test without using a controlling computer. For our chosen task, we can use “if” and “for” statements to write the logic we want, saving us from having to develop some impressive manual dexterity and patience. Pretty cool, right?
The commands are our hands pressing the buttons and the program is our brain knowing the process to follow to make all our measurements. TSP is a very powerful tool in instrument automation and testing. To prove it, I’m going to scale up a typical benchtop measurement to an industry level test.
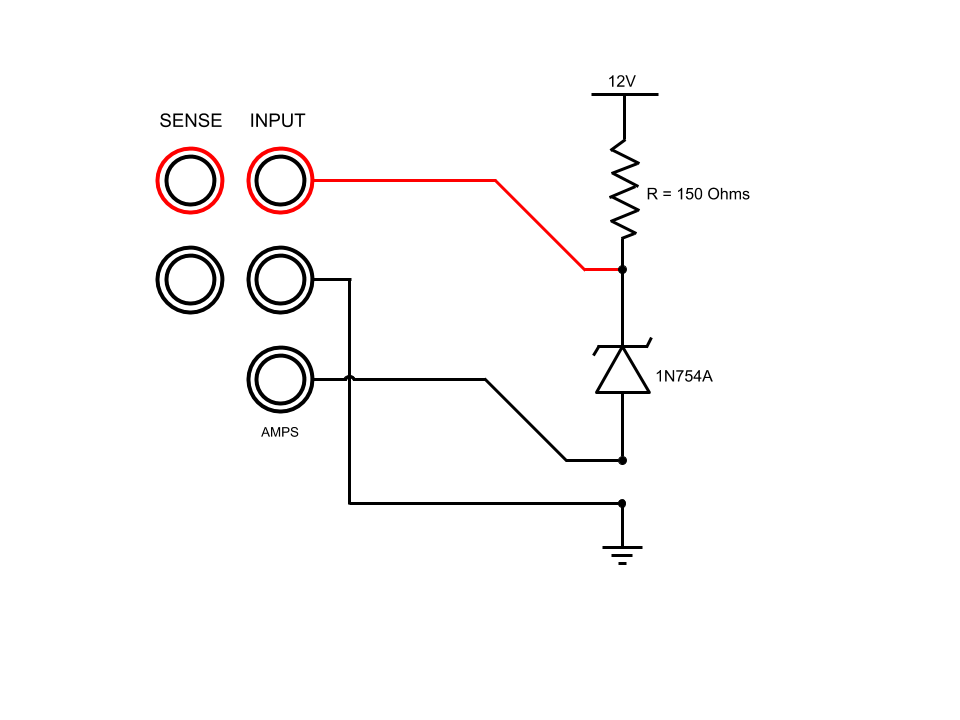
Let’s say these are our requirements:
- We have a 6.9 volt Zener diode
- In series with a 150 ohm resistor
- Connected to a 12 volt supply
- We want to find the power being consumed by the diode
To do this, we need to know the voltage across the diode and the current flowing through it. We can measure these things using a digital multimeter. First, we switch our function to DC Voltage, plug our leads into the Hi and Lo input terminals, clip them across the diode, and record the measurement. Then, we remove our leads from the circuit, move one of our leads to the Amps terminal, switch the function of the instrument to DC Current, put the meter in series with the circuit, and record the measurement. Using the two recorded values we can then manually calculate the power being consumed by the Zener diode.

I measured 6.85 V and 34.40 mA and I calculated power to be 236 mW, or about a quarter of a watt. The whole process took me about a minute and a half to complete.

But what if we had to do this test every minute over the course of multiple hours. Maybe we could do that, but almost anything else would be a better use of our time, especially when we have the tools to automate. The script below shows how this can be done, but before we go further, we need to change the wiring of the setup. Since we don’t want to spend any time changing the leads from Input Hi to AMPS when we change functions, we will instead use the below setup, to measure both without unplugging anything.
The script starts by defining some variables. We want to run our test for 5 hours and we can use that number to calculate the test time in minutes. The next thing is to make a place to store our volts and current measurements, as well as the results of our power calculations. We initialize three array variables, volts, current, and power, to do this. We also need a place for our power measurements to be stored on the instrument in a way that we access them later, so we make a buffer with units “Watts” to write the values into.
The next part is the most important. We want to use the control structures mentioned earlier to tell the instrument what to do next. So, we start by using a “for” loop to have the instrument do the set of instructions for the duration we selected. The sequence we did by hand earlier was: measure voltage, measure current, calculate power. That is what we want to tell the instrument to do over and over again for the number of minutes we set, which is exactly what we do in the code below. Additionally, we need to account for the fact that values below a certain threshold don’t make sense (and also can’t be displayed on the DMM6500 because they are too small). We fix this with the “if” statement which states: If the value is below 10^-8 we just treat it as if it is equal to zero. The final step is to wait 60 seconds before starting the loop over again. Implementing this automation means we can start our test and forget about it until the time is up.


Alright, now that that test is over, we want to investigate further, so we decide to vary the input voltage and see how that changes the power dissipated by the diode. But, we don’t want to have to sit around and change the supply voltage, we want to automate this as well. To do so, we will use a SMU, or source measure unit. Think of it as a power supply, a voltmeter, an ammeter and more, all in one box. This instrument can source V while measuring I and we can control it from our DMM using TSP-link, a communication method that allows us to send an instrument our TSP commands from a script running on another.


Hopefully now you can see the usefulness of instrument automation. It really does become a necessity whenever multiple, repeated measurements are needed, especially if those measurements require multiple instruments. In industry, this comes up again and again from assembly lines, to automating validation testing, to component engineering, and more. The familiarity with test and measure equipment acquired in school is a great starting point to expand into the instrument automation world. Knowledge of how to set up and use these instruments is a key aspect of automating the measurements. Familiarity with TSP is the next part. It’s the part that lets you do the job you need to do, in a time period that is economical and efficient. How far you take it now is up to you, it’s an awesome tool that can do really cool things in the hands of a skilled engineer.