

Question: What if my DPO/DSA 7000/70000 Oscilloscope is losing its time or date settings, or I am getting CMOS Read Error, CMOS checksum error, or CMOS Battery Failure messages?
Answer:
You may need to change the CMOS battery on the motherboard. Refer to attached instructions for changing the battery and resetting the CMOS.
Refer to the respective instrument service manual for instructions how to gain access to the instrument motherboard.
How to replace the CMOS battery on DPO/DSA 7000/70000 Scopes
If your Oscilloscope is losing its time or date settings, or you are receiving a message CMOS
Read Error, CMOS checksum error, or CMOS Battery Failure.
Have a qualified service technician perform the labor. First power off and unplug the scope.
Locate your CMOS battery
When inside your Oscilloscope make sure you're aware of ESD and its potential dangers. Open
up the Oscilloscope and locate the battery on the computer motherboard.
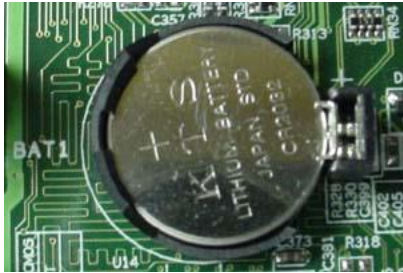
The part number for this battery is CR2032. Part # 146009600 or 146A01500
Removing the battery
This motherboard has a clip holding the battery down. You will need to use one hand to press the
clip, so the battery may be released. The battery may just pop up. If not, you will need to grab
the edge of the battery with small tipped straight slot screw driver or something like a scribe.
Gently lift out the battery out.
Insert the new battery by gently pressing it into the battery housing. When you push down on
the battery, the retaining clip will back away allowing the battery to fall into place. The clip will
then spring back to secure the battery in place. Close up the unit and power back on.
Enter CMOS values
Once the battery is replaced you will need to set default values in the BIOS. Depending on the
mother board the BIOS can be called up by repeatedly pressing or <F2> or <DEL> key on they key board with unit is powering up.
If you do not see a BIOS set up screen pop up on your Scope's LCD display, this means the motherboard has defaulted to displaying the video out the BGA or DVI port on the mother board and not displaying it to the LCD. This is not likely, but it could occur. If this happens you will need to connect an external monitor to the VGA or DVI port of the mother board.
For MSO/DSA/DPO 70000C products, MSO 70000 and DPO7000C products you will need to correct the Boot Display Settings. From BIOS menu select <Chipset>, then North Bridge Configuration, then Video Function Configuration, then Boot display device. Change the Boot Display Device settings to "CRT + LVDS". Press <f10> to save changes and reboot. The Scope should now display to the front LCD.
For non-C products you just need to set BIOS Display settings to "PCI".<F(>. You will then want to "Save and Close".
Again, this may be selection on the BIOS menu or you can simply press <F10>.
Once the scope displays to the LCD, then you just need to set the Date and Time in BIOS and set default values.
From the BIOS set up screen select "Set default Values". You will need to select this from the BIOS menu or in some motherboards you can simply press <F9>. You will then want to "Save and Close". Again, ths may be a selection on the BIOS menu or you can simply press <F10>.
This completes the steps in replacing the CMOS battery.
Product Series: DPO7000 DPO70000SX ATI Performance Oscilloscope