Introduction
This application note introduces scripting with Keithley's Test Script Processor (TSP) technology and its most powerful and enticing features. With scripting, programs and code can be loaded directly onto an instrument and run locally.
Keithley’s TSP goes well beyond just sending instrument commands. The TSP language is a fully featured programming language with all the capabilities you would expect including variables and variable typing, math operators, tables, creation of user functions, logical operators, string manipulation, conditional branching, loop control, and built-in standard libraries. All these tools together, built into the TSP language, allow TSP-enabled instruments to be their own controller and execute complete test sequences, running local scripts and performing local data analysis without the communication overhead inherent in other remote instrument control methods.
What is TSP?
Keithley’s TSP is a flexible hardware/software architecture that allows message-based programming, much like SCPI, with enhanced capabilities for controlling test sequencing/ flow, decision-making, and instrument autonomy. TSPenabled instruments operate like conventional SCPI instruments by responding to a sequence of commands sent by the controller. You can send individual commands to the TSP-enabled instrument the same way you would when using SCPI with any other instrument. Making the switch to TSP will afford you improved throughput, access to additional interfacing options between instruments, and the convenience of autonomous instrumentation.
The use of an on-board Test Script Processor has made it possible to create “smart” instruments, with built-in decisionmaking capabilities, which reduces the need to communicate so frequently with an external controller over the bus. This approach to test system design allows smart instrument systems to be much more efficient than those that rely on standard programming. As the number of TSP-based instruments grows, test system developers will have greater flexibility to build test systems with far higher throughput without compromising measurement integrity.
TSP encompasses both the TSP command set and the TSP scripting language. The TSP scripting language is based on Lua version 5.0, and when used together with the TSP command set, allows for logic and subroutines that would normally reside on a PC to run inside the instrument, which reduces the amount of data and number of messages sent over the communications bus by a considerable amount.
What is Lua?
Lua is a powerful and robust yet lightweight scripting language that is easy to learn. Lua’s small footprint and readability made this scripting language the best choice to implement into measurement instruments. The Test Script Processor scripting engine is a Lua interpreter. Keithley instruments use a modified Lua version 5.0. In TSPenabled instruments, the Lua programming language has been extended with Keithley-specific instrument control commands. Lua commands can be sent and executed one at a time like with SCPI. Unlike instruments that are only compatible with SCPI, TSP instruments can store full scripts, functions, or variables in their memory, meaning that an instrument can function completely autonomously once loaded with a script. For writing these scripts, Keithley Test Script Builder is the obvious choice.
Keithley Test Script Builder
Keithley Test Script Builder (TSB) is a free integrated development environment (IDE) available for TSP. Using TSB allows you to maximize the benefits of scripting with TSP. The included instrument console can open a direct connection to the instrument from the controlling PC. Unlike other programming environments, TSB does not require you to directly reference communications libraries or wrappers in their code. You can integrate TSP commands in with the rest of your code seamlessly, without having to use a function to send the command to the instrument because Test Script Builder automatically runs IVI VISA in the background.
Test Script Builder has a built-in control structure, and allows you to debug your code, including the usage of TSP commands. The included instrument console allows you to read error messages and “watch” returned data with the appropriate commands. It should be noted that the TSP command set does not require any specific development environment since scripts are compiled and run once they are sent to the instrument. However, while IDEs built around compiled languages are not necessary for TSP, they can be used all the same. TSP commands can also be used within other scripting languages such as Python or Perl, although Test Script Builder along with Lua based scripting will yield the best results.
To download Keithley Test Script Builder, visit: https://www.tek.com/keithley-test-script-builder
Why Use Scripting?
Scripting is an integral function of TSP that allows users to have direct, automatic control of their instrument without the need for an external computer in a similar way that you would script a microcontroller such as an Arduino. Scripts can accomplish complex tasks ranging from changing a sourced value based on the last reading to synchronizing trigger sweeps across multiple instruments, or simple tasks like displaying text on the instrument display or applying a mathematical formula to readings in a buffer. With scripting, the logic control is moved from an external computer to the instrument itself, cutting down on communication overhead and giving the instrument the power to make decisions on the fly.
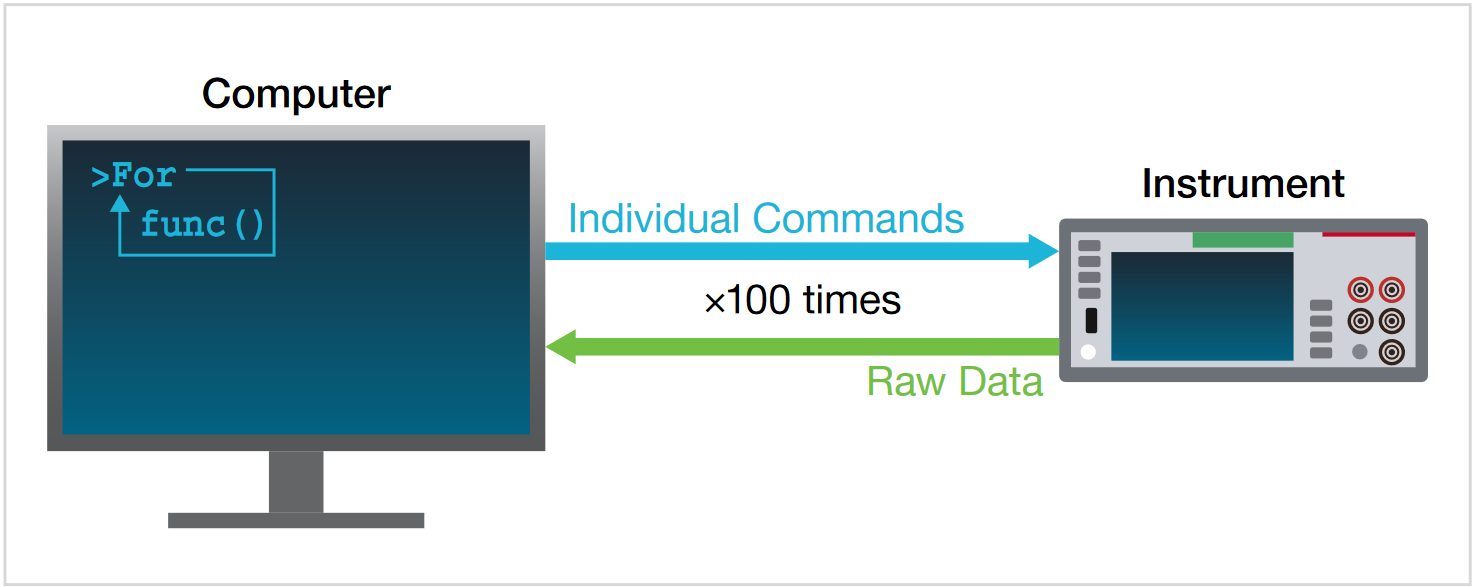
The instrument performs more quickly and efficiently when it processes scripts than it does when it processes individual commands. Scripts eliminate repeated data transfer times from the controller, reducing interface bandwidth. Performing more data processing on the instrument can reduce bandwidth across networks and increase test throughput. For example, where you would normally need to take 100 readings, send them to the PC, and then apply a filter before obtaining a single result, with a TSP script you can offload the necessary processing and calculations onto the instrument so that only a single result is returned to the PC.
Consider the following diagram. It depicts the amount of interactions across the communication bus when sending individual commands from a controlling PC to an instrument. Perhaps the computer is running a Python script to change settings on the instrument and take readings in a for loop. This method places all the programming logic on the computer side of the connection and requires the most interactions across the bus. As a result, assuming all other factors are equal, this method is the slowest.
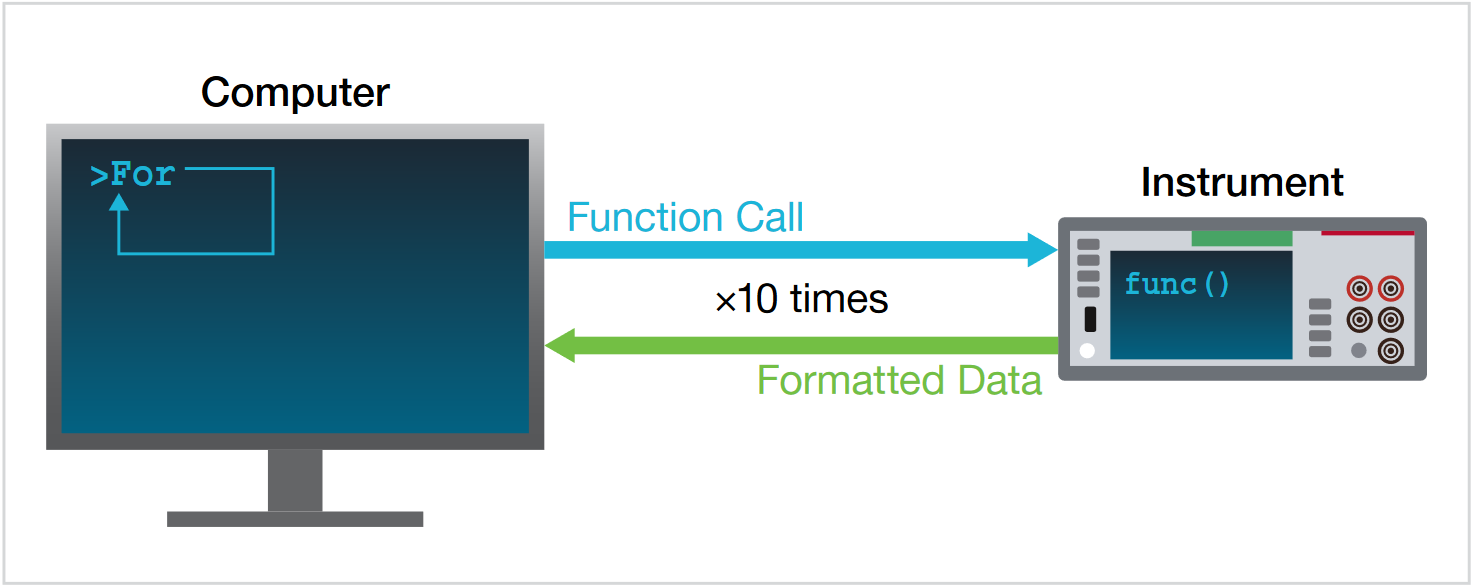
This next diagram depicts using a computer to send function calls over the bus. This method splits the programming logic such that the controller is still performing the loop operation, but the instrument is processing the function. Perhaps the previously mentioned Python script has been cut down to only perform the loop, while the instrument now handles configuring itself and taking its own readings before returning them to the computer. The number of interactions between the computer and the instrument are significantly reduced, but can still be shaved down further.
The final diagram shows a TSP script call being sent to the instrument by the computer, while all of the logic and data processing is done by the instrument. The computer might still be running a python program to call the script, but now the computer only receives the final result, allowing the instrument to perform all the needed math and loops. This method requires only a single interaction across the bus and is by far the quickest method for running tests.

In the instrument, the Test Script Processor engine processes and runs scripts. Scripting with TSP offers repeatability, a test running on the instrument gives best repeatability in timing because the test environment is totally in the instrument. A single script can apply the same test to dozens of instruments via instrument-to-instrument communication techniques. Scripts can even be stored in the instrument’s non-volatile memory or on a USB drive to be accessed from the front panel.
Advanced Features of TSP
An Example: Python to TSP
If you currently have a partial or fully developed solution for you application in a language other than TSP, you may be wondering how you’ll incorporate TSP into your workflow, or even how to convert your existing code into TSP scripts. The following example will walk through the process step by step as described by the previous diagrams.
This Python code controls a 2450 SourceMeter® Source Measure Unit (SMU) using the open source PyVISA library. The SMU is configured to source current and measure voltage in order to determine the forward voltage of a diode. The Python code then instructs the SMU to source several different current levels and measure the forward voltage at each of those levels. Finally, the difference between the maximum and minimum forward voltages is printed to the python console.
import visa

rm = visa.ResourceManager()

address = "TCPIP0::192.0.0.1::inst0::INSTR" #Keithley 2450 SMU

inst = rm.open_resource(address)

inst.write("reset()")

inst.write("smu.source.func = smu.FUNC_DC_CURRENT")

inst.write("smu.source.vlimit.level = 21")

inst.write("smu.source.autorange = smu.ON")

inst.write("smu.source.autodelay = smu.ON")

inst.write("smu.measure.func = smu.FUNC_DC_VOLTAGE")

inst.write("smu.measure.autorange = smu.ON")

inst.write("smu.measure.nplc = 1")

currlist = [1E-7, 1E-6, 1E-5, 1E-4, 1E-3, 1E-2] # list of currents to source

voltlist = [None for curr in currlist] # Create an empty array for voltage measurements the

same size as our source list

for i, current in enumerate(currlist): # Loop over the current source list

inst.write("smu.source.level = "+str(current))

inst.write("smu.source.output = smu.ON")

inst.write("smu.measure.read()")

inst.write("smu.source.output = smu.OFF")

voltlist[i] = inst.query("print(defbuffer1.readings[defbuffer1.endindex])") #

Grab the last reading

voltlist[i] = float(voltlist[i]) # .query returns a string, so it must be casted

to a number

voltDiff = max(voltlist) - min(voltlist)

print(voltDiff)
Now, all the configuration commands are moved into two TSP functions called config() and forwardv(). These functions run the same commands as the previous python code ran, but they are now stored directly on the instrument so the number of interactions the Python code has with the instrument has been greatly reduced. You can find the full contents of each function in the appendix of this application note.
Where before the Python code had 7 interactions during configuration and 5 each loop iteration, the code now has 1 interaction for configuration and 1 each loop iteration. However, we have changed the communication timeout from Python since each TSP function will not return a response immediately as before. Instead each function will run multiple TSP commands before returning a response that the function has completed.
inst.timeout = 10000

inst.write("config()")

currlist = [1E-7, 1E-6, 1E-5, 1E-4, 1E-3, 1E-2]

voltlist = [None for curr in currlist]

for i, current in enumerate(currlist):

voltlist[i] = inst.query("forwardv("+str(current)+")")

voltlist[i] = float(voltlist[i])

voltDiff = max(voltlist) - min(voltlist)

print(voltDiff)
This final Python code accomplishes the same task as before, but now with only a single interaction with the instrument. All the logic of looping and creating arrays has been moved to TSP so that the Python code now only calls a script and prints the result. Once again, you can find the full script in the appendix of this application note. At this point, if desired, the computer could be removed from the equation entirely and the result could instead be printed to the front panel of the instrument, rather than returned to the computer’s console.
voltDiff = inst.query("FullDiodeTest()")

print(voltDiff)
Script Rules
Important points regarding scripts:
- Each script must have a unique name that cannot start with a number.
- Script names must not contain spaces.
- If you load a new script with the same name as an existing script, an error event message is generated. You must delete the existing script before you create a new script with the same name.
- If you revise a script and save it to the instrument with a new name, the previously loaded script remains in the instrument with the original name.
- You can save scripts to nonvolatile memory in the instrument. Saving a script to nonvolatile memory allows the instrument to be turned off without losing the script.
Store & Run Scripts Locally
To enjoy the full benefits of scripting, the TSP script must be saved to the instrument’s internal memory. This allows them to be accessed by any remote control scheme or even to be run without a controlling PC from the instrument’s front panel. There are several ways to accomplish this and they all reach the same goal.
If using Test Script Builder, scripts can be sent and saved to an instrument directly. This method is particularly helpful for larger scripts or applications with many functions as TSB provides tools to manage a large number of scripts across many different instruments, along with its debugging capabilities.
Another method, more suited to single or few instrument setups, involves simply saving the script with the *.tsp extension and placing it on a USB drive. The front panel controls of TSP enabled instruments will allow you to run the script directly from the USB drive, or save the script to instrument’s internal memory.
Finally, when you need to automate the delivery of scripts, or when it is more practical to send scripts over an existing remote connection, scripts may be sent and saved to an instrument line-by-line. Using the loadscript and endscript keywords, any remote communication interface can save TSP scripts to an instrument.
Automatic Execution Scripts
Scripts saved to USB drives or the instrument’s internal memory can be copied to start up. Scripts added to start up will automatically execute as part of the instrument’s poweron sequence. Below is an example script that changes the buffer size and sets a DMM6500 6½-Digit Bench/System Digital Multimeter to measure current:
reset()

-- Change the size of the default buffer

defbuffer1.capacity = 1000

-- Set the measurement function to current

dmm.measure.func = dmm.FUNC_DC_CURRENT

-- Take a reading

dmm.measure.read()
To save the script to the DMM6500’s power up sequence from the front panel, load the script onto the instrument’s local memory. Then, go to MENU > SCRIPTS > RUN and then select the script you want saved to the power up sequence and select Copy to Power Up. Alternatively, you can name your script autoexec.tsp and the instrument will always run the script at startup.
Using Display Windows
TSP scripts give access to user interactions on the instrument display itself. Display commands will allow you to write scripts that publish custom messages, button prompts, and data input screens on the front panel of the instrument. The following example for Keithley’s Touch, Test, Invent® line of instruments features a short script that creates a menu with two options on the front panel. After a selection is made, an input screen appears and takes a numeric input from the user. Then, the input is printed to the USER swipe screen on the front panel:
-- Creates a GUI with two buttons labeled Set Voltage and Set Current

func_choice = display.input.option("Select a Function", "Set Voltage", "Set Current")

-- If user selects Set Voltage

if func_choice == display.BUTTON_OPTION1 then

-- Prompt user to specify voltage with numeric input box

-- Default value is 0, min is 0, max is 15

voltage = display.input.number("Set Voltage (V)", display.NFORMAT_DECIMAL, 0, 0, 15)

-- Change swipe screen to USER

display.changescreen(display.SCREEN_USER_SWIPE)

-- Print specified voltage to USER swipe screen

display.settext(display.TEXT1, voltage .. " (V)")

end

-- If user selects Set Current

if func_choice == display.BUTTON_OPTION2 then

-- Ask user to specify current limit with numeric input box

-- Default value is 0, min is 0, max is 3

current = display.input.number("Set Current Limit (A)", display.NFORMAT_DECIMAL, 0, 0, 3)

-- Change swipe screen to USER

display.changescreen(display.SCREEN_USER_SWIPE)

-- Print specified voltage to USER swipe screen

display.settext(display.TEXT1, current .. " (A)")

end

Aliasing
If you do not like the naming conventions of traditional TSP commands or wish to abbreviate them, you can rename the commands via aliasing. To alias a command, you can store up to the third “.” , the lowest level, into a variable. With every “.” aliased, the better the script’s performance and the faster the commands are processed. This example demonstrates how to create aliases for TSP commands:
dm = dmm.measure

current = dmm.FUNC_DC_CURRENT

dm.func = current -- Alias for dmm.measure.func = dmm.FUNC_DC_CURRENT

stop = trigger.model.abort

stop() -- Alias for trigger.model.abort()

clear = eventlog.clear

clear() -- Alias for eventlog.clear()
Note in the above example, when aliasing a function command like trigger.model.abort, the parenthesis normally accompanied with the function is not used. However, when calling the aliased function, stop, the parenthesis is used normally. This behavior is the same for any command that is a function.
Reading and Writing to the Front Panel USB
You can write data to files and read data from files saved on a USB drive plugged into the instrument’s front panel using scripts. TSP commands that create and manipulate files are useful for a multitude of purposes, ranging from storing buffer data to a USB, to accessing initialization files for more complex scripting applications. The code snippet below uses TSP commands and scripting logic to read data from an initialization file if one exists, or create an initialization file with inputs from the user via the front panel if one is absent:
-- Check for USB plugged into front panel

usb_exist = file.usbdriveexists()

-- If USB exist is true

if usb_exist == 1 then

-- Check for target file

file_check = fs.is_file("/usb1/Config.ini")

if file_check == true then

-- Open and read config file, store config data in variable

config_file = file.open("/usb1/Config.ini", file.MODE_READ)

config_data = file.read(config_file, file.READ_ALL)

file.close(config_file)

elseif config_data == nil or file_check == false then

-- Allow user to input config data and write data to a config file

config_data = display.input.string("Input Config Data", display.SFORMAT_ANY)

config_file = file.open("/usb1/Config.ini", file.MODE_WRITE)

file.write(config_file, config_data)

file.close(config_file)

end

end
Sweeping
Sweeps allow you to set a source measure unit (SMU) to source specific voltage or current values to a device under test, where a measurement is made for each sourced value. The 2400 Series of SMUs can generate linear staircase, logarithmic staircase, linear dual staircase, and logarithmic dual staircase sweeps from the front panel or from a remote interface. When generating a sweep, the instrument creates a source configuration list and a trigger model that contains the settings that were selected for the sweep. In addition to these generated sweeps, custom list sweeps can be defined using remote commands.
When defining a custom sweep, specified source levels are added to a source configuration list. The benefit of a custom sweep is that you can programatically define all the levels of the source configuration list, giving you direct control of sweep rather than allowing a sweep function to define the levels for you. The following example for the 2460 SMU defines and executes a custom voltage sweep, calculates several values, and prints the results to the terminal of Test Script Builder and the front panel of the 2460.
-- Reset the Model 2460 and clear the buffer.

reset()

-- Set the source and measure functions.

smu.source.func = smu.FUNC_DC_VOLTAGE

smu.measure.func = smu.FUNC_DC_CURRENT

-- Configure the measurement settings.

smu.measure.terminals = smu.TERMINALS_FRONT

smu.measure.sense = smu.SENSE_4WIRE

smu.measure.autorange = smu.ON

smu.measure.nplc = 1

-- Configure the source settings.

smu.source.highc = smu.OFF

smu.source.range = 10

smu.source.readback = smu.ON

smu.source.highc = smu.OFF

smu.source.ilimit.level = 5

-- Create a configuration list of current source levels

smu.source.configlist.create("VoltListSweep")

-- Add source levels to configuration list

for v = 1, 9 do

smu.source.level = v

smu.source.configlist.store("VoltListSweep")

end

-- Add Configuration List to Sweep

smu.source.sweeplist("VoltListSweep")

-- Start the sweep and wait for it to complete.

trigger.model.initiate()

waitcomplete()

-- Define values for next step.

voltage = defbuffer1.sourcevalues

current = defbuffer1

imax = current[1]

vmax = voltage[1]

pmax = voltage[1]*current[1]

-- Calculate Max Power, Current, and Voltage

for i = 1, 9 do

print(voltage[i],current[i],voltage[i]*current[i])

if (voltage[i]*current[i] > pmax) then

pmax = voltage[i]*current[i]

imax = current[i]

vmax = voltage[i]

end

end

pmax = math.abs(pmax)

imax = math.abs(imax)

print("Pmax = pmax, Imax = imax, Vmax = vmax)

-- Display values on the Model 2460 front panel.

display.changescreen(display.SCREEN_USER_SWIPE)

display.settext(display.TEXT1, string.format("Pmax = %.4fW", pmax))

display.settext(display.TEXT2, string.format("Imax = %.4fA, Vmax = %.2fV", Imax, Vmax))
TSP-Net
With Keithley TSP-Net, an included library of TSP, you can use TSP-enabled instruments to control any ethernet controllable instrument. Using this feature, measurement instruments can be controlled remotely by other instruments without a PC. This type of setup is especially convenient when an older instrument lacks a front panel or requires navigating through settings with numerous buttons or knobs. Using TSP-Net, you can use an instrument with a touchscreen to act as a front panel for another instrument that is lacking one. To set up a TSP-Net connection, connect the desired instruments to the same network or to one another via ethernet cable and upload a TSP-Net script onto the controlling instrument.
TSP-Net works similarly to sockets-based programming between a computer and an instrument. Instead of using a PC, one of the instruments connected to the network acts as the controller, driving the target instruments through a TSP script via an ethernet network connection. This allows one or more instruments that are not necessarily located in the same immediate area to control the others remotely and communicate with each other. The controlling instrument uses commands from the TSP-Net library to transfer string data, including commands, to a remote instrument. In the same way, the controlling instrument can retrieve and manipulate data from the target instruments. Because strings are sent over the bus, a TSP instrument can send SCPI commands, which are strings of ascii characters, to an instrument that is not TSP compatible with a script using TSP-Net.
This example demonstrates the main coding structures and commands associated with the use of TSP-Net. Note the similarities between these commands from the TSP-Net library and typical sockets based programming:
-- Initialize constant value(s) and global variable(s)
local remote_port = 5025 -- Default ethernet port

local remote_ip = "169.254.136.120" -- Remote instrument IP address

local KE3390_idString = "Keithley Instruments Inc.,3390" -- 3390 ID String

local tspnet_instID = nil -- Instrument connection object

-- Initialize connection between DAQ and controlled instrument

function tspnet_init(remote_ip, remote_port)

tspnet.timeout = 5.0

tspnet.reset()

tspnet_instID = tspnet.connect(remote_ip, remote_port, "*RST\n")

if tspnet_instID == nil then return nil end

tspnet_ipaddress = remote_ip

tspnet.termination(tspnet_instID, tspnet.TERM_LF)

tspnet_send("*RST")

return tspnet_instID

end

-- Send command to controlled remote instrument

function tspnet_send(command)

tspnet.execute(tspnet_instID, command)

end

-- Query data from the controlled instrument

function tspnet_query(command, timeout)

timeout = timeout or 5.0 -- Use default timeout of 5 secs if not specified

tspnet.execute(tspnet_instID, command)

timer.cleartime()

while tspnet.readavailable(tspnet_instID) == 0 and timer.gettime() < timeout do

delay(0.1)

end

return tspnet.read(tspnet_instID)

end

-- Terminate the connection between the master and subordinate instrument

function tspnet_destroy()

if tspnet_instID ~= nil then

tspnet.disconnect(tspnet_instID)

tspnet_instID = nil

end

end
See the appendix at the end of this document for the full example script, which uses TSP-Net to send SCPI commands from a DAQ6510 6½-Digit Data Acquisition and Logging Multimeter System to a Keithley 3390 Arbitrary Waveform Generator.
Conclusion
Using TSP as a powerful scripting tool can increase the overall functionality of your instruments. TSP affords you a multitude of advantages, including the ability to run scripts as part of an instrument’s boot sequence and applying custom text and graphical interfaces to the front panel. Scripting gives users the option to control multiple instruments with a single program, and significantly reduces communications over the bus. Fully integrating logical operations with remote commands creates a plethora of possibilities for new tests.
Appendix
The following example script uses TSP-Net to send SCPI commands from a DAQ6510 to a Keithley 3390 arbitrary waveform generator:
-- Initialize constant value(s) and global variable(s)

local instPort = 5025 -- Default ethernet port

local instAddr = "169.254.136.120" -- Remote instrument IP address

local KE3390_idString = "Keithley Instruments Inc.,3390" -- 3390 ID String

local tspnet_instID = nil -- Instrument connection object

-- Initialize connection between DAQ and controlled instrument

function tspnet_init(remote_ip, remote_port)

tspnet.timeout = 5.0

tspnet.reset()

tspnet_instID = tspnet.connect(remote_ip, remote_port, "*RST\n")

if tspnet_instID == nil then return nil end

tspnet_ipaddress = remote_ip

tspnet.termination(tspnet_instID, tspnet.TERM_LF)

tspnet_send("*RST")

return tspnet_instID

end

-- Send command to controlled remote instrument

function tspnet_send(command)

tspnet.execute(tspnet_instID, command)

end

-- Query data from the controlled instrument

function tspnet_query(command, timeout)

timeout = timeout or 5.0 -- Use default timeout of 5 secs if not specified

tspnet.execute(tspnet_instID, command)

timer.cleartime()

while tspnet.readavailable(tspnet_instID) == 0 and timer.gettime() < timeout do

delay(0.1)

end

return tspnet.read(tspnet_instID)

end

-- Terminate the connection between the master and subordinate instrument

function tspnet_destroy()

if tspnet_instID ~= nil then

tspnet.disconnect(tspnet_instID)

tspnet_instID = nil

end

end

-- *** Setup Functions for 3390 ***********************************************************

-- Get 3390's instrument ID

function KE3390_GetIdString()

myID = tspnet_query("*IDN?\n", 5)

delay(0.1)

return myID

end

-- Set Waveform Type

function KE3390_SetWave()

type, result = display.input.option("Set Waveform Type", "Sine", "Square", "Ramp")

if type == display.BUTTON_OPTION1 then

freq = display.input.number("Set Frequency (Hz)", display.NFORMAT_DECIMAL, 1000, .0000001, 50000000)

amp = display.input.number("Set Amplitude (Vpp)", display.NFORMAT_DECIMAL, 0.1)

off = display.input.number("Set Offset Voltage (V)", display.NFORMAT_DECIMAL, 0)

tspnet_send("APPLy:SINusoid " .. tostring(freq) .. "," .. tostring(amp) .. "," .. tostring(off) .. "\n")

delay(0.1)

elseif type == display.BUTTON_OPTION2 then

freq = display.input.number("Set Frequency (Hz)", display.NFORMAT_DECIMAL, 1000, .0000001, 25000000)

amp = display.input.number("Set Amplitude (Vpp)", display.NFORMAT_DECIMAL, 0.1)

off = display.input.number("Set Offset Voltage (V)", display.NFORMAT_DECIMAL, 0)

tspnet_send("APPLy:SQUare " .. tostring(freq) .. "," .. tostring(amp) .. "," .. tostring(off) .. "\n")

percent = display.input.number("Set Duty Cycle (%)", display.NFORMAT_DECIMAL, 0)

KE3390_SetDCycle(percent)

delay(0.1)

elseif type == display.BUTTON_OPTION3 then

freq = display.input.number("Set Frequency (Hz)", display.NFORMAT_DECIMAL, 1000, .0000001, 200000)

amp = display.input.number("Set Amplitude (Vpp)", display.NFORMAT_DECIMAL, 0.1)

off = display.input.number("Set Offset Voltage (V)", display.NFORMAT_DECIMAL, 0)

tspnet_send("APPLy:RAMP " .. tostring(freq) .. "," .. tostring(amp) .. "," .. tostring(off) .. "\n")

percent = display.input.number("Set Ramp Symmetry (%)", display.NFORMAT_DECIMAL, 0)

KE3390_SetRampSymm(percent)

delay(0.1)

end

end

-- Set Amplitude

function KE3390_SetAmp(amp)

tspnet_send("VOLT " .. tostring(amp) .. "\n")

delay(0.1)

end

-- Set Frequency

function KE3390_SetFreq(freq)

tspnet_send("FREQ " .. tostring(freq) .. "\n")

delay(0.1)

end

-- Set Voltage Offset

function KE3390_SetVoltOff(off)

tspnet_send("VOLT:OFFS " .. tostring(off) .. "\n")

delay(0.1)

end

-- Set Duty Cycle

function KE3390_SetDCycle(percent)

tspnet_send("FUNC:SQU:DCYC " .. tostring(percent) .. "\n")

delay(0.1)

end

-- Set Ramp Symmetry

function KE3390_SetRampSymm(percent)

tspnet_send("FUNC:RAMP:SYMM " .. tostring(percent) .. "\n")

delay(0.1)

end

-- Set 3390 Output State ON

function KE3390_outputStateON()

tspnet_send("OUTP ON\n")

delay(0.1)

end

-- Set 3390 Output State OFF

function KE3390_outputStateOFF()

tspnet_send("OUTP OFF\n")

delay(0.1)

end

-- Check Output State

function KE3390_checkOutput()

query_output = tspnet_query("OUTP?\n", timeout)

delay(0.1)

return query_output

end

-- *** Connection Status ******************************************************************

-- A function that tests the connection between DMM and 3390

function test_connection()

-- Connect DMM to 3390

tspnet_init(instAddr, instPort)

display.waitevent(1)

-- Print (connection_status)

-- Check for initial tsp connection

if tspnet_instID == nil then

display.changescreen(display.SCREEN_USER_SWIPE)

display.settext(display.TEXT1, "Connection failed.")

display.settext(display.TEXT2, "Please check connection.")

return 0

else

-- Query 3390's ID string

KE3390_GetIdString()

print (myID)


-- Change to user swipe screen

display.changescreen(display.SCREEN_USER_SWIPE)


-- Check for query ID string nil value

if myID == nil or myID == "" then

display.settext(display.TEXT1, "Failed to query ID.")

display.settext(display.TEXT2, "Please restart 3390 Controller.")


-- Terminate connection to controller

tspnet_destroy()

return 0

else

-- Get manufacturer and model number from ID string

-- Instruments's name is formated as follows: manufactuer, model number, serial number, firmware level.

-- Each variable is separated by a comma ","

-- The manufacturer_model variable is getting manufactuer and model number by getting the index of

-- The first 2 comma ","

_, endPosition = string.find(myID, ",")

_, endPosition = string.find(myID, ",", endPosition+1)

manufacturer_model = string.sub(myID, 1, endPosition-1)

-- If the manufactuer and model name are not matched

if manufacturer_model != KE3390_idString then

display.settext(display.TEXT1, "Connection failed.")

display.settext(display.TEXT2, "The instrument is not a 3390")


-- Terminate connection to controller

tspnet_destroy()

return 0

else

display.settext(display.TEXT1, "Connection Success!")

display.settext(display.TEXT2, "Keithley Model 3390 50MHz AWG")

return 1

end

end

end

end

-- A function that displays exit text

function display_exit_text()

-- change to user swipe screen

display.changescreen(display.SCREEN_USER_SWIPE)

display.settext(display.TEXT1, "Program exited.")

display.settext(display.TEXT2, "")

end

-- *** 3390 Control Code ******************************************************************

reset()

-- Change to User Swipe Screen and clear all messages in this swipe screen

display.changescreen(display.SCREEN_USER_SWIPE)

display.settext(display.TEXT1, "")

display.settext(display.TEXT2, "")

-- A reminder to ensure connection

display.prompt(display.BUTTONS_OK, "Please ensure TSPNet connection between DMM6500 and 3390.")

prompt_ID, result = display.waitevent()

display.changescreen(display.SCREEN_USER_SWIPE)

display.settext(display.TEXT1, "Please Wait ...")

display.settext(display.TEXT2, "Checking Connection")

-- Test/establish LAN connection

test_status = test_connection()

while tspnet_instID ~= nil do

func_choice, result = display.input.option("Select a Function", "Set Waveform", "Set Amplitude", "Set Frequency", "Set Volt Offset", "Set Duty Cycle", "Set Symmetry", "Output ON/ OFF", "Exit Script")

display.waitevent(1)

if func_choice == display.BUTTON_OPTION1 then

-- Ask user to specify waveform type

KE3390_SetWave()

elseif func_choice == display.BUTTON_OPTION2 then

-- Ask user to specify the amplitude

amp = display.input.number("Set Amplitude (Vpp)", display.NFORMAT_DECIMAL, 0.1)

KE3390_SetAmp(amp)

elseif func_choice == display.BUTTON_OPTION3 then

-- Ask user to specify the frequency

freq = display.input.number("Set Frequency (Hz)", display.NFORMAT_DECIMAL, 1000)

KE3390_SetFreq(freq)

elseif func_choice == display.BUTTON_OPTION4 then

-- Ask user to specify the offset voltage

off = display.input.number("Set Offset Voltage (V)", display.NFORMAT_DECIMAL, 0)

KE3390_SetVoltOff(off)

elseif func_choice == display.BUTTON_OPTION5 then

-- Ask user to specify the duty cycle for square waveforms

percent = display.input.number("Set Duty Cycle (%)", display.NFORMAT_DECIMAL, 0)

KE3390_SetDCycle(percent)

elseif func_choice == display.BUTTON_OPTION6 then

-- Ask user to specify the symmetry for ramp waveforms

percent = display.input.number("Set Ramp Symmetry (%)", display.NFORMAT_DECIMAL, 0)

KE3390_SetRampSymm(percent)

elseif func_choice == display.BUTTON_OPTION7 then

-- Check if the output is ON or OFF

KE3390_checkOutput()

if query_output == "1" then

-- Set 3390 Output State OFF

KE3390_outputStateOFF()

elseif query_output == "0" then

-- Set 3390 Output State ON

KE3390_outputStateON()

end

elseif func_choice == display.BUTTON_OPTION8 then

-- Stop the script and disconnect the TSPNet connection

display_exit_text()

tspnet_destroy()

end

end

tspnet_destroy()
The following TSP code contains the functions referenced config() and forwardv() references in the earlier Python example (include hyperlink to section?) Once stored in the instrument’s memory, these functions can be called like any other instrument command.
function config() -- The config function

reset()

smu.source.func = smu.FUNC_DC_CURRENT

smu.source.vlimit.level = 21

smu.source.autorange = smu.ON

smu.source.autodelay = smu.ON

smu.measure.func = smu.FUNC_DC_VOLTAGE

smu.measure.autorange = smu.ON

smu.measure.nplc = 1

end

function forwardv(current) -- The forwardv function

smu.source.level = current

smu.source.output = smu.ON

smu.measure.read()

smu.source.output = smu.OFF

print(defbuffer1.readings[defbuffer1.endindex])

end
This Python will load the functions into an instruments memory.
import visa

rm = visa.ResourceManager()

address = "TCPIP0::192.0.0.5::inst0::INSTR" #Keithley 2450 SMU

inst = rm.open_resource(address)

inst.write("loadscript DiodeTest") # Begin loading the script, named DiodeTest

inst.write("function config()") # The config function

inst.write("reset()")

inst.write("smu.source.func = smu.FUNC_DC_CURRENT")

inst.write("smu.source.vlimit.level = 21")

inst.write("smu.source.autorange = smu.ON")

inst.write("smu.source.autodelay = smu.ON")

inst.write("smu.measure.func = smu.FUNC_DC_VOLTAGE")

inst.write("smu.measure.autorange = smu.ON")

inst.write("smu.measure.nplc = 1")

inst.write("end")

inst.write("function forwardv(current)") # The forwardv function

inst.write("smu.source.level = current")

inst.write("smu.source.output = smu.ON")

inst.write("smu.measure.read()")

inst.write("smu.source.output = smu.OFF")

inst.write("print(defbuffer1.readings[defbuffer1.endindex])")

inst.write("end")

inst.write("endscript")

inst.write("DiodeTest.save()") # Save the script, DiodeTest, into nonvolatile memory

inst.write("DiodeTest()") # Run the script to load the functions into memory
The following TSP code is the full script, FullDiodeTest from the earlier Python example (again, hyperlink?). You can save this script to a 2450 SourceMeter® instrument with the name FullDiodeTest to run the earlier Python example without any changes. Note the structure, it contains 3 functions. The first two are largely the same as before and are helper functions, the third is a "Main" function, forwardDiff() that does everything necessary to obtain the needed result. The script ends by calling that Main function, which otherwise would just be defined, but not run.
function config() -- The config function

reset()

smu.source.func = smu.FUNC_DC_CURRENT

smu.source.vlimit.level = 21

smu.source.autorange = smu.ON

smu.source.autodelay = smu.ON

smu.measure.func = smu.FUNC_DC_VOLTAGE

smu.measure.autorange = smu.ON

smu.measure.nplc = 1

end

function forwardv(current) -- Before, we printed the last reading to return the value to

python, since we’re working all in TSP now, the value needs to be returned, not printed

smu.source.level = current

smu.source.output = smu.ON

smu.measure.read()

smu.source.output = smu.OFF

return defbuffer1.readings[defbuffer1.endindex] -- changed print to return

function forwardDiff()

config() -- It’s okay to call other scripts from within a TSP script!

currlist = {1E-7, 1E-6, 1E-5, 1E-4, 1E-3, 1E-2}

voltlist = {n = table.getn(currlist)}

for i , current in ipairs(currlist) do --ipairs is similar to the Python

enumerate() function

voltlist[i] = forwardv(current)

end

voltDiff = math.max(unpack(voltlist)) - math.min(unpack(voltlist))

print(voltDiff)

end

forwardDiff()
This Python code will save the script into an instrument’s memory. Once loaded into memory, the full test can be run by calling the forwardDiff() function so that the entire script does not need to be reloaded into memory.
import visa

rm = visa.ResourceManager()

address = "TCPIP0::192.0.0.5::inst0::INSTR" #Keithley 2450 SMU

inst = rm.open_resource(address)

inst.write("loadscript FullDiodeTest")

inst.write("function config()") # The config function

inst.write("reset()")

inst.write("smu.source.func = smu.FUNC_DC_CURRENT")

inst.write("smu.source.vlimit.level = 21")

inst.write("smu.source.autorange = smu.ON")

inst.write("smu.source.autodelay = smu.ON")

inst.write("smu.measure.func = smu.FUNC_DC_VOLTAGE")

inst.write("smu.measure.autorange = smu.ON")

inst.write("smu.measure.nplc = 1")

inst.write("end")

inst.write("function forwardv(current)")

inst.write("smu.source.level = current")

inst.write("smu.source.output = smu.ON")

inst.write("smu.measure.read()")

inst.write("smu.source.output = smu.OFF")

inst.write("return defbuffer1.readings[defbuffer1.endindex]") # changed print to return, since

the logic is all in TSP now, we don’t want these values printed to console

inst.write("end")

inst.write("function forwardDiff()")

inst.write("config()") # It’s okay to call other scripts from within a TSP script!

inst.write("currlist = {1E-7, 1E-6, 1E-5, 1E-4, 1E-3, 1E-2}")

inst.write("voltlist = {n = table.getn(currlist)}")

inst.write("for i , current in ipairs(currlist) do")

inst.write("voltlist[i] = forwardv(current)")

inst.write("end")

inst.write("voltDiff = math.max(unpack(voltlist)) - math.min(unpack(voltlist))")

inst.write("print(voltDiff)")

inst.write("end")

inst.write("forwardDiff()") # Run the "Main" function

inst.write("endscript")

inst.write("FullDiodeTest.save()") # Save the script, FullDiodeTest, into nonvolatile memory