
Introduction
Keithley's Series 2600B System SourceMeter instruments are the test and measurement industry's fastest SMU (Source Measurement Unit) instruments. Based on Keithley’s thirdgeneration SMU architecture, the Series 2600B line combines fast and accurate analog performance with up to two source and measure channels in a half-rack package. They are also capable of extremely high speed test sequencing and automation as a result of their embedded TSP® (Test Script Processor) scripting engine. Additionally, the Series 2600B provides full software emulation of Keithley’s second generation SMU architecture, found in the Model 2400 instruments, enabling these users to easily and quickly migrate their applications to the new, higher throughput Series 2600B instruments.
Test software based on SCPI (Standard Commands for Programming Instrumentation) commands is used to control the Model 2400 remotely. Series 2600/2600A instruments don’t natively respond to SCPI commands; instead, they use a command set known as ICL (Instrument Command Language) commands. This difference in command sets once required users to re-write their code if they wished to use a Series 2600/2600A instrument in the place of a Model 2400. For many users with existing test stands, re-writing test software to support the new instrument’s command set was simply not feasible due to the time and costs involved or simply because the source code was not available. Today, however, Series 2600B instruments provide a solution for these users because they are able to accept the SCPI commands of the Model 2400 by using a 2400 Personality Script.
The TSP scripting engine of Series 2600B instruments runs a test script named Persona2400 to emulate the operation of a Model 2400. This script accepts the SCPI commands of the Model 2400 and then quickly and seamlessly translates them into the native ICL commands that Series 2600B instruments understand. The TSP scripting engine can accomplish this translation so quickly that, for a typical Model 2400 SCPI command sequence, users can expect up to a 2× improvement in test execution time when they replace a Model 2400 with a Series 2600B instrument running the Persona2400 script. Once the script is up and running, from the perspective of a Series 2600B instrument programmer, the instrument appears simply to be a faster Model 2400.
Advanced Capabilities of the 2400 Personality Script
Because of the Model 2400’s industry popularity, other SMU instruments have been developed in an attempt to emulate it; however, many of the Model 2400’s key capabilities are omitted. The Series 2600B are the only SMU instruments that emulate all Model 2400 commands, including source-memory sweeps; linear, log, and list sweeps; Trigger Link and digital I/O; status model; and identification query
Source-Memory Sweeps
Source-Memory sweeps allow the instrument to be pre-loaded with multiple Source and Measure configurations and then cycle through them quickly from a single command. Source-Memory is critical to high-speed production testing with the Model 2400. The Persona2400 script has full support for Source-Memory sweeps, including highly advanced features like Source-Memory location branching.
Linear, Log and List Sweeps
Sweeps allow the instrument to cycle quickly through multiple source values, taking measurements at each point. The Persona2400 script uses the Series 2600B line’s advanced trigger model to perform sweeps, giving sweeps more accurate timing with less timing jitter than sweeps performed on the original Model 2400, which results in even more consistent measurements.
Trigger Link and Digital I/O
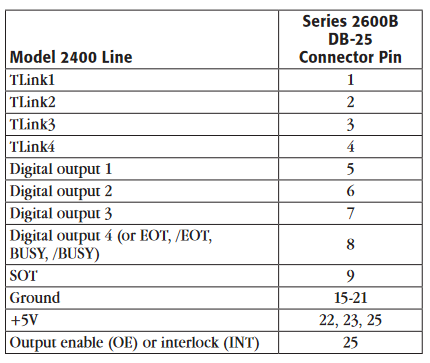
The Persona2400 script supports the Trigger Link and digital I/O ports of the Model 2400. This is critical for high-speed automated binning applications and synchronization with other pieces of equipment. The pins from the Trigger Link and digital I/O ports on the Model 2400 have all been mapped to the pins of the 25-pin D-sub connector on the back of Series 2600B instruments. Table 1 outlines the complete pin mapping.
Status Model
The status model is used to monitor the state of the instrument and generate service requests (SRQs) to signal the controller to perform on operation on the instrument. It is often used to increase system responsiveness. The Persona2400 script supports all registers of the 2400 status model and generates SRQs from these registers.
Identification Query (Legacy Mode)
Nearly every instrument ever made supports the *IDN? identification query command. However, most instruments will only report their own model number, even when they are attempting to emulate another instrument. This can cause problems when trying to use the instrument as a drop-in replacement because when the test software performs an ID query at startup, it will detect the wrong instrument and will abort the test. For many test systems, accessing the source code to change the supported model to the new model is often difficult if not impossible, especially when pre-compiled drivers are in use. Series 2600B instruments have a legacy mode to address this problem. Legacy mode allows the Series 2600B instrument to respond to an ID query that it is a different model than it truly is. When emulating a Model 2400, a Series 2600B instrument will report that it is a Model 2400 and will even report the correct firmware revision; this helps users save countless hours and headaches.
Performing Model 2400 emulation in script offers Series 2600B instrument users a variety of advantages over other Model 2400 emulation implementations, including the ability to:
- Extend the SCPI command set that the instrument accepts, thereby expanding the capability
- Intermix SCPI commands with ICL commands and TSP scripting
- Enter and exit 2400 emulation without the need to re-boot the instrument
Adapting Existing Applications for Use with Emulation
To use a Series 2600B instrument as a replacement for a Model 2400 in an existing application, a few simple steps are first required to configure the Series 2600B instrument and the test system to operate in emulation mode:
- Load the Persona2400 script
- Configure the Model 2400 emulation mode
- Start the Model 2400 emulation mode
For applications that involve more advanced programming considerations, two additional steps might be required: - Connect Trigger Link and digital I/O (if necessary)
- Identify and adapt any unsupported or partially supported commands (if necessary)
Step 1: Load the Persona2400 script
Every Series 2600B System SourceMeter instrument comes with a USB flash drive that contains the Person2400 script (2600B-800A.tsp). The script is also available for downloading from Keithley's website (www.keithley.com). The script may be loaded onto the instrument from the front panel using a USB flash drive or remotely. However, because the USB flash drive offers the simplest way to load the script into the instrument, it is the recommended method. To load the Persona2400 script from the Series 2600B instrument's front panel:
- Insert the USB flash drive containing the Persona2400 script (2600B-800A.tsp) into the front panel USB port.
- Press the MENU button, then select SCRIPT from the Main Menu and then press ENTER.
- From the Script menu, select LOAD then press ENTER.
- From the Load Script menu, select USB1 and then press ENTER.
- Select 2600B-800A.tsp and press ENTER. After a few seconds, a confirmation message will appear, indicating that loading the script was successful, then the Script Action menu will load.
- Select SAVE-INTERNAL from the Script Action menu, then press ENTER.
- Select YES from the Save Script Internal menu and then press ENTER. After a few seconds, the Script Action menu will appear again.
- Press the EXIT button as many times as necessary to return to the main screen.
At this point, the script is loaded in the instrument's nonvolatile memory and is ready to run.
Step 2: Configure the Model 2400 emulation mode
Before entering 2400 emulation mode for the first time, we recommend configuring the emulation mode first. To do this, go to the front panel of the Series 2600B instrument and follow these instructions:
- Press the LOAD key, then select USER from the menu and then press the ENTER key.
- Select Configure2400 and then press the ENTER key. Press the RUN key to load the Configure2400 configuration menu.
The Configure2400 configuration menu has several selections, but the two most important ones are RunAtPowerOn and DisplayErrors
To configure the Series 2600B instrument as a true drop-in replacement for a Model 2400, RunAtPowerOn must be enabled.This will configure the Series 2600B instrument to run the Persona2400 script automatically and start the emulation mode immediately after the instrument boots. If RunAtPowerOn is not enabled, the 2400 emulation mode must be started manually.
DisplayErrors allows enabling or disabling the display of errors on the instrument’s front panel. If enabled, when an error occurs, test execution will pause and an error message describing the error will be displayed on the front panel for a few seconds before execution resumes. This is most useful for debugging, so we recommend enabling it the first time a Series 2600B instrument is used in place of a Model 2400 because it will help quickly identify if the code is using any unsupported commands. However, to ensure the fastest execution time, DisplayErrors should be disabled.
After each option in the Configure2400 configuration menu has been selected and configured, the instrument will return to its main screen. Configure2400 is the currently active script, so simply press the RUN key to re-enter the Configure2400 configuration menu.
Step 3: Start the Model 2400 emulation mode
If the Model 2400 emulation mode is configured and RunAtPowerOn is enabled, simply power the instrument off and back on and the Model 2400 emulation mode will begin automatically after the instrument boots. If RunAtPowerOn is not enabled or there's some reason not to reboot, then the emulation mode can be started manually from the front panel by doing the following:
- Press the LOAD key, then select USER from the menu and then press ENTER.
- Select Run2400 from the USER TESTS: menu and then press ENTER.
Alternatively, the emulation mode can be started remotely by sending the command Engine2400() to the instrument. This command is useful in test systems where it's necessary to be able to start the emulation mode without operator intervention.
Advanced Programming Considerations
Step 4: Connect Trigger Link and Digital I/O
The Persona2400 script maps the Trigger Link and digital I/O lines of the Model 2400 to the digital I/O lines of the Series 2600B's 25-pin D-sub connector.Table 1 outlines a complete pin mapping. Although the Persona2400 script does support Trigger Link, it’s important to be aware of the limitations.
On a Model 2400, it is possible to use a single Trigger Link line as both an input trigger and an output trigger at the same time. The digital I/O of Series 2600B instruments does not support this mode of operation, so input and output triggers must be on separate Trigger Link lines.
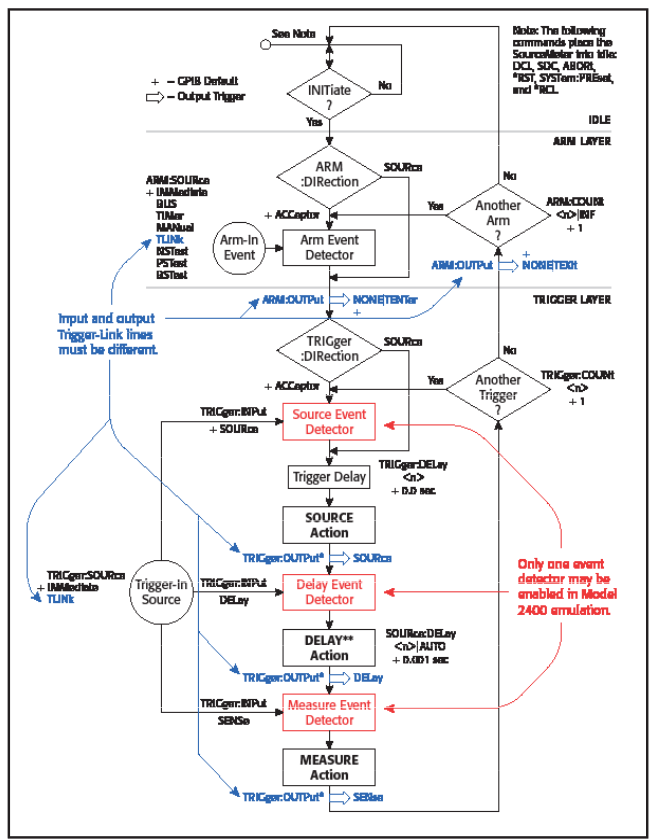
The other limitation is in how the input trigger can be assigned to event detectors in the 2400 trigger model. In the trigger model of the Model 2400, the Source, Delay, and Sense event detectors can all be enabled to wait on a single input trigger line. If all three event detectors are enabled, then the input trigger line needs to be triggered three times to get past all three event detectors (refer to Figure 1 for details). The Series 2600B's trigger model does not support this mode of operation, so the input trigger may only be assigned to a single event detector.
For most users, these differences in capability will not cause a problem because these modes of operation aren’t used often. However, it's important to be aware of them for troubleshooting purposes if the application uses Trigger Link and any issues arise in getting the application up and running.
Step 5: Identify and adapt any unsupported or partially supported commands
The Persona2400 emulation script is fully compatible with most of the SCPI commands of the Model 2400, but due to fundamental differences between Series 2600B instruments and the Model 2400, some commands are not supported or are only partially supported. If a command is unsupported or partially supported, it is usually because there is no way to perform the operation the command was intended to execute on a Series 2600B instrument.
One example of a partially supported command is :SYSTem:AZERo:CACHing:REFResh. This command, which refreshes the autozero cache on the Model 2400, has no Series 2600B equivalent because Series 2600B instruments handle autozero caching completely automatically and therefore omits a manual refresh method. The command is partially supported in that the instrument will accept the command without generating an error, but the instrument will not perform any operations when the command is received.
For most partially supported commands, accepting the command and doing nothing is the default case because these commands will not affect the operation of the overall test. Therefore, it is usually safe to leave them in existing test code without modification. However, for some partially supported commands, operation will be affected, which will usually result in the occurrence of an error later in the test program, most often when the :INIT command is called. This type of error is most likely to occur with the partially supported commands that configure the input and output Trigger Link triggers as described previously. For commands such as these, if the command is being used to configure the instrument in an unsupported mode of operation, code adjustments will be necessary.
Unsupported commands are those for which no operation exists and accepting the command and ignoring it would result in incorrect operation in all cases. For example, the :SYSTem:GUARd command configures the guard signal on the Model 2400 for either ohms guard or cable guard. Series 2600B instruments are equipped with hardware that only supports cable guard and cannot support ohms guard in any way. If the Series 2600B instrument were to accept and ignore the :SYSTem:GUARd command, the user might believe that ohms guard was supported when it is not and the only indication of this would be incorrect measurements. Allowing this to happen would make it hard to identify the source of the problem in the system; therefore, it is better not to support the command at all and generate an error instead.
The fastest and simplest way to find unsupported commands in the code is to enable DisplayErrors, then step through the code line by line. When the instrument arrives at a line that sends an unsupported command, an error -113: Undefined header message will appear on the front panel of the instrument.Assuming that the code runs without error on a Model 2400, then the line sent just prior to the display of the -113 error will be an unsupported command.
Unsupported commands must be removed from the code to avoid generating errors.
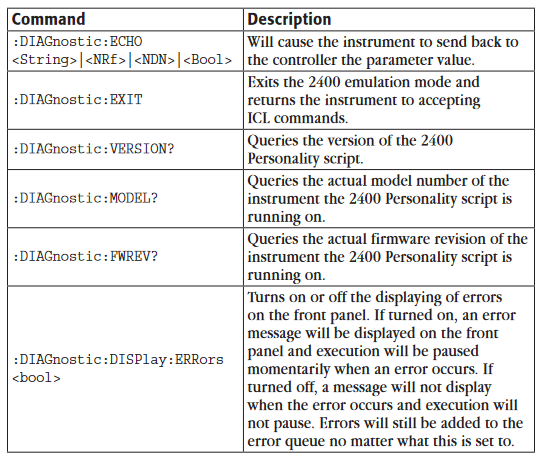
Diagnostic Commands
The Persona2400 script supports some additional SCPI commands that are not a part of the Model 2400's command set. These commands are used to perform diagnostic functions and can be found in the DIAGNOSTIC sub-system of the SCPI command tree. These commands are of great utility to users who develop systems with the Series 2600B that must support both SCPI commands and ICL commands. Table 2 lists the DIAGNOSTIC commands available.
Adding New SCPI Commands to the Script
One of the biggest advantages of the Model 2400 emulation mode running as a script on a Series 2600B instrument rather than in firmware is that the Persona2400 script is open source code, so any user is free to modify it to change or add functionality. Therefore, if a command is listed as unsupported, but there’s an implementation method that would work for a particular application, the new command can simply be added to the script, thereby extending its capability
To edit the Persona2400 script, first load it into an editing environment such as Keithley Test Script Builder, which is included on the CD that comes with every Series 2600B instrument; Test Script Builder is also available for download from www.keithley.com. Test Script Builder is designed for editing TSP scripts and will make the editing process easier; however, a simple code editor such as Notepad can be used as well.
Follow this procedure to add a new command to the script:
- Add the new command to the global command tree.
- Add command aliases to support both long and short forms of the command.
- Implement the command.
- Assign parsers to parse any parameters the command may accept.
- Add a function to implement the operation of the command.
- Add a function to implement the query operation of the command.
To clarify this procedure, the following example illustrates how to add a new command to the :DIAGnostic sub-system that will allow setting and querying the state of the five unused digital I/O pins of the Series 2600B 25-pin D-sub connector.
Adding a command to the global command tree
The global command tree contains all the commands that the Persona2400 script accepts; this is where to start when adding a new command.
Press Ctrl-F in the code editor to open the "Find" window and search for the line gCommandTree =. This line identifies the top of the global command tree table. The global command tree table is organized by sub-systems and each sub-system is added as a sub-table of the global command table. This is where to add the new command in its long form.
Scroll down through the table or use the "Find" window to find the "DIAGNOSTIC" sub-table, which looks like this:
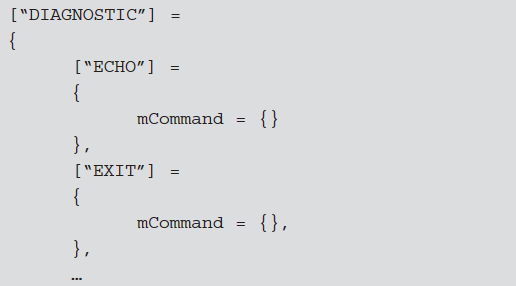
Several more sub-tables can be found under the "DIAGNOSTIC" sub-table, each one representing a command in the :DIAGnostic sub-system. To add the new command, add the following lines of code to the end of the "DIAGNOSTIC" sub-table:
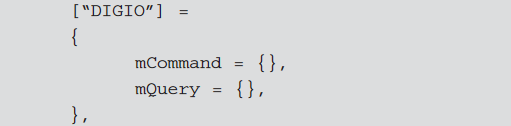
Adding the "DIGIO" sub-table tells the command parser that :DIAGnostic:DIGIO is a valid path. To let the parser know that :DIAGnostic:DIGIO is also a valid command, mCommand = {} must be added as an entry of the "DIGIO" sub-table. To let the parser know that :DIAGnostic:DIGIO? is a valid query, mQuery = {} must be added as an entry of the "DIGIO" sub-table. Only add the mCommand or mQuery lines if the command will support them.
Adding command aliases
After the new command is added to the global command tree, aliases must also be added in order to call the command using the short form rather than the long form. The full form of the new command is :DIAGnostic:DIGIO and the short form is :DIAG:DIGIO. In order for the short form to work, an alias for it must be added to the script.
Search for the word "Aliases" using the code editor's "Find" window to go to the top of the section of the Persona 2400 script where aliases are defined. The aliases are grouped by subsystem and listed in alphabetical order, but an alias can be added anywhere in this section. However, inserting the alias for the new command near the other aliases for its particular sub-system is recommended.
Use the "Find" window to search for gCommandTree["DIAG"].Under this line, add the following code:

The command illustrated in this example has only one short form, so only one alias is needed. However, if a new command has more than one short form, it should be added here as well.Refer to the aliases for other commands for additional examples.
Implement the command
The new command in this example is intended to let us set the value of the unused digital I/O bits on the Series 2600B's 25-pin D-sub and perform a query to read the bits. To do this, the command will need to accept an integer number as a parameter and then use this number to set the value of the digital I/O bits. To do this, we must first assign our command a parameter parser to parse the command's parameter, then create two functions: one to implement the command and one to implement the query.
Use the code editor's "Find" window to find this line:

The lines immediately following this line assign the :DIAGnostic:DISPlay:ERRors command a parser to parse its parameter, then assign it functions that implement the command and query. These lines of code are similar to those required to implement the new command and are a good reference point from which to start.
To implement the new command, scroll down below the lines of code that implement the :DIAGnostic:DISPlay:ERRors command and add the following line of code to assign gCurrentRoot to the new command.

In this line, gCurrentRoot acts much like a pointer in C/ C++ to point to our command in the global command tree. This is done to reduce code clutter and improve code execution speed because the TSP engine won't have to parse and decode the entire gCommandTree["DIAGNOSTIC"]["DIGIO"] variable name every time something has to be changed.
The following sections describe how to assign the parameter parser and add the functions to implement the command.
Assigning a parser to parse parameters
In order for the Persona2400 script to support command parameters, the command must be assigned one or more parameter parsers. A parameter parser examines the parameters at the end of the command string and parses them based on an expected data type. For example, if the parameter following a command is supposed to be a Boolean value, then a Boolean parameter parser should be assigned to it. If the command parameter that is passed is a valid Boolean value, then its value will be made available to the function that implements the command. If the parameter is anything else, the Persona2400 script will handle it and generate an instrument error. If it's not necessary for the command to support parameters, then assigning parameter parsers is not necessary and this step can be skipped.
The new command in this example expects an Integer as a parameter, so it should be assigned an Integer parser. To add the parameter parser to the new command, add the following line of code after the gCurrentRoot assignment.

The value assigned to gCurrentRoot.mCommand. mParameters is expected to be a table of parsers. However, in this line of code, it appears as though it is not a table but perhaps the parser itself has been assigned, so this shouldn't work. However, the reason gParserTable.mInteger is acceptable is because it is not the parser but rather a predefined table of parsers that contains only the integer parser. The definition for gParserTable.mInteger can be found elsewhere in the script and includes this line:

For our new command, we assigned an integer parser because we want our command to output the integer value on the unused digital I/O bits, but for other commands, it may be necessary to parse a different data type. Table 3 lists several different data types and the names of the predefined parser tables that support those types.

Add a function to implement the operation of the command
In order for a command to do anything, it needs some code to run. To do this, the Persona2400 script needs execution functions added to the command's sub-tables. Previously, when we added a new command to the global command tree, we placed two sub-tables named mCommand and mQuery in our command's table. It is in these sub-tables where the Persona2400 script looks for the command's code and where we need to place the code that implements our command. We do this by placing a function named mExecute in each of these sub-tables.
To implement the command, place the following code after the line that assigns the parameter parser.
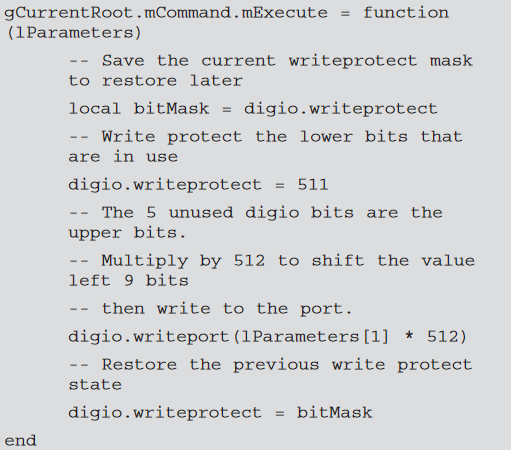
This code creates the mExecute function in the command's mCommand sub-table and contains our code. The function has one parameter named lParameters that is used by the Persona2400 script to pass the parameters that were parsed by the parameter parser to the command execution code.This parameter is actually a table of values and has support for commands with multiple parameters. However, our new command in this example only uses a single parameter so our code will only access the first entry in the table.
The rest of the code in the function simply implements the command. For our example command, the code takes the value passed in as a parameter, manipulates the data and then assigns it to the unused digital I/O bits.
Add a function to implement the query operation of the command
With our new example command, we wanted not only to support setting the unused digital I/O bits of the Series 2600B instrument but to be able to query the current value of the bits. To do this, we need to add a function that implements the query. After the command's implementation code, add the following lines of code:
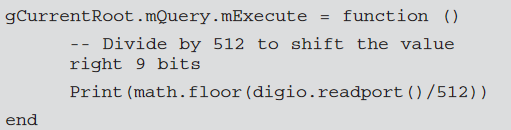
This code creates the mExecute function in the command's mQuery sub-table and contains the query code. Unlike the mCommand.mExecute function, the mQuery.mExecute function does not contain a parameter. This is because queries do not support parameters, so the Persona2400 script will have nothing to pass to it. For our new example command, our query code simply reads the digital I/O port, does some manipulation on the data, and then prints it back so the controller can read it.
Using SCPI commands in TSP scripts
Another advantage of implementing Model 2400 emulation on the Series 2600B via a script rather than in firmware is that it allows combining SCPI commands with ICL commands and TSP scripting. The Persona2400 script facilitates this by providing a TSP script function Execute2400(cmdString) whose parameter (cmdString) is a string containing the SCPI command to be executed. When the Persona2400 script is used this way, the Series 2600B instrument is being operated in its native mode and is simply calling into the Persona2400 script’s API. This provides a migration path that allows users to dabble in TSP scripting without the need to learn the Series 2600B’s ICL commands.
- Do the following to combine SCPI commands with ICL commands and TSP scripting:
- Load and Run the Persona2400 script into non-volatile memory but do not start the 2400 emulation mode. If the script has already been loaded and 2400 emulation mode is currently running, then press the EXIT key on the front panel or send the command :DIAG:EXIT to exit emulation mode.
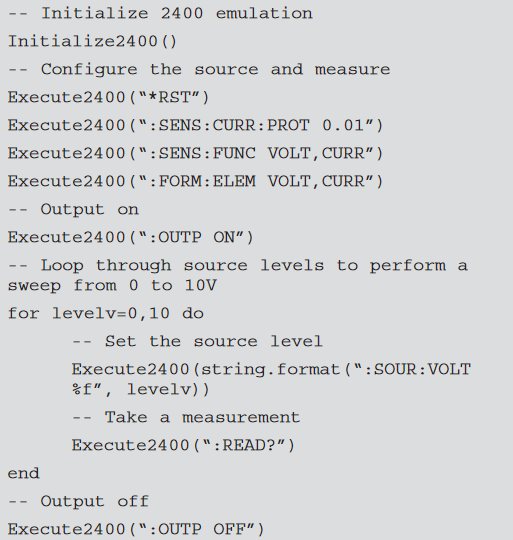
- Send the command Initialize2400() to the instrument once. This initializes the 2400 emulation engine without placing the instrument into 2400 emulation mode. This command can be placed at the beginning of a test script.
Send SCPI commands to the instrument by calling the function Execute2400(cmdString) and sending the SCPI command as the parameter.
The following example script performs a linear voltage sweep using SCPI commands and a for loop:
Conclusion
The 2600B System SourceMeter instrument supports all the advanced features of the Model 2400 that make high speed production testing possible (like Source-Memory sweep, Trigger Link, digital I/O binning, and status model support). This makes the Series 2600B instruments true drop-in replacements for the Model 2400. The emulation mode's script-based implementation allows users greater flexibility, giving them the ability to modify how a command is implemented and extend the command set with new commands. It allows them to mix Model 2400 SCPI commands with native ICL commands and TSP scripting and lets them switch in and out of emulation mode quickly without the necessity of waiting for the instrument to reboot.
Find more valuable resources at TEK.COM
Copyright © Tektronix. All rights reserved. Tektronix products are covered by U.S. and foreign patents, issued and pending. Information in this publication supersedes that in all previously published material. Specification and price change privileges reserved. TEKTRONIX and TEK are registered trademarks of Tektronix, Inc. All other trade names referenced are the service marks, trademarks or registered trademarks of their respective companies.
No.3193 10.17.12